Wow I can’t believe I am finally sharing our small bathroom makeover reveal today! I must say that I love how it turned out even though I had a tough time figuring out the design for the space. All the DIY challenges and delays were worth it as well!

It feels like forever ago that I was sharing about the coastal and classic bathroom design plan for this space! Originally, the plan was to finish this small master bathroom makeover in just 6 weeks as part of the One Room Challenge. However, due to delays with our drywall repair and other projects, it took several weeks longer than anticipated!
Note, this post contains some affiliate links. For more info see my disclosures here.
Here is a recap of all the projects and updates that I shared for this space during our renovation process:
- Classic and Coastal Bathroom Renovation Plan
- 5 Porcelain Tiles that Look like Marble
- Benjamin Moore Blue Gray Paint Colors
- Bathroom Makeover Progress
- DIY Built In Bathroom Shelves and Cabinet
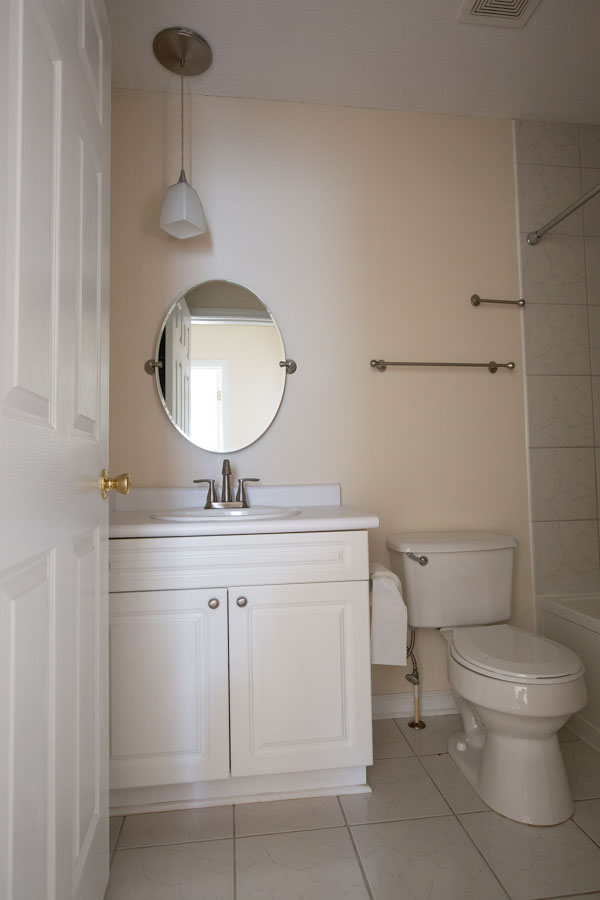
Let’s take a look at how this bathroom originally looked when we moved in:
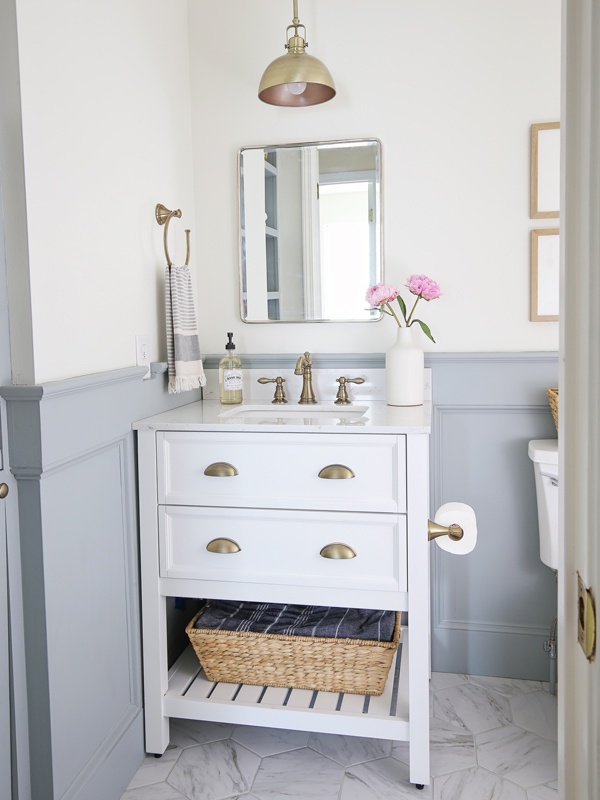
And now:

This space was totally gutted, except for the bathtub and about half of the drywall. We removed our popcorn ceiling, replaced the vanity, sink, faucet, toilet, light, shower fixtures, old tile in the shower area and on the floor, removed the old wire shelves and added built in storage shelves, painted the walls and ceiling, added a DIY wainscoting treatment, and added all new bathroom hardware fixtures. Also, we installed new drywall all around the shower area.
Whew! It was quite a lot of projects to tackle in this DIY small bathroom makeover!
One of my favorite features of our budget bathroom makeover is the DIY wainscoting. I can’t tell you how many times I changed my mind about what type of wainscoting to do in this space. There is such a small amount of wall space that a board and batten treatment wouldn’t look right and even shiplap wouldn’t look that great with so little showing!
I was going to do a v-groove wainscoting, but I had trouble sourcing material that was affordable and the right thickness. So, when I saw this DIY molding wall treatment by Jenna Sue Design, I loved it immediately and knew it was a great alternative! I followed her tutorial except for a few modifications like only going part way up the wall and adding a chair rail. The chair rail was found at a local lumber store, Southern Lumber, and was the perfect finishing detail! It’s designed to fit over 3/4″ thick wood which worked out great over our 1x6s.
I think the wainscoting really elevates the small space and adds that custom wow factor! I painted it Boothbay Gray by Benjamin Moore in eggshell.
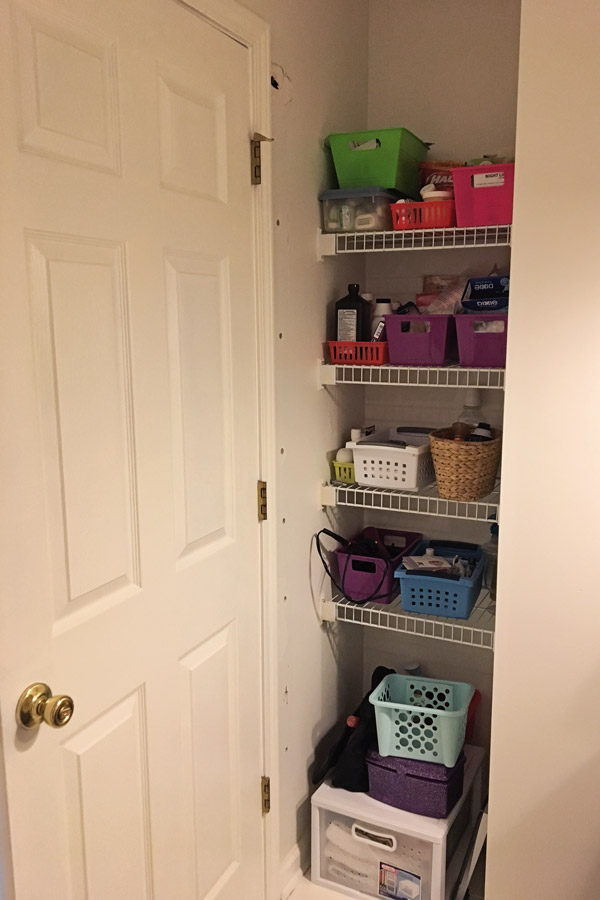
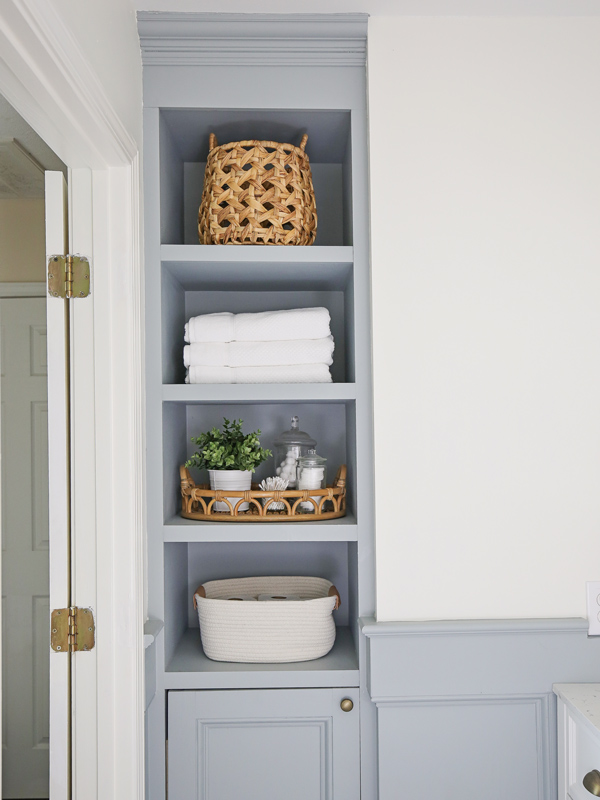
My other favorite feature of our bathroom makeover DIY is our DIY built in bathroom shelves and cabinet. Originally, we had a corner nook with wire shelving and our bathroom door covered it up so it was difficult to get to. I decided to do custom built ins to maximize the space by adding lots of extra storage and to make the nook a pretty, focal feature of the room! I love it when things can be functional and beautiful!
BEFORE WITH WIRE SHELVES:
AFTER:
📩 Want to Save This?
Further, we reversed our bathroom door so it opens into our hallway. This makes a huge difference in opening up the space and making it seem larger despite its tiny size! And it allows the built ins to be easily accessed and seen right when you walk in the room.
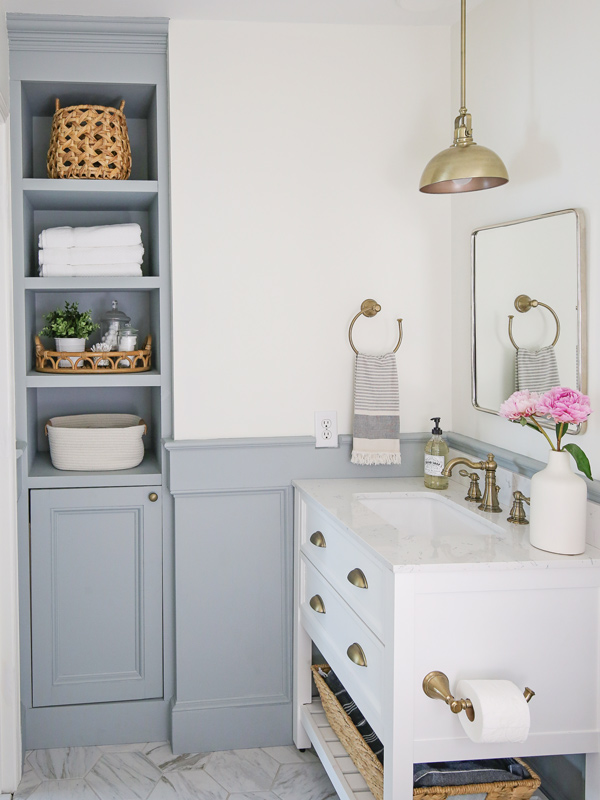
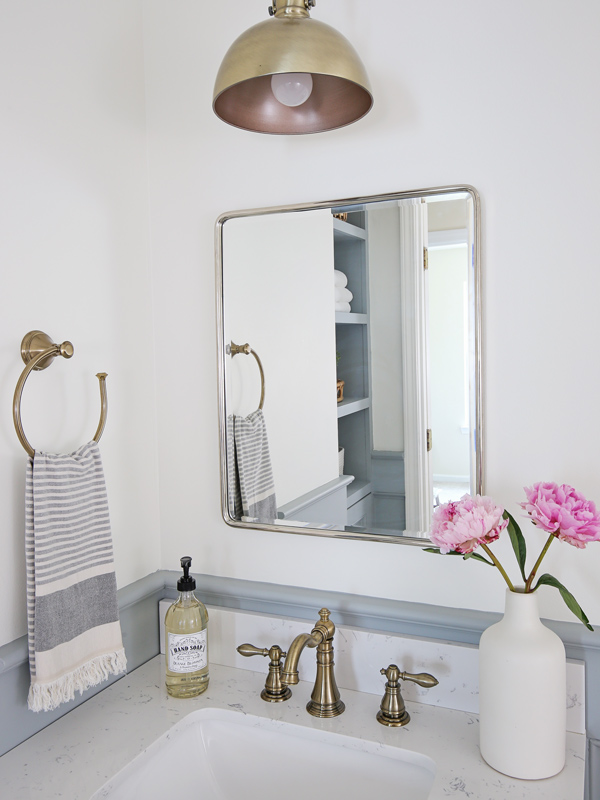
Another way I made the space seem larger was by choosing a bathroom vanity that was open underneath with an open storage shelf. By using a less bulky vanity, it fits the space better and makes it a bit more airy of a feeling! Also, I love the faux marble top (easy to maintain) and the drawer storage. The white color really pops against the blue grey wainscoting! And I love the look of the vintage brass faucet with it!
To jazz up the vanity and make it more custom and to match my other hardware, I replaced the factory grade pulls with these classic brass pulls. They were a pain to replace because of the drawer dividers and I had to buy a special right angle drill bit, but it was worth it for sure!
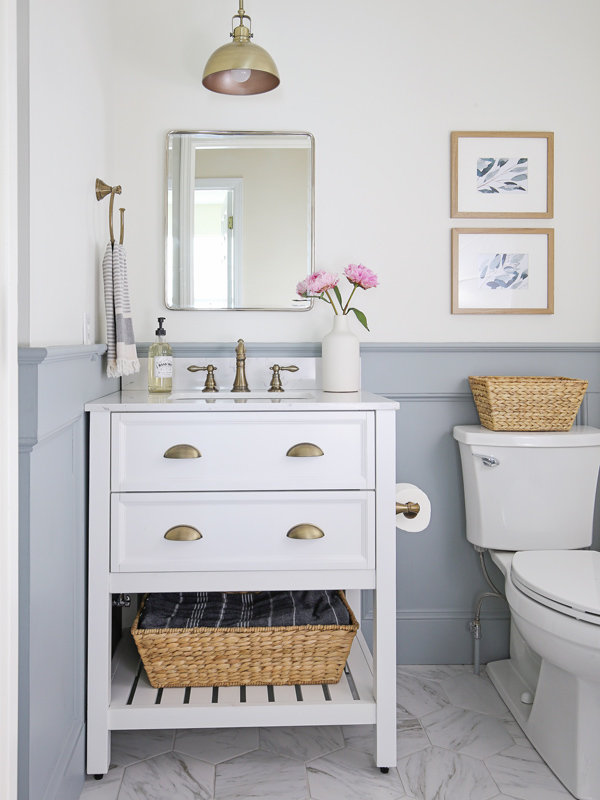
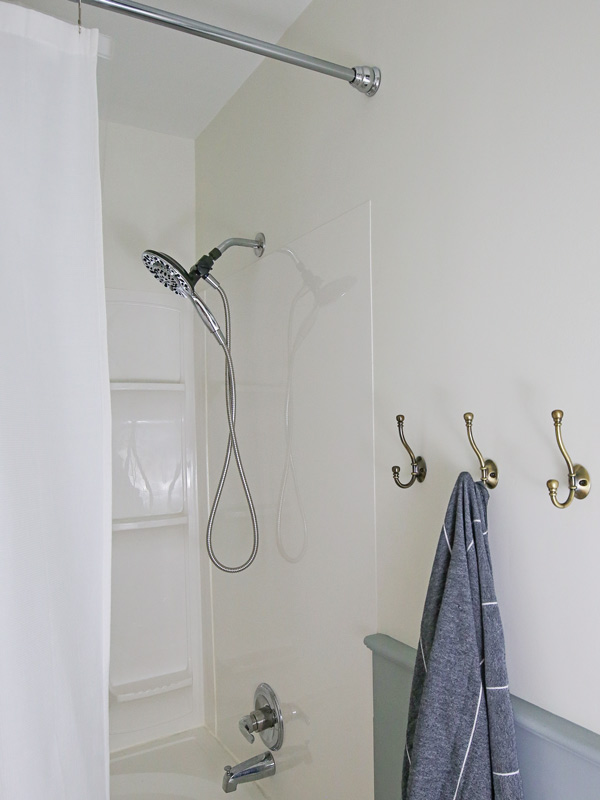
Speaking of hardware, I decided to go with a mixed metal look! Vintage brass is my dominant hardware color. I was able to get fixtures from many different places and the finishes matched very well which can be tough with brass! Then, I mixed in some polished nickel with the gorgeous mirror (that I splurged on) and a few small chrome fixtures (the shower fixtures and rod). Usually I wouldn’t mix nickel and chrome, but since they are not near each other it works out and goes together well. Plus, the chrome is less maintenance and less expensive.
Another big feature of the room that I love is the hexagon marble floor tile! It’s actually porcelain tile that looks like marble! We saved a lot of money by installing it ourselves and I’m so happy with how it turned out especially since it was our first tiling experience!
Since we added so much extra storage with the built ins and the vanity drawers, I decided to keep the space above the toilet clean and simple with some pretty artwork! I found this beautiful eucalyptus artwork (similar here) on Etsy. I cropped it into two 5×7 prints, had the prints printed on a linen texture paper through Mpix, and then I framed them in these thin, wood picture frames. They match our paint color great!

Finally, we decided to keep our original tub to save on costs. It’s actually a garden size tub and takes up a lot of space. We replaced the old dingy shower tile with a clean, white surround which was a more functional, budget saving decision and it’s much easier to maintain long term than grouted tile. Also, we had all the shower fixtures replaced. The finishing touch was adding our white, waffle weave shower curtain which I already had. It adds texture to the room and a nice, clean contrast against the blue grey paint!
Let’s talk about the budget!
This transformation was definitely a budget bathroom makeover! I know the word budget can vary in terms of how much, but many full small bathroom makeovers can average around $8,000 – $10,000 or more (just do a quick Google search)! We did the majority of the labor ourselves and hired out the plumbing, electric, and drywall repair. This saved us thousands of dollars, allowed me to use some nicer fixtures and decor pieces in the space, and kept this bathroom makeover on a budget!
Further, by DIYing many parts of this bathroom, like our built ins, we were able to achieve a higher end, custom look that would be pretty expensive to hire out and raise costs even more.
So just how much did we spend on this bathroom makeover DIY? I tried really hard to keep track of the expenses (there were dozens of trips to the home improvement store ha). The final cost came to about $3,600 after adding up all my receipts/credit card charges. I had planned on staying under $3,000, but with big renovations like this there are always unexpected expenses.
Below is a full budget breakdown of all materials and products used with links to where they are from, and how much everything cost! I hope that these financial details are helpful in showing how much a DIY budget bathroom makeover actually costs, as well as the types of things you have to spend money on which you may not think of at the beginning when planning a remodel.
Small Bathroom Makeover Sources and Budget Breakdown:

- Shower Surround – $256
- Shower Trim Kit – $102
- Shower Head – $45
- Shower Rod – reused from original bathroom – $0
- Shower Curtain – already owned – $0
- Shower Hooks – TJ Maxx – $5
- Vanity & Sink – $350
- Sink Faucet (Vintage Brass) – $212
- Vanity Brass Pulls & cabinet knob
- DIY Built In Shelves & Cabinet – $160
- DIY Wainscoting – $123
- Basket under vanity – $27
- Mirror (polished nickel) – $200
- Pendant Light
- Towel Ring and Toilet Paper Holder
- Hand Towel – similar here – already owned – $0
- Bath Towel – already owned – $0
- Towel Hooks (owned 2 already) – similar here – $5
- Tile – $225
- Grout (warm gray) – $34
- Tile Supplies (wet saw, cement board, mortar, tiling tools) – $175
- Drywall and Drywall Materials – $100
- Toilet – similar here – $169
- White Flower Vase – already owned – $0
- Artwork Print – similar here – $3.50
- Artwork printing/shipping by Mpix – $8
- Picture Frames (2) – $24
- SHELF DECOR:
- Previously owned most items – $0
- White rope basket
- Wicker basket – $19
- Bamboo Tray – Target
- PAINT – $30
- I already had the wall and ceiling paint on hand which saved some $
- Walls – White Dove by Benjamin Moore in eggshell
- Wainscoting and built in – Boothbay Gray by Benjamin Moore in eggshell
- LABOR:
- Electric/Plumbing – $369
- Drywall Repair – $275
- 8% SC Sales Tax on all materials (this really adds up) and Other Supplies, including: trim caulk, tub caulk, shower surround adhesive, spackle, right angle drill bit, screws, nails, plastic rolls, paint rollers, primer, light switch plate, shipping/return fees, all other supplies/tools – $548
- GRAND TOTAL: $3,600
Well that’s a wrap on this DIY small bathroom makeover! I’m so happy it’s finished! This project really burnt me out especially with being pregnant. I will be taking a break from big projects for awhile and just focusing on smaller ones haha!
Follow along on Instagram and Pinterest for my latest projects and sneak peeks!
Dana Chitwood
Saturday 21st of September 2019
Well shoot. I had my board & batten all planned out. White paint to match vanity and color up above. Now, seeing the flip of that on your walls, I'm all curfuffled and not sure which I like best. How did you choose to not paint the B&B white? And why not paint the B&B a typical trim satin or semigloss? And your dark vanity on the other bathroom has me second guessing again. BUT...your marble-look tile choice is indeed helping me solidify a choice! Great job!
Angela Marie Made
Monday 23rd of September 2019
Thanks Dana! I wanted to try something different with the color on the B&B as well as on the built in shelves and cabinet. Also, I really wanted the white vanity/sink to pop against a painted wall color instead of blend in with a white B&B. I decided to use to eggshell instead of satin/semi-gloss since I prefer a more matte paint look and less shine. Also, I find that eggshell is still very easy to wipe down especially with all the paint options that are a more dirt resistant formula. Hope that helps some!!!
Shelley
Thursday 12th of September 2019
This looks amazing! I love the wall color you chose. How do you know what to do first? Did you start with the floor and work your way up?
Angela Marie Made
Friday 13th of September 2019
Thank you so much Shelley! I started with a Pinterest board of different ideas I really liked, then I narrowed it down from there with my own design mood board. Then, I made final decisions and adjustments based on the products I found and my budget.
Aisha
Sunday 21st of July 2019
It looks great! And the floors are beautiful. Newbie question, did you take out the previous tile before installing the new one right? Any pointers for installing tile?
Angela Marie Made
Monday 22nd of July 2019
Thank you Aisha! Yes we did remove the old tile first since the bathroom was located on the second floor. It was our first time installing tile with this project and we looked at several different tutorials and youtube videos which really helped. So I definitely recommend doing that and just taking your time. Also, we really like the pre-mixed grout by Mapei that we used. It was one less thing to have to mix and it worked really great!
marvin shelley - Master Sawdust Maker
Friday 21st of June 2019
young lady, you sure did a fine job. Very impressive and pretty.