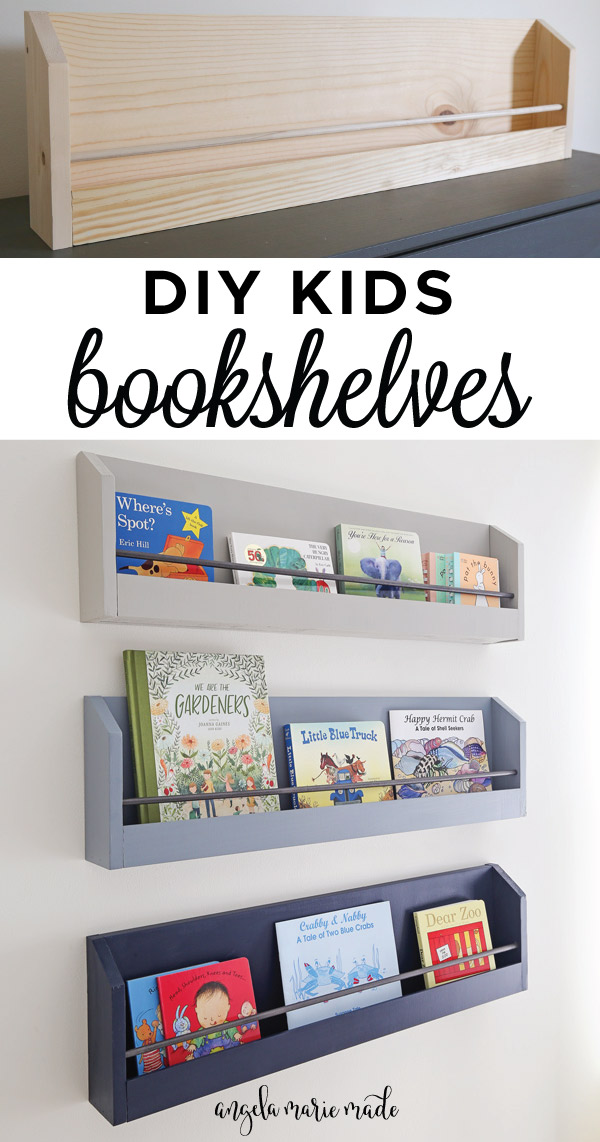
When designing our little one’s nursery room, I knew I wanted to create a DIY kids bookshelf for the wall as part of a reading nook. I ended up making a set of three DIY floating bookshelves! They are one of my favorite projects in the space!

I made all three of the bookshelves for $60, which I think is a great price for solid wood bookshelves! They can be painted or stained too which is great. The tutorial is below!
Also, if you need more DIY kids storage ideas, check out our DIY toy box and DIY bookshelf (it’s perfect for organizing toys, baskets, or anything else)!
Note, this post contains some affiliate links. For more info see my disclosures here.
How to Make a DIY Kids Bookshelf:
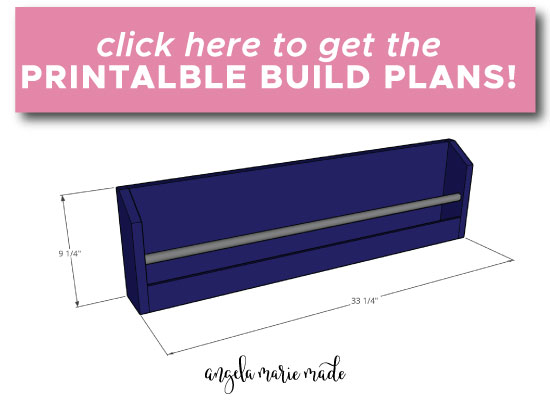
***The materials listed below are enough to make 3 bookshelves at 33 1/4″ long each. If you’d like to just make one bookshelf or different size shelves, adjust material as needed!***
Materials:
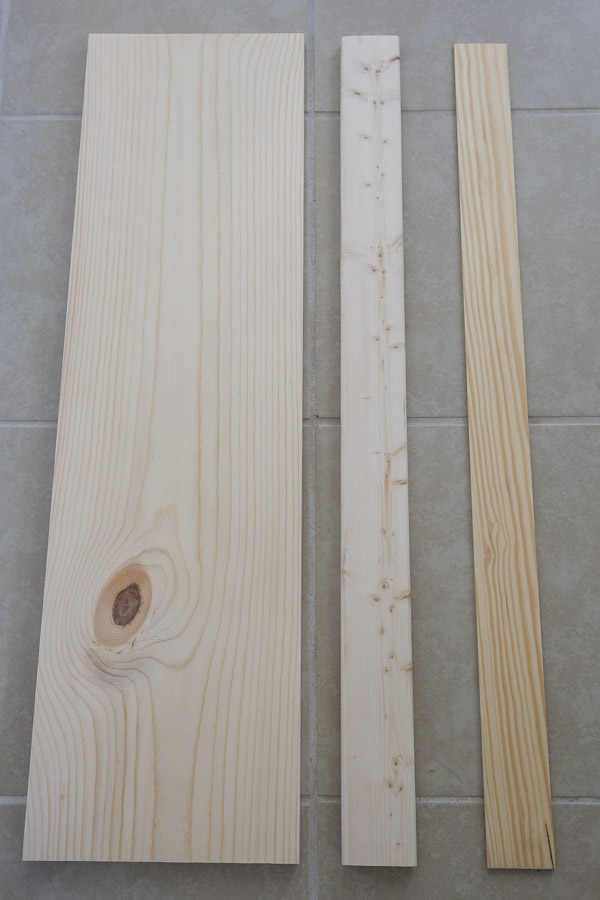
- (1) 1×10 @ 8ft
- (1) 1×4 @ 6ft (for sides of shelves)
- (1) 1×3 @ 8ft (for base of shelves, I used a furring board to save $)
- (1) 2 1/4″ x 8ft lattice board @ 1/4″ thick (or this 2 1/2″ tall board can be used as well)
- (3) 3/8″ dowel rods @ 3ft
- 1 1/4″ and 1″ brad nails
- Wood glue
- Wood filler or light spackle
- Paint or Stain
- Oil rubbed bronze spray paint (optional)
Tools:
- Miter saw
- Drill
- Brad nailer
- Clamps
- Tape Measure
DIY Wall Bookshelf for Kids Video:
Subscribe to my YouTube Channel here!
1. Make initial lumber cuts
As I mentioned above, I bought enough lumber to make 3 bookshelves, but I am going to explain how to just make one bookshelf at 33 1/4″ long so just repeat the same steps to make two more shelves if desired!
Click here for the printable wall bookshelf plans PDF which include the cut list and step by step building steps with easy to follow diagrams!
Use a miter saw (or circular saw) and make the following cut from the 1×10 for the back of the shelf:
- 1 piece @ 31 3/4″
Make the following cut from the 1×3 board for the base of the shelf:
- 1 piece @ 31 3/4″
Make the following cut from the 2 1/4″ board @ 1/4″ thick for the front of the shelf:
- 1 piece @ 31 3/4″
Make the following cut from the dowel rod:
- 1 piece @ 32 1/4″
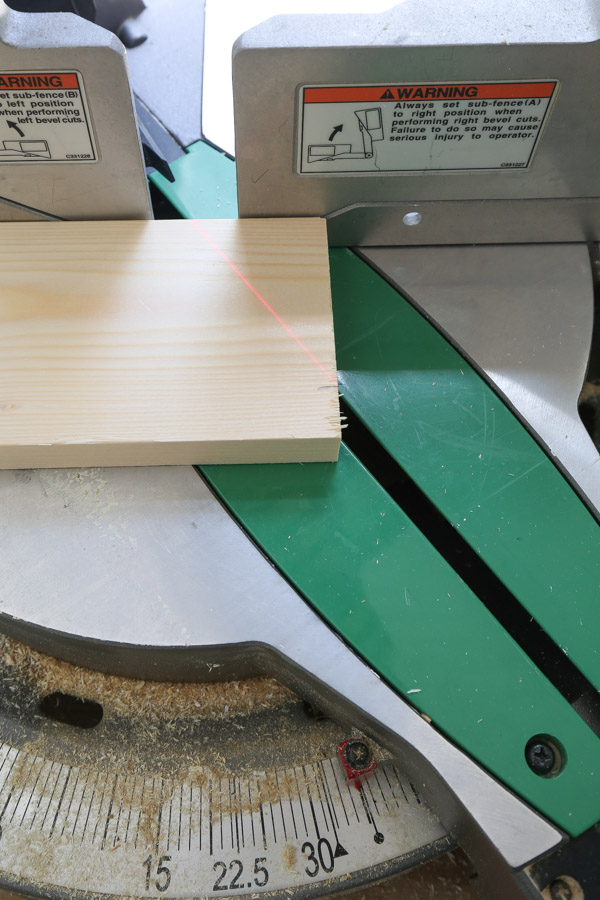
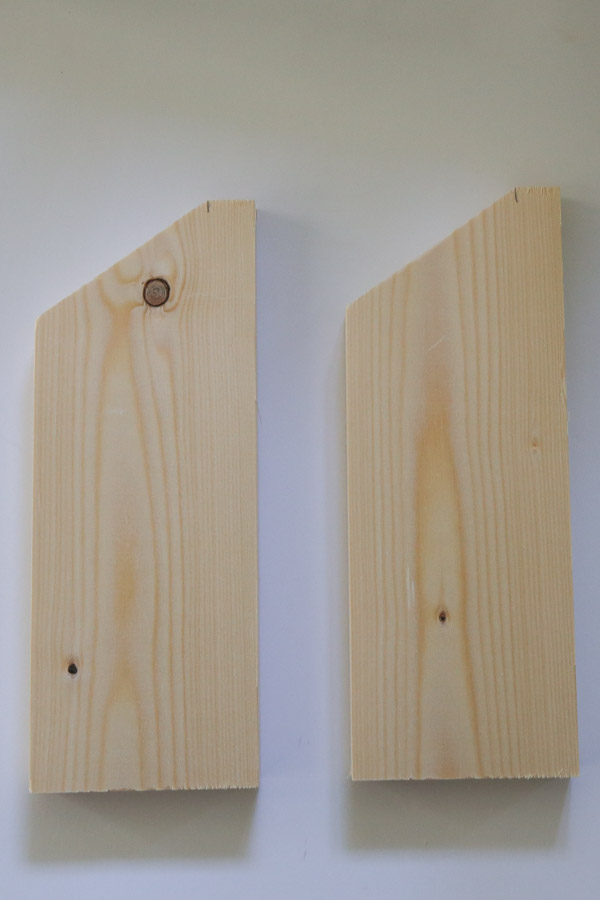
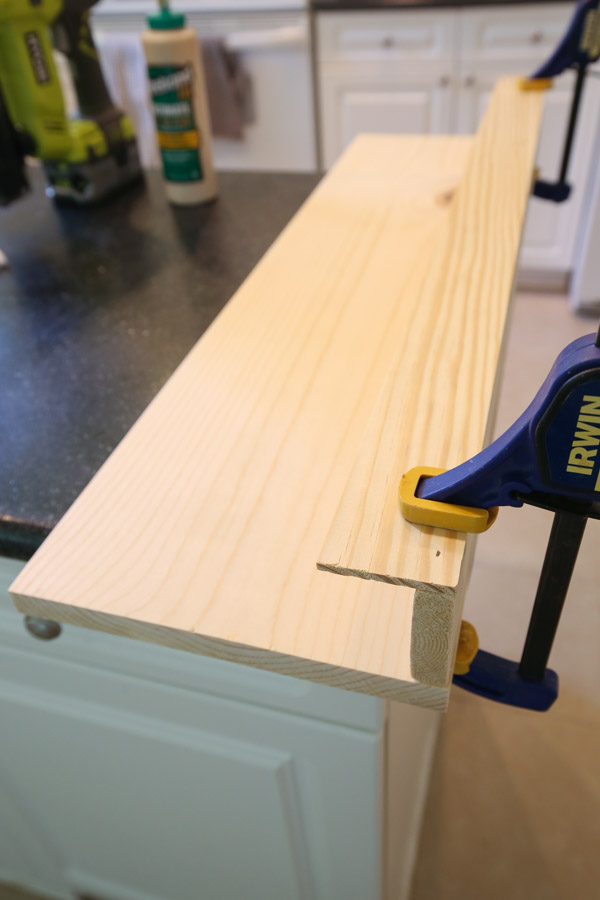
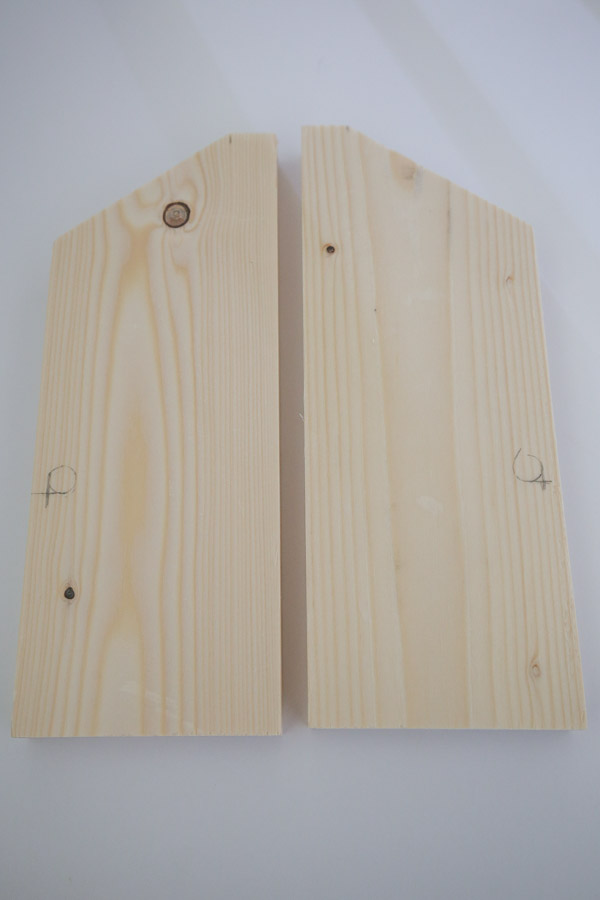
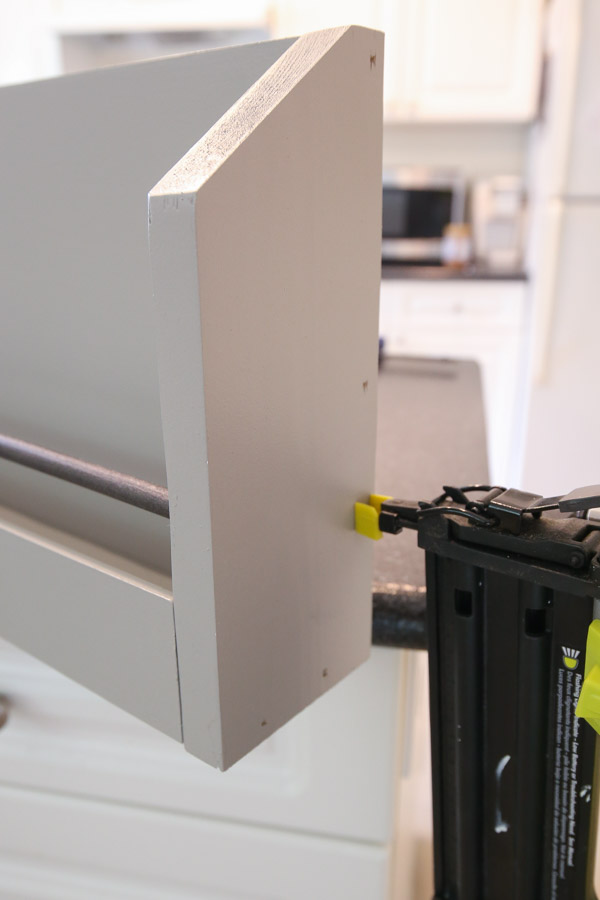
2. Make cuts for sides of DIY kids bookshelf
Make the following cuts from the 1×4 for the sides of the bookshelf:
- 2 pieces @ 9 1/4″
On each of the two side pieces mark 3/4″ up from the end of the board.
Then, set your miter saw to 35 degrees. Cut the board at an angle from your mark as shown in the below photos. Also, you can see all of this in action in the DIY kids wall bookshelf video tutorial here!
3. Assemble DIY bookshelf
Using a brad nailer, 1 1/4″ brad nails, and wood glue, attach the 1×3 board to the 1×10 backing board as shown below.

Then, attach the 1/4″ thick board for the front of the DIY kids bookshelf to the 1×3 board with wood glue and a few 1″ brad nails.
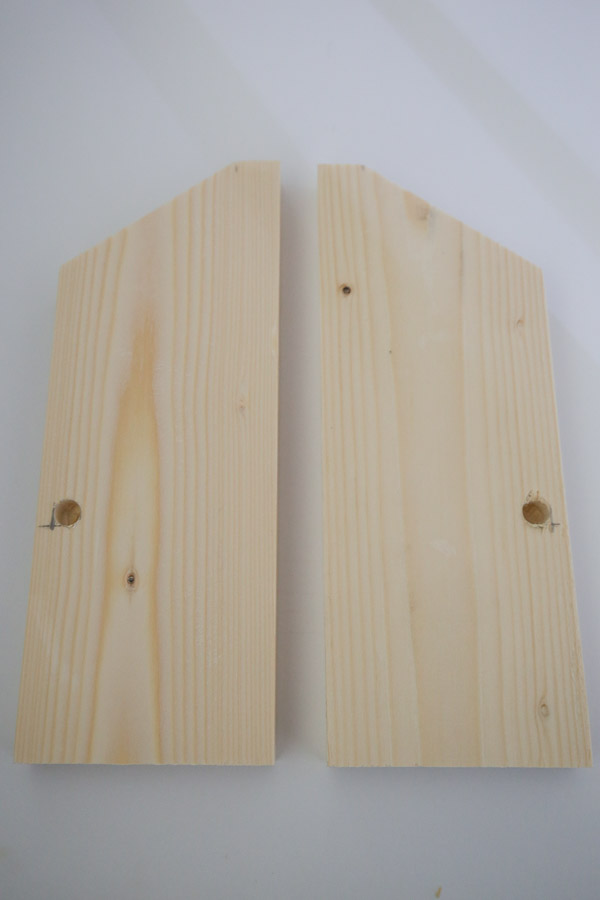
4. Finish making bookshelf sides and drill the rod holes
Now it’s time to add the holes for the dowel rod that will go along the front of the bookshelf.
Measure and mark 3 1/4″ up from the bottom of each side board and 1/4″ in from the side of each side board.
Then, use the end of the dowel rod to draw a circle at this point to mark exactly where you need to drill the dowel rod hole.
Use a 3/8″ drill bit and drill a hole at these marked spots that’s about 1/2″ deep. Don’t drill all the way through!
Tip: I added tape at the ½” point on my drill bit before drilling to help me know where to stop drilling.
📩 Want to Save This?
4b. Drill holes for hanging the bookshelf (optional)
At this point we went ahead and drilled holes on the back of the bookshelf for easy hanging on the wall from screws (again only drilling a 1/2″ deep and not going through the wood). You can hang these differently though if you prefer!
5. Test fit the bookshelf boards together
At this point, I went ahead and tested the fit of everything by inserting my cut dowel rod into the side piece holes and then lining up my side board pieces with my bookshelf.
You may need to gently twist the dowel rod into the drilled holes if it’s a really tight fit. You can always drill the hole a little wider, but ultimately you want a firm fit of the dowel rod in the hole so it doesn’t move around.
I didn’t attach everything together yet because I wanted to paint and spray paint first since it would be much easier to do before attaching the sides and dowel rod to the DIY kids bookshelf.

6. Paint (or stain) and spray paint DIY floating bookshelves
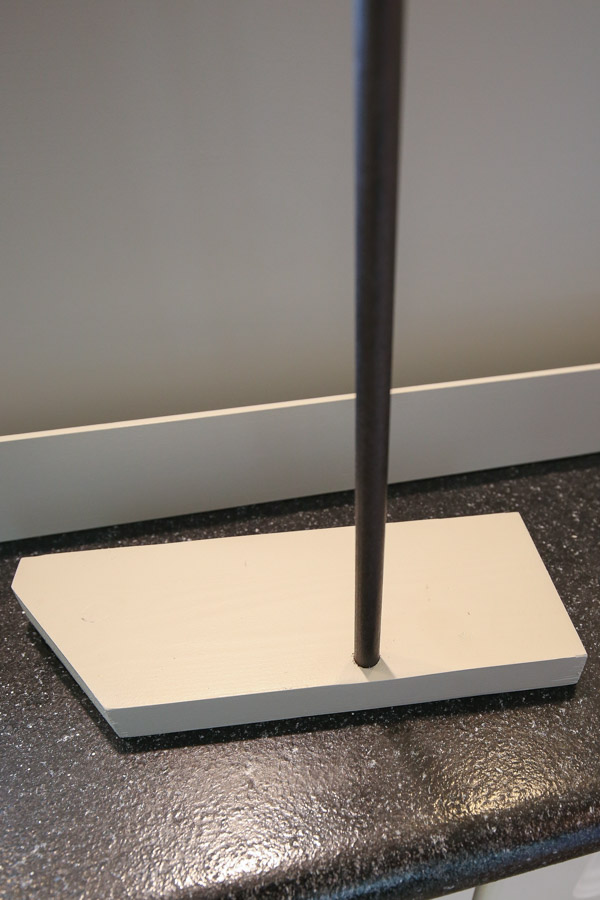
Go ahead and paint or stain your DIY floating bookshelves and spray paint the dowel rod if desired. It’s much easier to do this step with the dowel rod unattached as well as the side board pieces.
If you are painting the wood, make sure to prime it first, especially those knot holes!!
I spray painted my dowel rods with oil rubbed bronze spray paint to give the illusion of a metal rod.
For my three bookshelves, I bought paint samples (so I didn’t have to buy whole quarts) and used the following paint colors, all by Sherwin Williams:
- Dorian Gray
- Storm Cloud
- Anchors Aweigh
7. Finish assembling the DIY kids bookshelf
If your dowel rod holes got a little smaller due to paint seeping in them, gently widen them some with the drill.
Insert the dowel rod, with some wood glue on the ends, into one of the side boards. You can add wood glue to the hole too, just make sure to wipe the excess away after inserting the dowel rod.
I found it easiest to just add one side board to the dowel rod and attach it to the bookshelf. Then then to do the second board after that.
Use a brad nailer and 1 1/4″ brad nails and wood glue to attach the side boards in place with the dowel rod and finish building the bookshelf!
Tip: Use clamps to help with this step!
Don’t forget, you can see all of this in action in the DIY kids wall bookshelf video tutorial here!
Fill all nail holes with wood filler or light spackle and do any necessary paint/stain touch ups.
And that’s it for building the bookshelves!
For attaching to the wall, we lined up the drilled holes on the back of the bookshelf (from step 4b) with screws with heavy duty anchors on the wall (since we couldn’t hit a wall stud). The holes on the shelving backs were just a little bit bigger than the screws.

To see the shelves in our reading nook, be sure to check out the full nursery reveal!
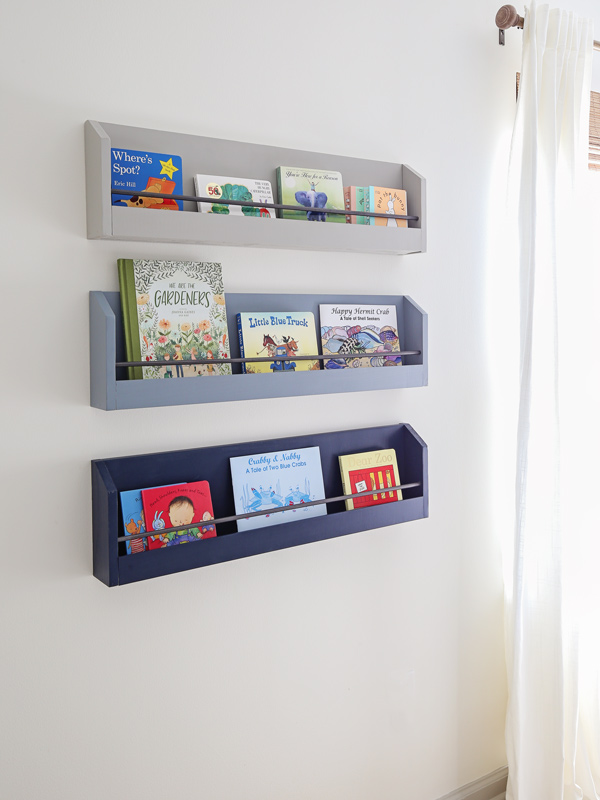
What do you think of this DIY kids bookshelf design? I love it, I think it’s classic yet a bit modern with the “metal” rod in the front!
Don’t forget to get the printable DIY wall bookshelf plans!
Again if you are interested in other bookshelf ideas, make sure to check out our DIY bookshelf with adjustable shelves!
I’d love to see your version of this build, be sure to share with me on social media @angelamariemade!
Follow along on my latest projects and sneak peaks on Instagram and Pinterest and Facebook!
Want to save for later? Pin it here:
Matt
Saturday 14th of August 2021
I like these but I think there is one adjustment..
Are your sure the side boards were cut from 1x3 boards? I measured 3.5inch width which made the side boards too small after I cut them.
I think the side board are cut from 1x4.
Angela Marie Made
Saturday 14th of August 2021
Thanks for letting me know, it's a typo! I used 1x4s for the sides, I will update that in the post!
Greg
Friday 13th of August 2021
I don't understand something. If you attach the 1x3 to the face of the 1x10 and then attach the lattice board on the other side of the 1x3, how are you using 1x3 for the ends of the bookshelf and having the corners come out flush. The shelf should be about 3.5" wide.... or am I missing something?
Angela Marie Made
Saturday 14th of August 2021
Thanks for letting me know, it’s a typo! I used 1x4s for the sides, which measure 3.5" wide, I will update that in the post!
Anne Louise
Thursday 20th of May 2021
Amazing. But how is it hanged ? Is there a hook or anything? How does it « float »?
Angela Marie Made
Friday 21st of May 2021
We drilled holes on the back of the bookshelves about a 1/2" deep and then installed screws with anchors into the wall to go into the holes.