Farmhouse tables are my absolute favorite piece of furniture and will always have a special meaning to me!
Farmhouse tables are the reason I taught myself how to build furniture, they opened up the DIY world to me that I love, and they also made me realize I could have a blog too.
I started my first creative small business by opening up a vintage rental company for weddings and farmhouse tables were the main rental item.
Brandon and I built 20, eight foot, beautiful, cedar farmhouse tables. Here is a photo of one them with some other rentals I offered:
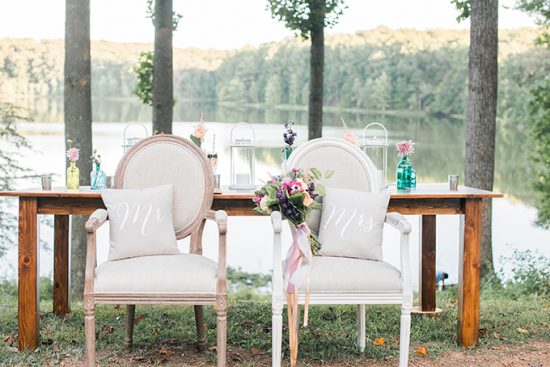
Kimberly Florence Photography and styling by Alyssa of Ginger & Blooms
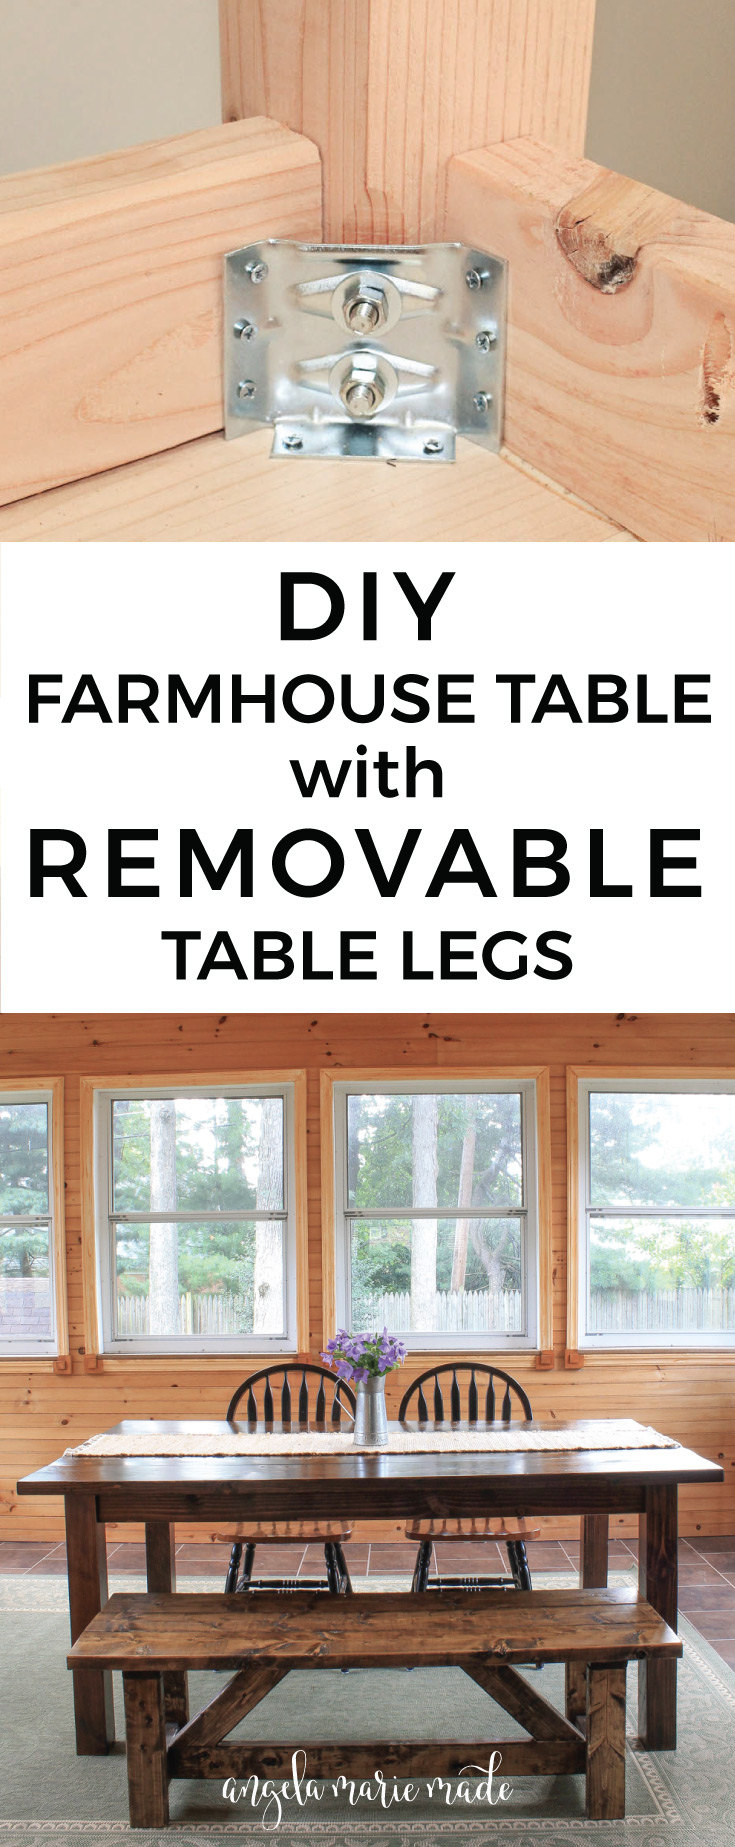
I no longer run the vintage rental business and I sold the farmhouse tables to another rental company, but my love of furniture building has continued and I am excited to finally share the farmhouse table build plans that we used to build 20+ farmhouse tables. What I love about these plans is that the table legs are easily removable! So, if you move a lot (or want to build them for your business too) and need them to be easily transportable, these plans work wonderfully!
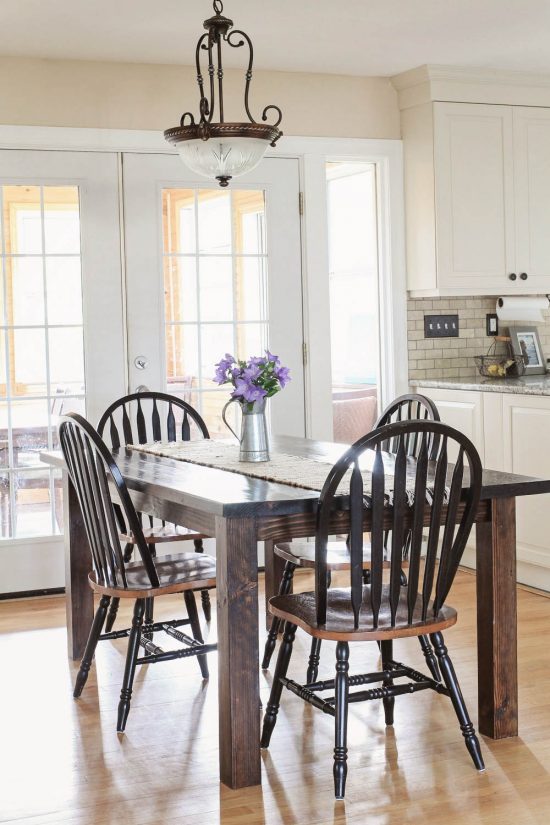
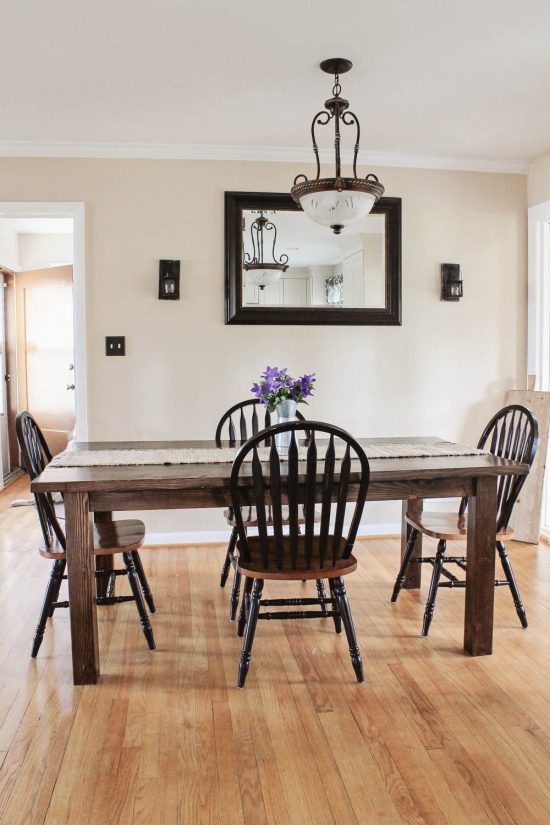
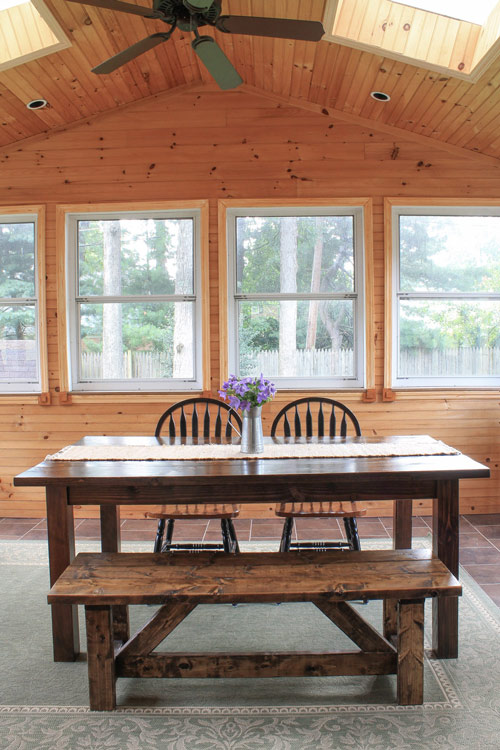
The plans I am providing are for a 6 ft. long x 40 in. wide farmhouse table using 2x thick wood, but they can be modified for any size table and with different wood thickness too. The farmhouse table in the photos below is the table Brandon and I built for my brother, sister in law, and nephew. I’ve also included a photo at the very end of our very FIRST farmhouse table that we still use today in our kitchen!
Note, if you are building the farm tables for a rental business, I recommend using 1x thick cedar wood. Cedar is beautiful and much lighter than pine wood. It makes transporting the tables even easier!
Note, this post contains some affiliate links. For more information see my disclosures here.
How to Build a Farmhouse Table with Removable Legs:
Materials:
- (3) 2×10 @ 8ft (for table top)
- (2) 2×8 @ 8ft (for table top)
- (4) 2×4 @ 8ft (for side aprons, end aprons & middle supports)
- (2) 4×4 @ 8ft (Not pressure treated, for legs)
- 1″ Wood Screws
- 2 1/2″ Kreg screws
- (8) 5/16-18 hanger bolts (2.5″ or 3″ long)
- Surface Mount Corner Brackets for Table Aprons
- 5/16″ flat washers and hex nuts
- Wood Glue
Tools:
- Kreg Jig
- Circular Saw
- Miter saw
- Router
- 45 degree Chamfer Router bit
- Drill Press
- Drill
- Clamps
- 5/16 Hanger Bolt driver
- Straight edge guide (or you can make one)
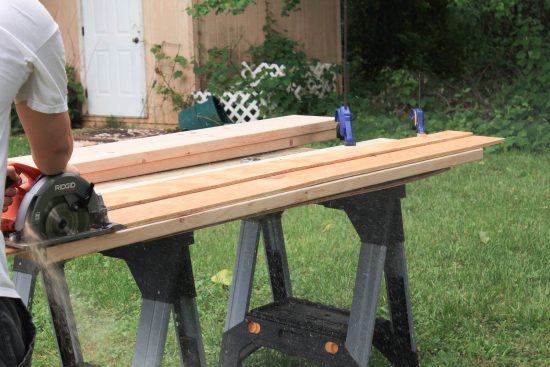
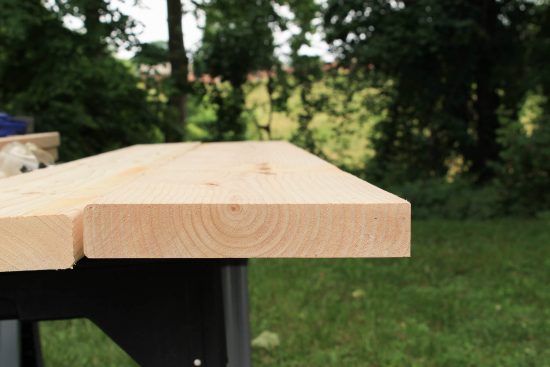
1. Gather all materials and supplies. Make your table top, legs, and side apron cuts
It’s important to pick the straightest boards you can find as this will help when you are assembling your table. Make the cuts below. Note, for the table top we are starting with an extra inch on each side which will be trimmed off later.
- Table top – (3) 2×10 @ 74″
- Table top -(2) 2×8 @ 74″
- Side Aprons – (2) 2×4 @ 57″
- Legs – (4) 4×4 @ 29″
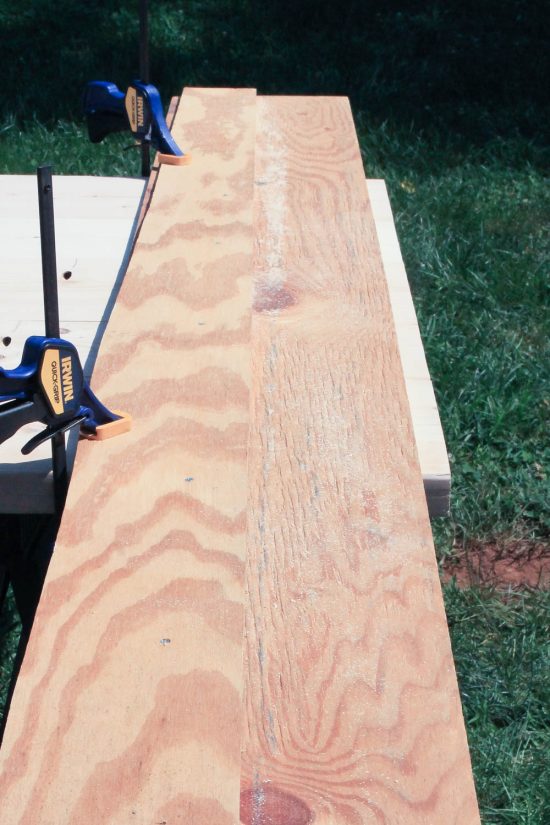
2. Trim side edges off table top boards
To get a snug fit for your table top boards, use a circular saw and trim 1/4″ off the side edges of all the boards, except for the two outside edges of the table top. We used a straight edge guide we made to do this, but you can use a table saw guide or buy a straight edge cutting guide as well. In the 2nd photo below you can see the difference straight edges on the right side make compared to the rounded edges on the left side. Note, typically for 1x thick wood the boards are already square/straight on the edges and you don’t need this step.
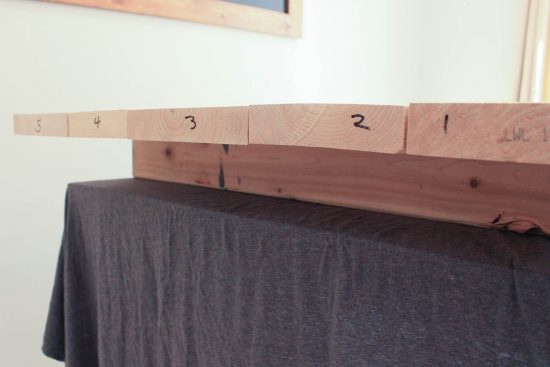
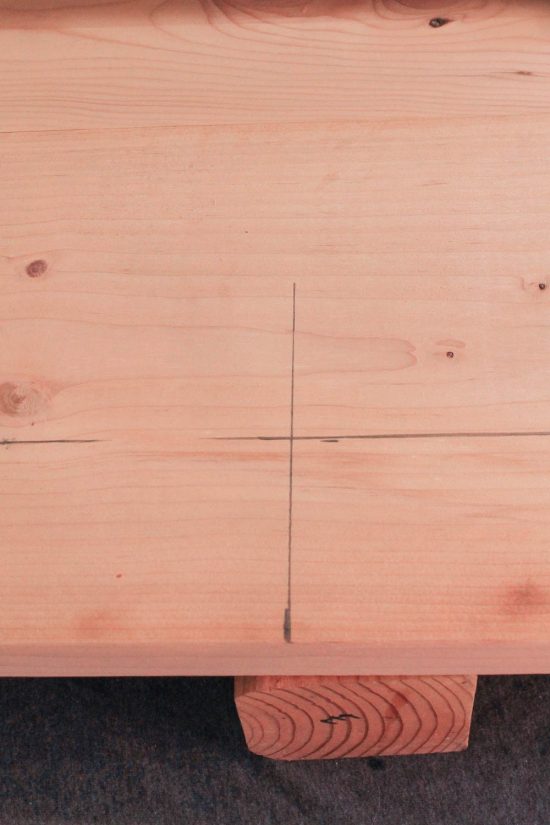
3. Lay out table top and and mark pocket hole locations
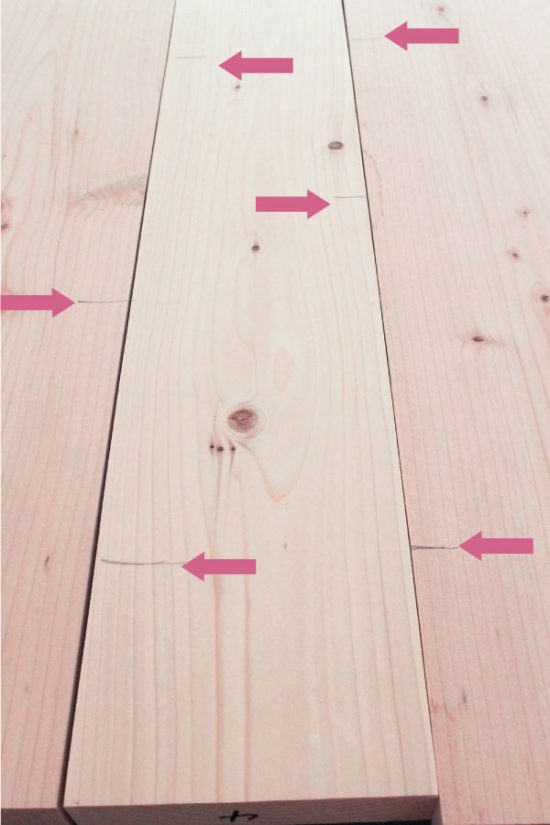
Lay out your table top board in the correct order (make sure two rounded outside edges are on the ends) and mark with a marker the order # on the board ends. Then, flip the boards over and mark where you are going to drill pocket holes. It’s best to space them 8″ – 12″ apart and alternate on each board. Also, make sure to stay a few inches in from the sides. I wish I had a better photo of the kreg hole markings, but I’ve added arrows on the photo below to give you an idea of the placement.
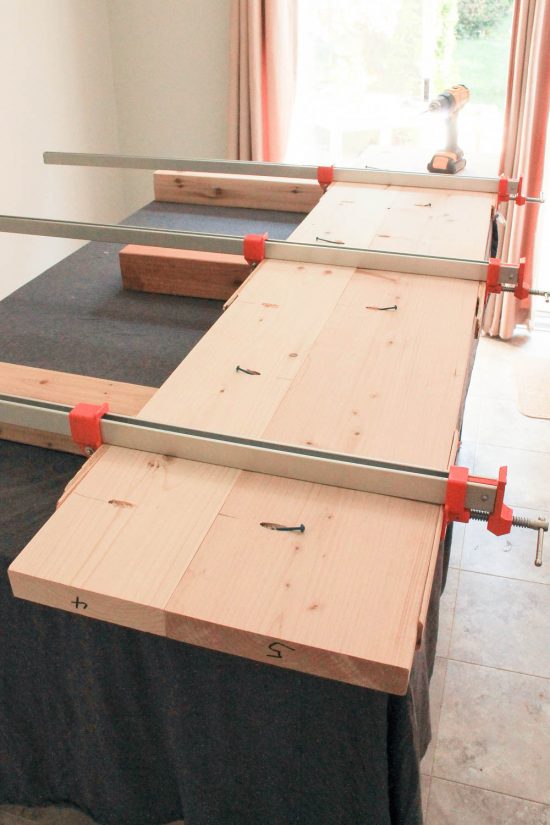
4. Drill pocket holes and assemble table top
Use your Kreg Jig and drill the pocket holes as marked on your table top boards.
*Tip: See my how to use a Kreg Jig post for an easy, step by step tutorial and video tutorial on how to use the Kreg Jig!
Then, using wood glue and kreg screws, attach each board together one at a time (making sure each board is assembled in the correct order). 48″ long clamps definitely help with this part.
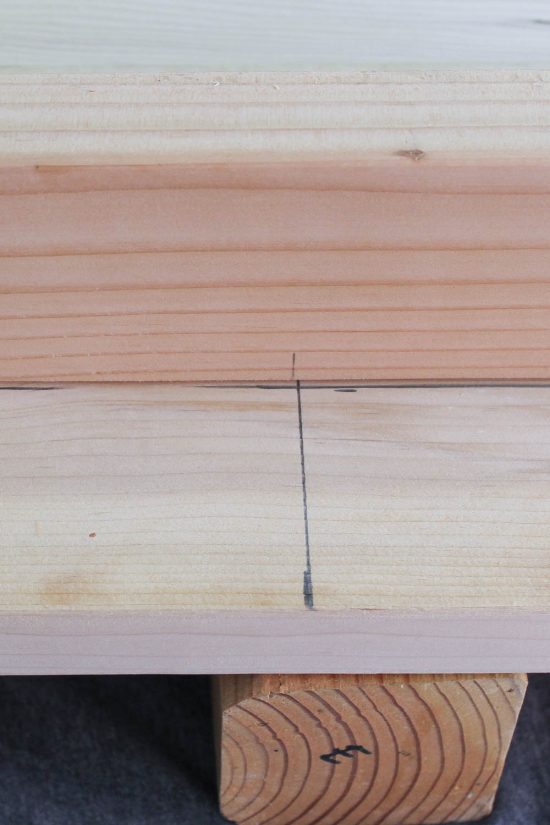
5. Trim the ends of the table top
Use a circular saw and trim 1″ off of both table top ends in order to get perfectly straight ends. The photo below is a bad pic but it gives you an idea of what this step looks like!
6. Drill pocket holes on side aprons and attach to table top
Use your Kreg Jig and drill three pocket holes spread out on both side aprons. On the bottom of the table top, mark the halfway point (36″) along the side, then mark 3 inches above that point. This is where the center point of your side apron should be attached. Next, mark the center point of your side apron (28.5″). Line up the center point of your side apron with the center point you marked along the side of your table top. Attach with kreg screws and wood glue (make sure your side apron is being attached perfectly parallel and 3″ in from the edge). Repeat on the other side.

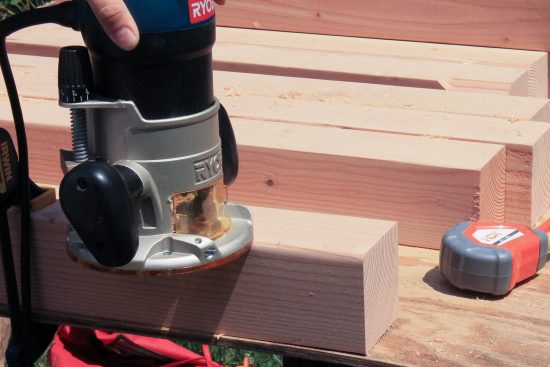
7. Prepare the table legs
On one of the the square edges of each table leg, use the 45 degree Chamfer Router bit and route a chamfer at least 3 inches long.

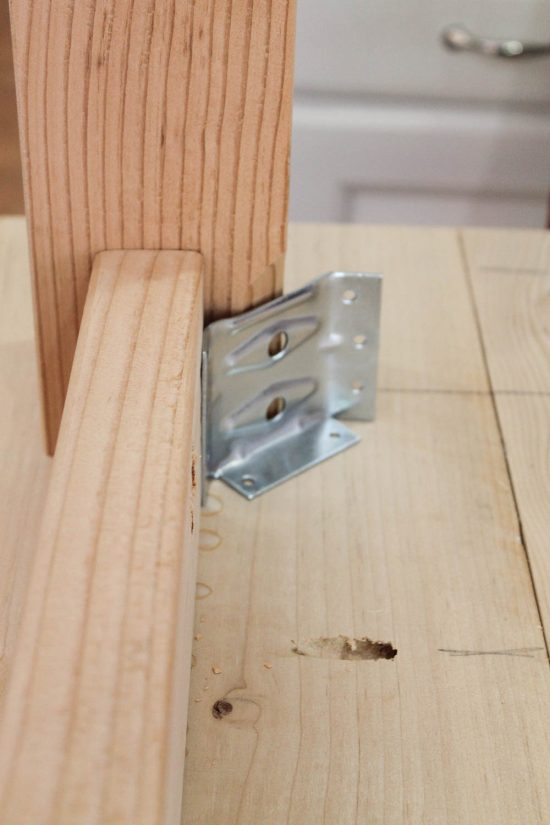
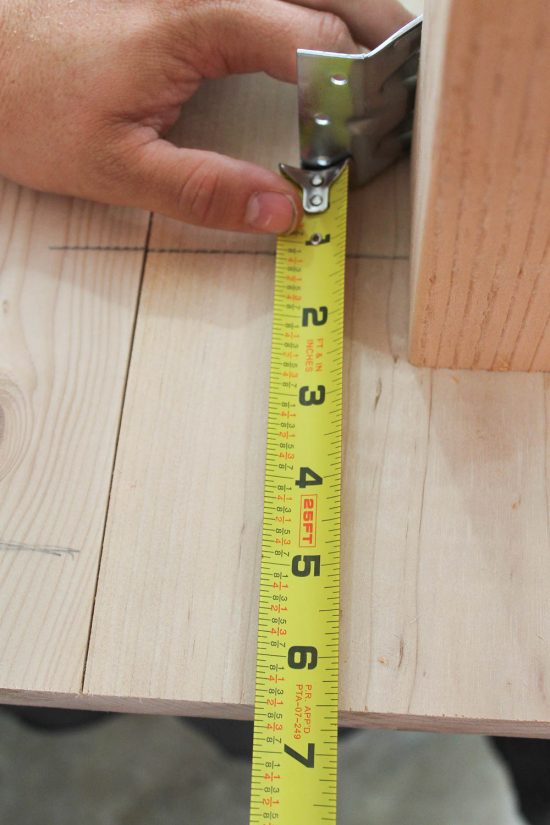
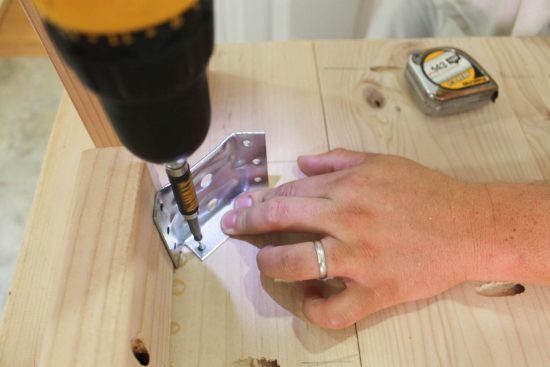
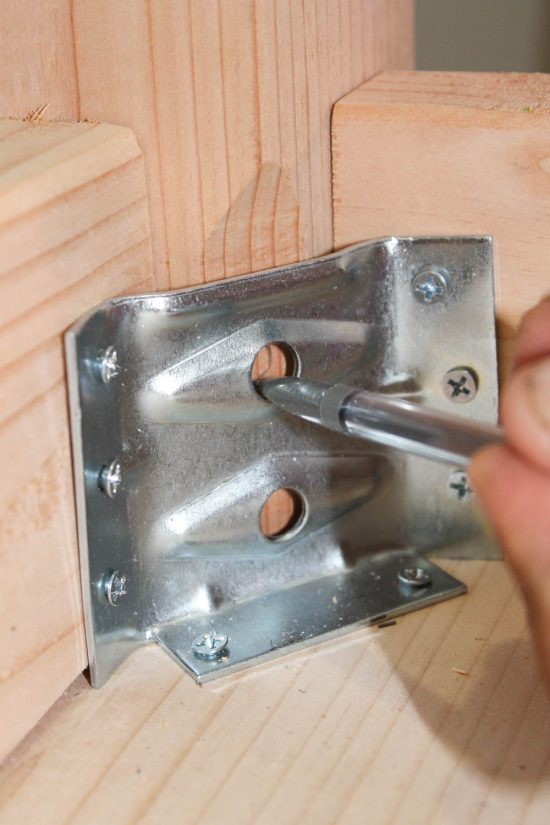
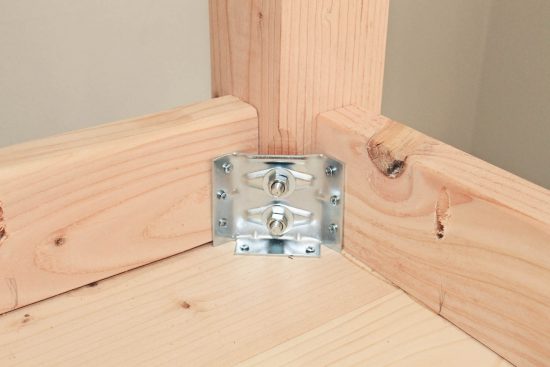
8. Prepare corner brackets
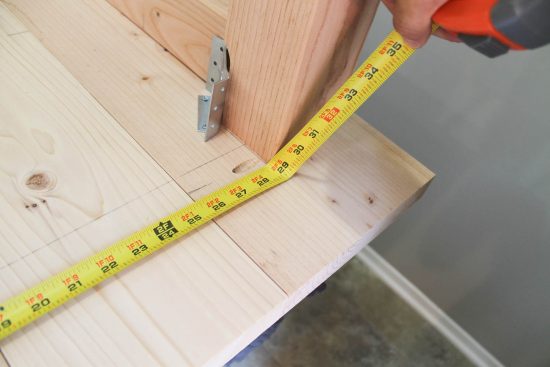
Line up your legs and corner brackets to the side aprons as shown in the photo below. Then, measure the distance from the bracket back to the table end (should be about 6.5″). Repeat on the other side and make sure the distance from the bracket back to the table end is the same so both of your corner brackets line up at the same distance from the table end. Attach brackets to table top using 1″ wood screws drilled into the the two, bottom, corner bracket holes. Repeat on the opposite side.
9. Prepare and attach end aprons
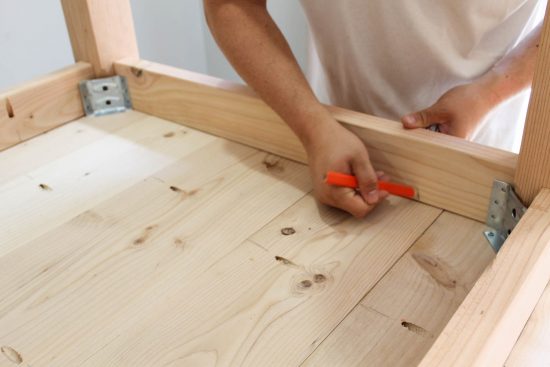
Line your table legs back up against the side aprons and corner brackets. Then measure the inside distance from one table leg to the other to get the exact end apron measurement. Repeat on the opposite table end. Next, cut your 2×4 end aprons to size, drill three pocket holes on them, and then attach to your table top with wood glue and kreg screws. Note, as shown in the 2nd photo below, it helps to line up your end aprons and mark where you’d like your three pocket holes to go so you avoid drilling them into a crack or other pocket hole on the table top.
📩 Want to Save This?
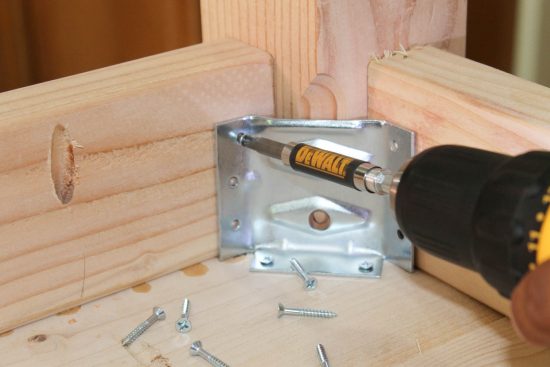
10. Drill screws into remaining corner bracket holes
Add screws to the remaining corner bracket holes to secure the corner brackets to the side aprons and end aprons.
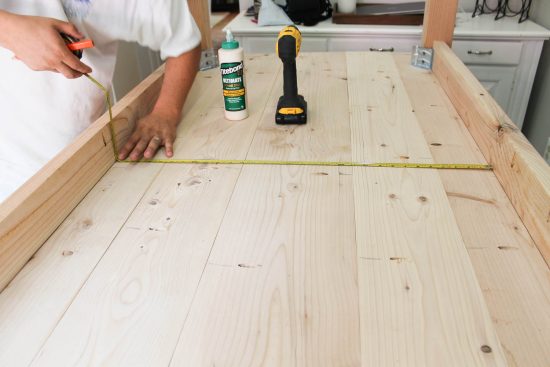
11. Prepare and attach middle support braces
Measure the exact distance in between the side aprons and cut three 2×4 middle support braces to size. Add two pocket holes to each end of the braces and attach to the side aprons on the bottom of the table top with wood glue and kreg screws. I forgot to take a photo of attaching the support braces…
12. Finish making table legs
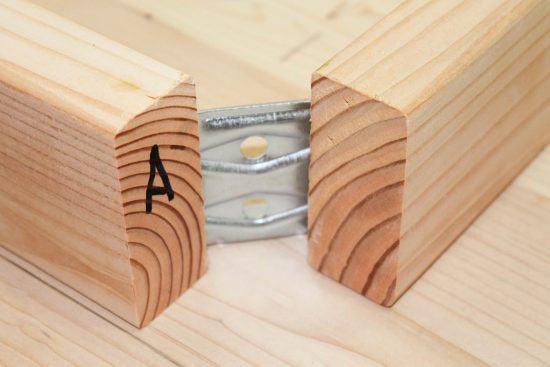
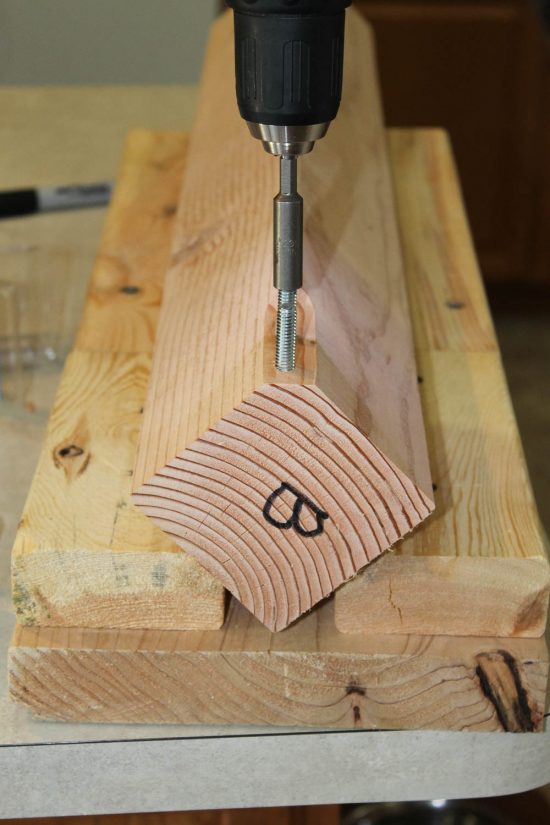
Use a small pencil and mark where the corner bracket holes lines up on the table leg chamfer. It also helps to label the table leg and end apron it matches perfectly with A, B, C, D if you want.

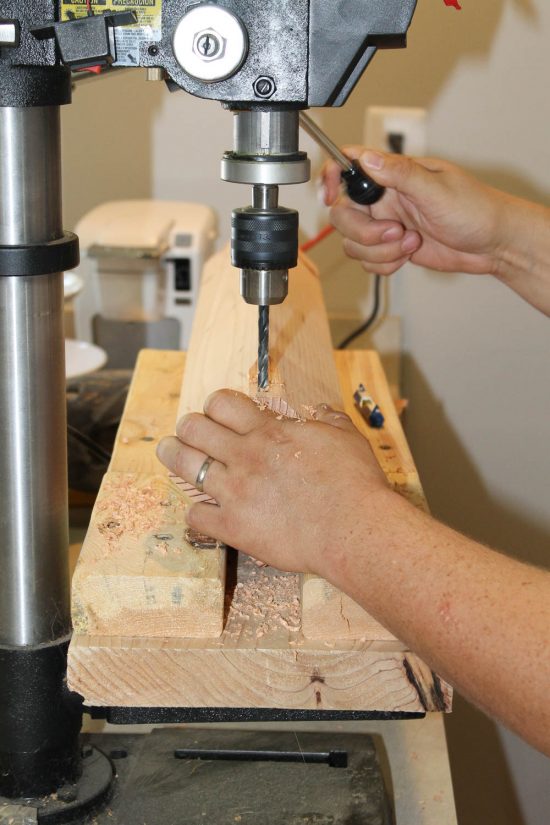
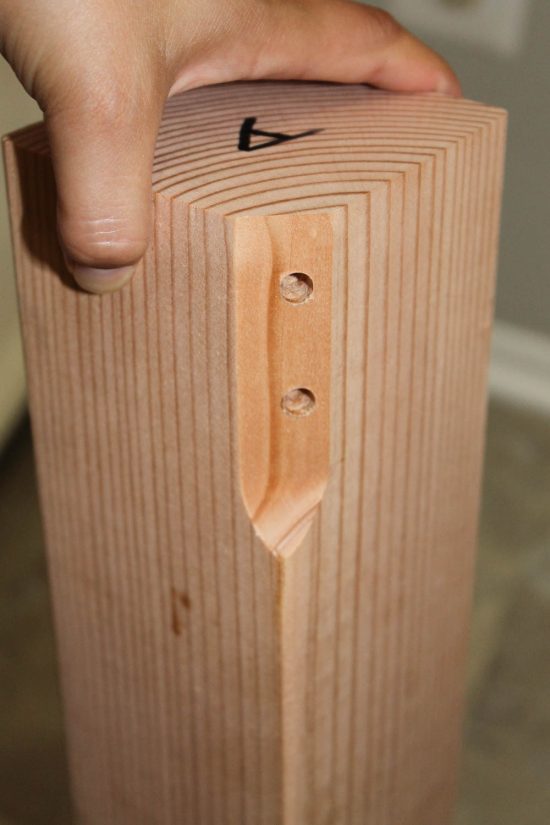
Use a drill press and drill 90 degree holes into the chamfer where you made your hole markings. It’s really important the hole is drilled at 90 degrees or else the leg may go on crooked. Next, the attach hanger bolts into the holes with a hanger bolt driver.
Finally, attach your removable legs to your farmhouse table with 5/16 flat washers and hex nuts!
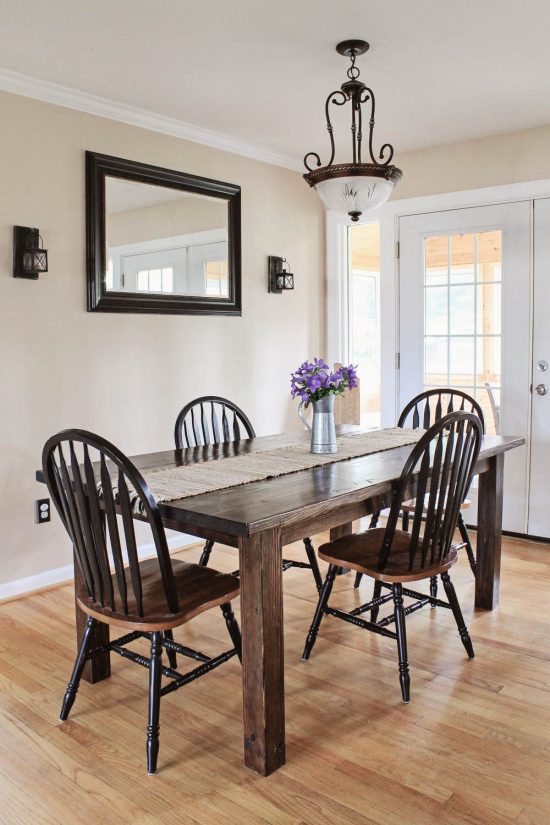
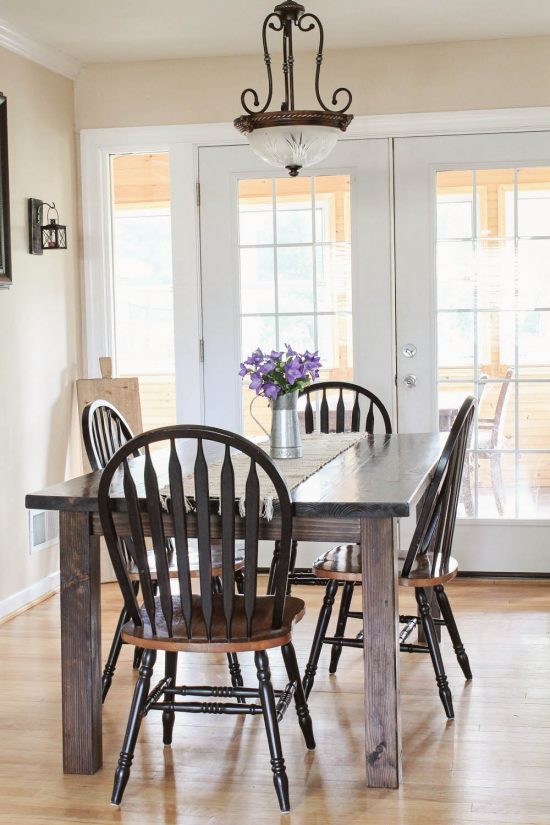
Flip your farmhouse table over and it’s all ready for sanding, staining, and finishing! Here is the final result:
And here is a photo of our very first farmhouse table that’s still in our kitchen today and was our test build to figure out the best way to build a farmhouse table with removable legs:
I hope these build plans explaining how to build a farmhouse table with removable legs has been helpful! For a tutorial on how I stained and finished all of the farmhouse tables we’ve built, you can check out my post How to Stain Wood. We used Minwax Dark Walnut for this table.
I’d love to see your version of this build! Feel free to share photos with me on Instagram, Facebook, or email: [email protected]!
Be sure to follow along on Instagram and Pinterest for my latest projects, fun updates, and sneak peeks!
You may also be interested in:

Gwyn
Wednesday 17th of January 2024
Hi Angela, Thanks for the plans. I love how these posts are still available & relevant even years later! We own a small wedding venue and look forward to trying your design. Did you have any issues with the screw holes in the legs stripping from repeatedly removing them for transport? Many thanks!
Allison Milford
Tuesday 6th of August 2019
When you did them for wedding do you know how many chairs were at each table typically, (how many did the 8ft table seat?)
Angela Marie Made
Tuesday 6th of August 2019
Yes, they fit up to 4 chairs on each side and 1 on each end, so a max of 10 chairs.
allison milford
Saturday 6th of July 2019
So it’s probaly me but you say make the apron 3” in from edge of table but then say it will be 6” from the corner of the leg? So is all the apron sides and ends 3” in from every edge?
Angela Marie Made
Monday 8th of July 2019
Sorry for the confusion! Only the longer side aprons are 3" from the edge. The short end aprons will be about 5" in from the edge since the metal bracket sits 6.5" inches back from the edge (and the wood is 1.5" thick). Hope that makes sense!
Mary
Thursday 30th of May 2019
Did you have any stability or wobble issues? I've seen a lot of DIY farmhouse style tables built with a cross beam between the legs around ankle/knee height.
Angela Marie Made
Monday 3rd of June 2019
Out of all of the 22+ farm tables that I have built this way, only 2 of them had a small wobble due to the wood being a bit warped. To fix this, we just trimmed around 1/4" or so off of one of the legs so it wouldn't wobble anymore and sit flush with the floor. They are all very stable and we didn't have a need for any additional beams.
Ben
Saturday 9th of February 2019
What is the advantage of kreg screws over just gluing?
Angela Marie Made
Monday 11th of February 2019
Kreg screws help provide an extra strong joint between the boards. Also, once all the boards are glued and connected with the Kreg screws you don't have to keep them clamped together for hours and wait for the glue to fully dry.