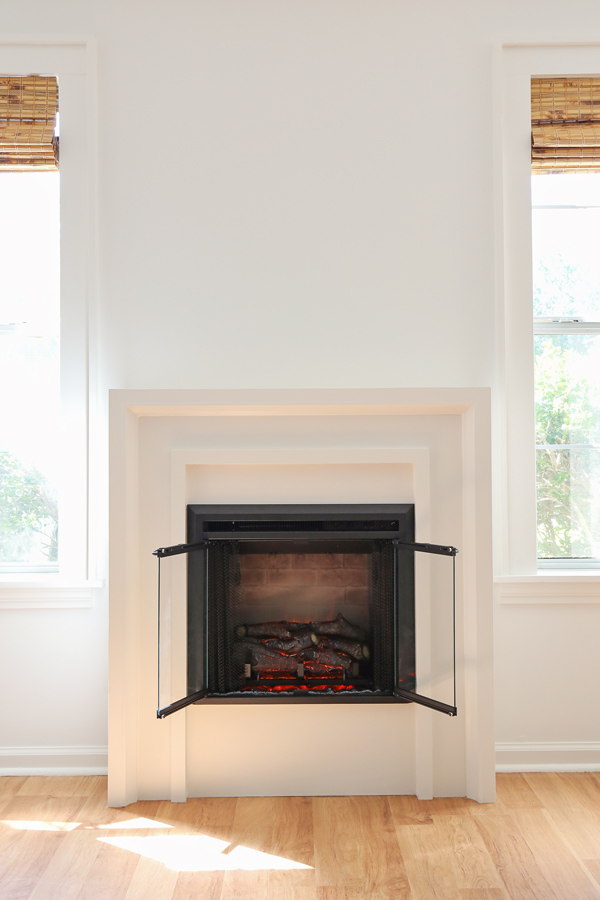
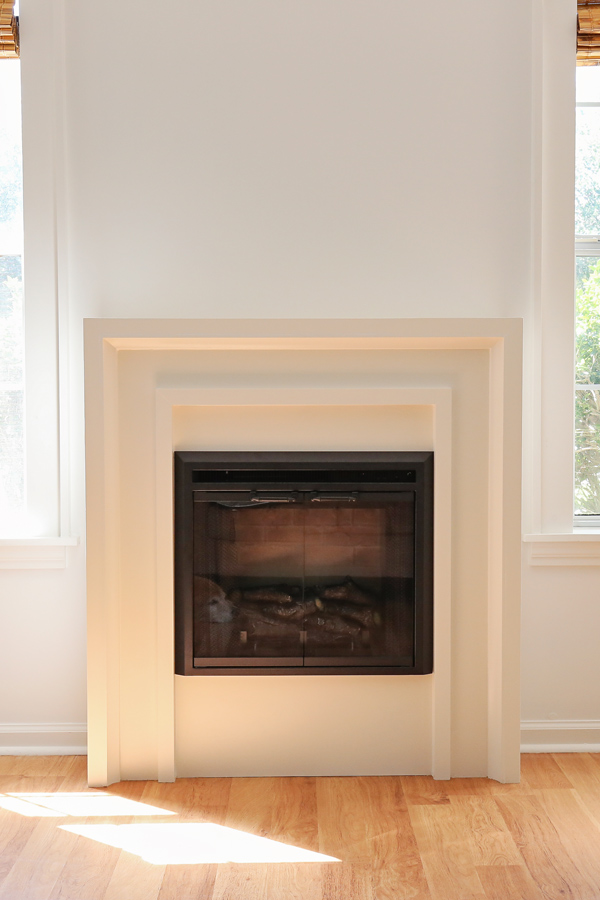
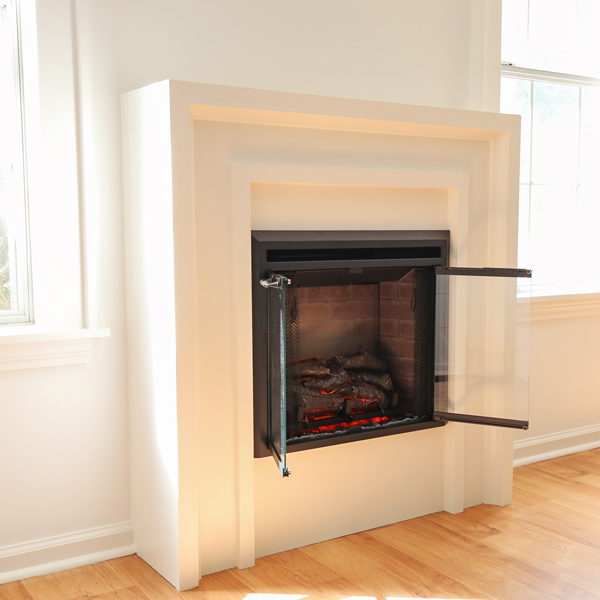
Learn how to build a DIY fireplace surround on a wall with an electric fireplace insert!
We are starting our living room makeover and I knew I wanted to add a DIY electric fireplace surround! It’s the perfect way to add coziness and character to a living room or family room!
Plus, I’ve been wanting to have a mantel to hang our stockings from for several years now!

For the design of this DIY electric fireplace, I was inspired by this fireplace photo from Studio McGee. I absolutely love the look and wanted to create a similar design. But I decided not to do the raised hearth to avoid low sharp corners with a little one running around!
Note, this post contains some affiliate links. I may earn a commission if you shop those links (at no cost to you). Thank you for supporting my small business. For more info see my disclosures here.
This project cost me about $550 total for both the lumber and the electric fireplace insert in the 22 13/16″ wide size.
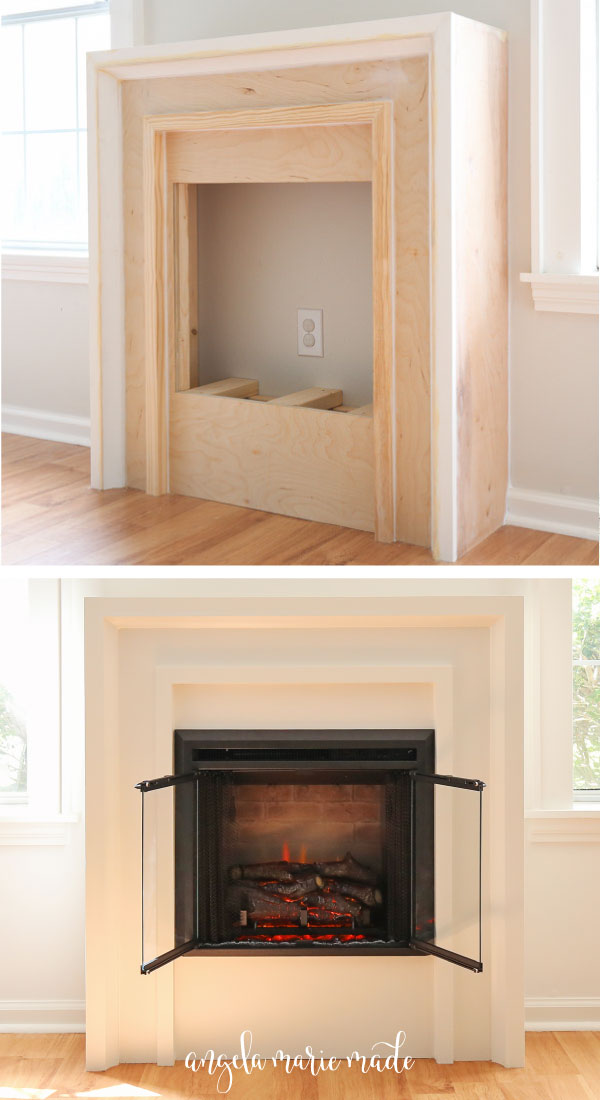
There are a lot of steps to this project, but it is mostly just working in layers. All of the layers and trim work are what make it so beautiful, custom, and classic/modern! Make sure to get the printable DIY fireplace plans below!
Final DIY Fireplace Surround Dimensions: 41″ wide x 44″ tall x 11 1/2″ deep
Note, I have another tutorial on how to build a DIY shiplap fireplace here!
How to Build a DIY Fireplace:
Materials:
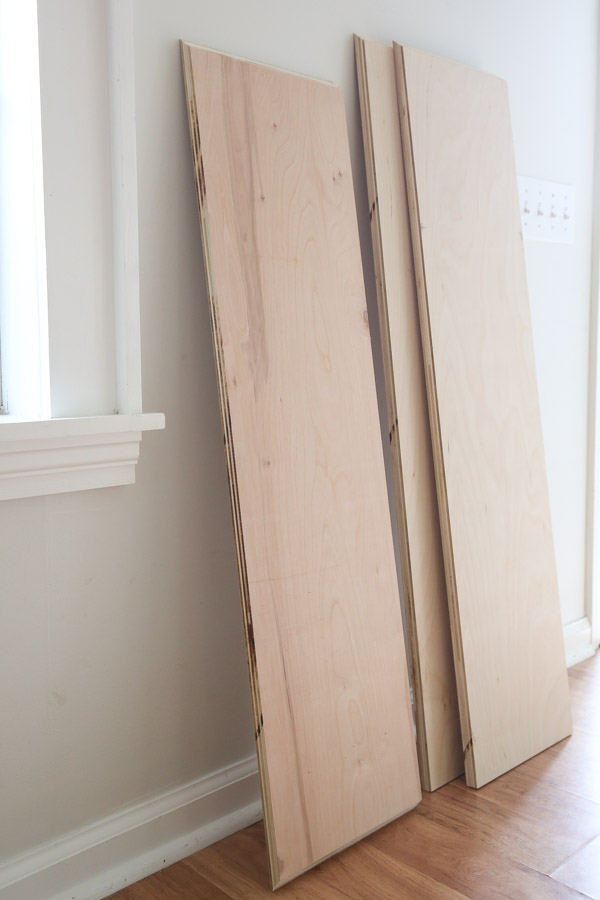
- (1) 4ft x 8ft @ 3/4″ thick plywood*
- (5) 2×4 @ 8ft
- (1) 2×2 @ 8ft (furring board)
- (2) 2×2 @ 8ft (premium boards)
- (2) 1×2 @ 8ft
- (2) 2″ cove or base cap molding (I used this board)
- 2 1/2″ self tapping screws (or wood screws)
- 3″ self tapping screws (or wood screws)
- 2″ and 1″ and 1 1/4″ brad nails
- Wood glue
- Spackle
- Wood filler
- Primer & paint
- 22 13/16″ Fireplace electric insert
Tools:
- Kreg Jig
- Miter saw
- Brad nailer
- Drill
- Clamps
- Circular saw or table saw
- Tape Measure
- Stud finder
- Dremel or multitool/oscillating tool
*I prefer to use this formaldehyde free plywood that is also pre-sanded!
**Make sure to use all wood for the trim on this project and not MDF or vinyl as there will likely be sanding needed for a seamless trim job!
DIY Fireplace Video Tutorial:
Subscribe to my YouTube Channel here!
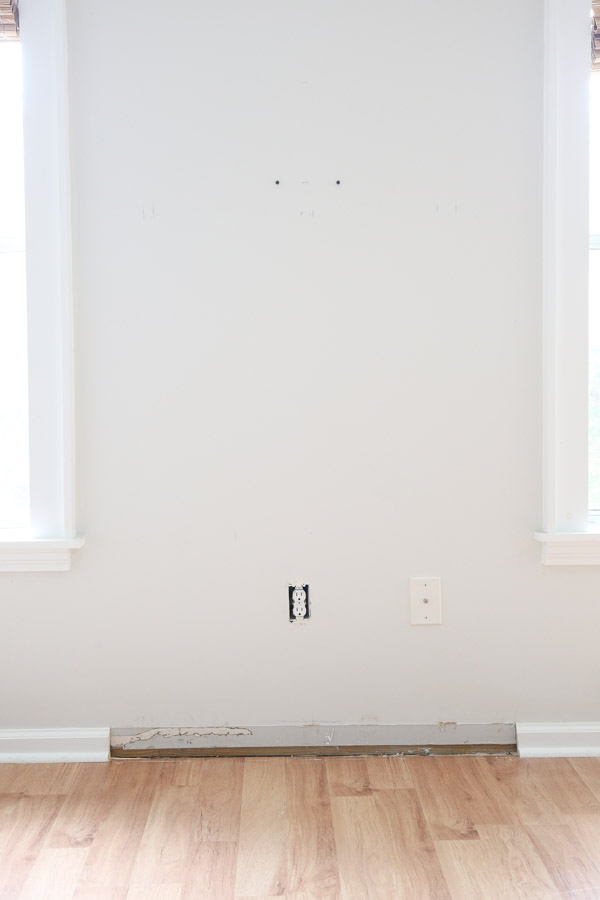
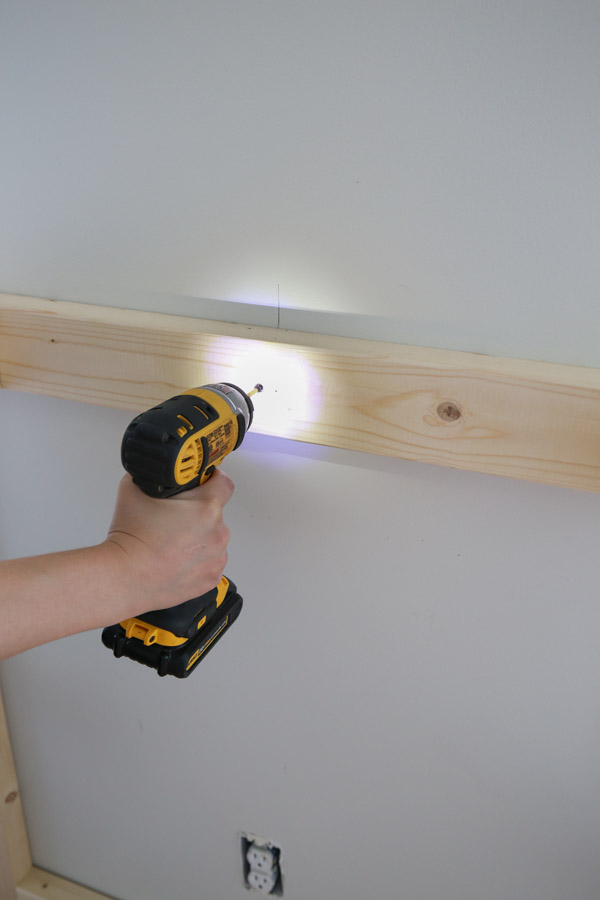
1. Remove the baseboard on the wall
Brandon used our Dremel tool to cut the baseboard out of the wall where the fireplace was being installed on our wall.
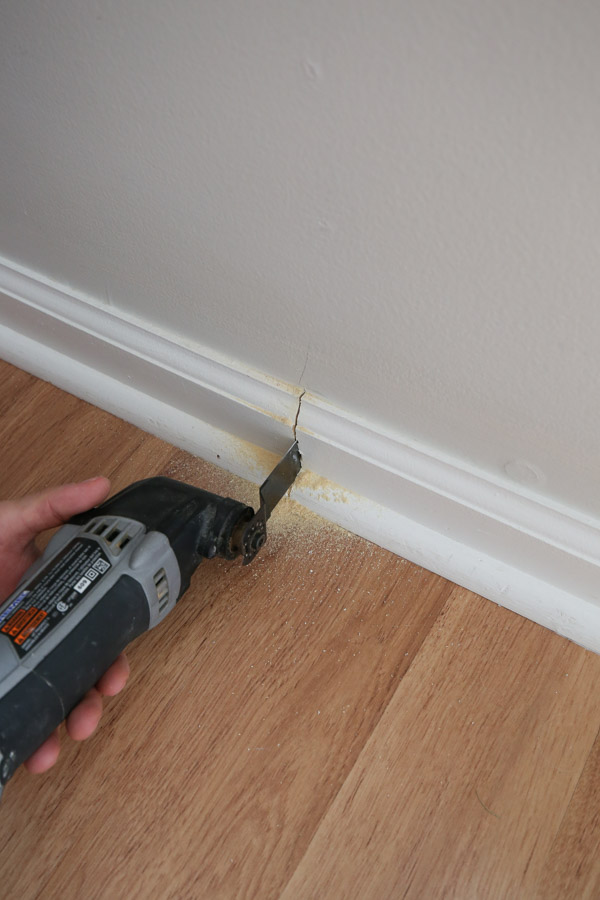
To remove the existing baseboard, score the top caulk line with a utility blade. Then, use a prybar and hammer to remove the baseboard from the wall.
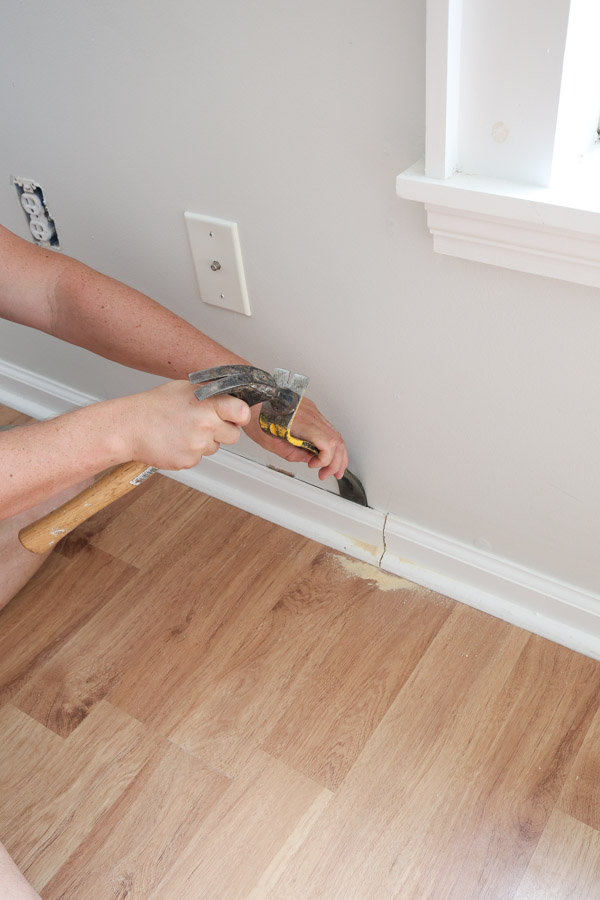
Although this fireplace surround is 41″ wide, we decided to remove 41 1/8″ of the baseboard to make sure we had a little wiggle room for the installation process and we knew that the extra gap would be caulkable.
Make sure there is an outlet nearby too for easily plugging in the electric fireplace insert!
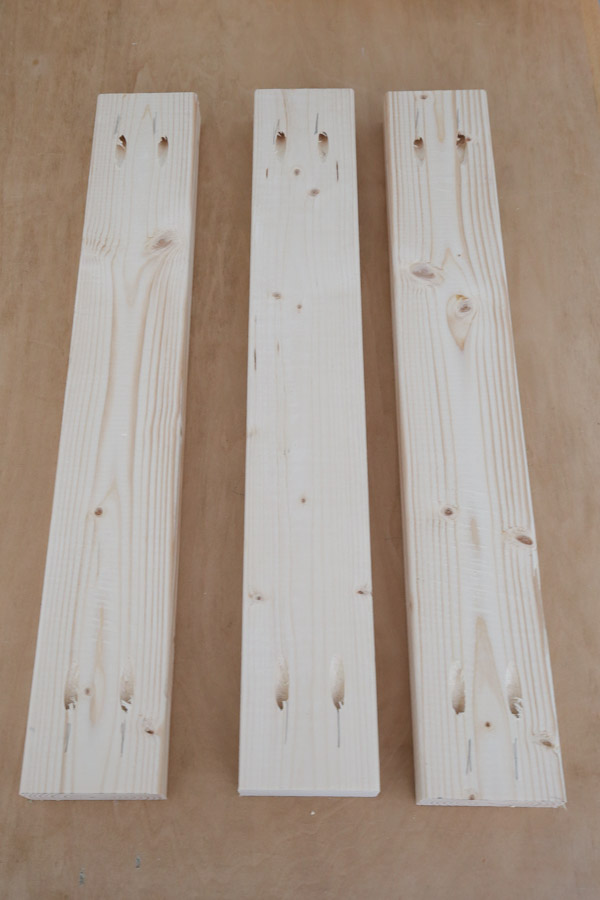
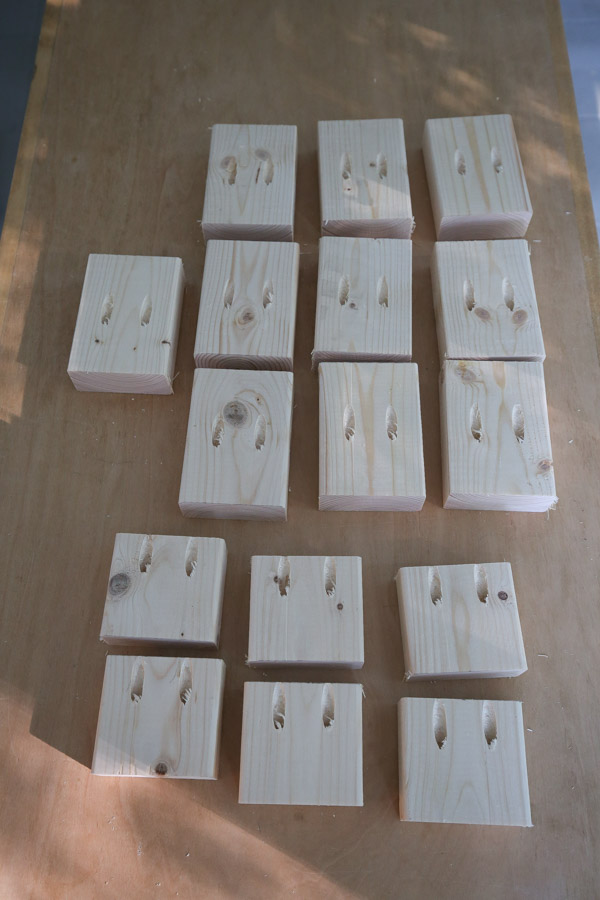
2. Make initial lumber cuts
Click here for the printable DIY fireplace surround plans which include the cut list and step by step building steps with easy to follow diagrams!
Make the initial lumber cuts from the 2×4 and 2×2 framing lumber for the frame of the fireplace.
Use a miter saw and make the following cuts from the 2×4s:
- (6) 2×4 @ 3 ¼” (for front frame)
- (3) 2×4 @ 8″ (for middle support frame)
- (10) 2×4 @ 5″ (for sides)
- (4) 2×4 @ 43 ¼” (for front & back frame)
- (3) 2×4 @ 23″ (for front frame)
- (2) 2×4 @ 32 ½” (for back frame)
Make the following cuts from the 2×2 furring boards:
- (2) 2×2 @ 43 ¼” (for front frame)
NOTE: There will be additional lumber cuts for the plywood and trim in step #8 and #10. It’s best to make these cuts after the frame of the fireplace is built.
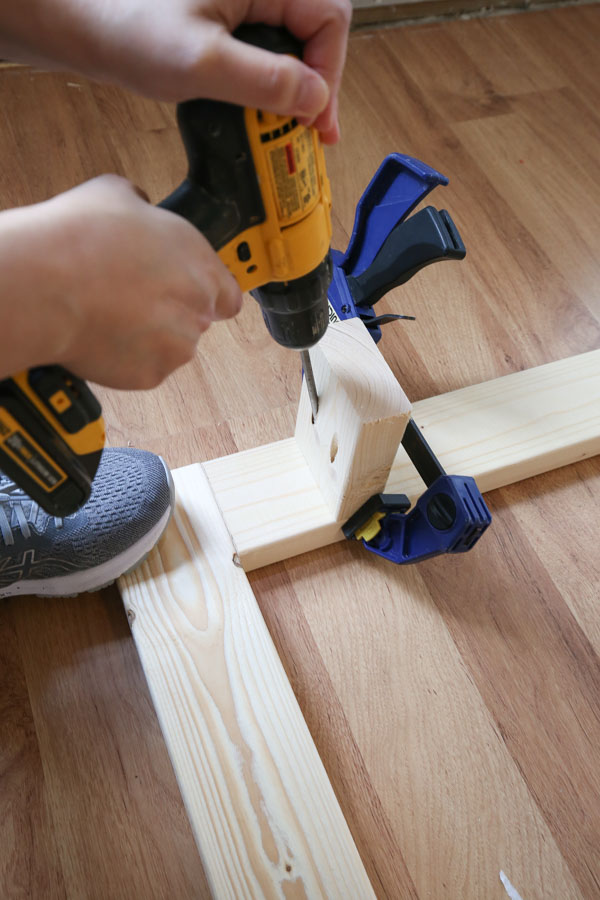
3. Add pocket holes to the boards
Make sure the Kreg Jig is set for 1 1/2″ thick wood. Use a Kreg Jig and add pocket holes to both sides of the following 2×4 boards:
- (3) 2×4 @ 23″ (for front frame)
- (2) 2×4 @ 32 ½” (for back frame)
Then, add pocket holes on one side for the following boards:
- (6) 2×4 @ 3 ¼” (for front frame)
- (10) 2×4 @ 5″ (for sides)
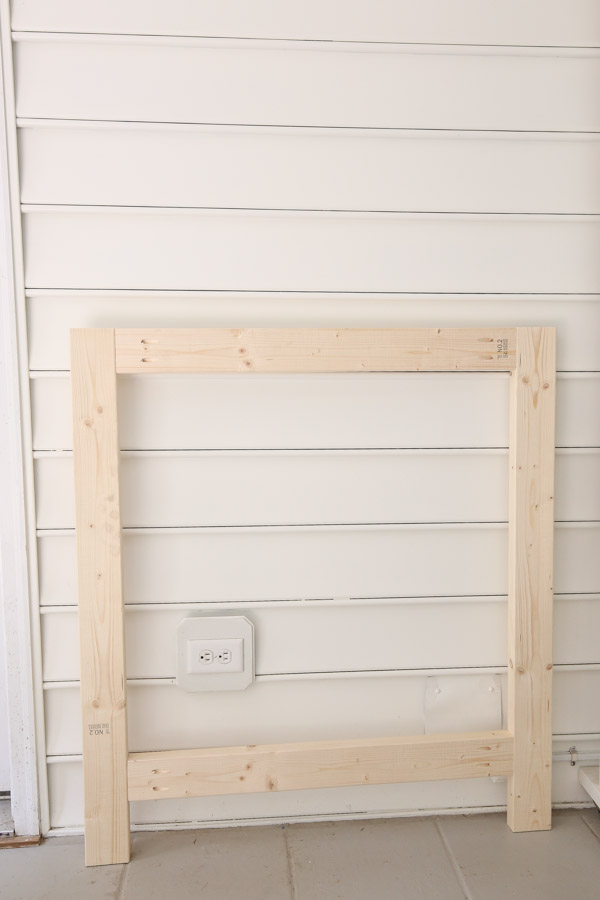
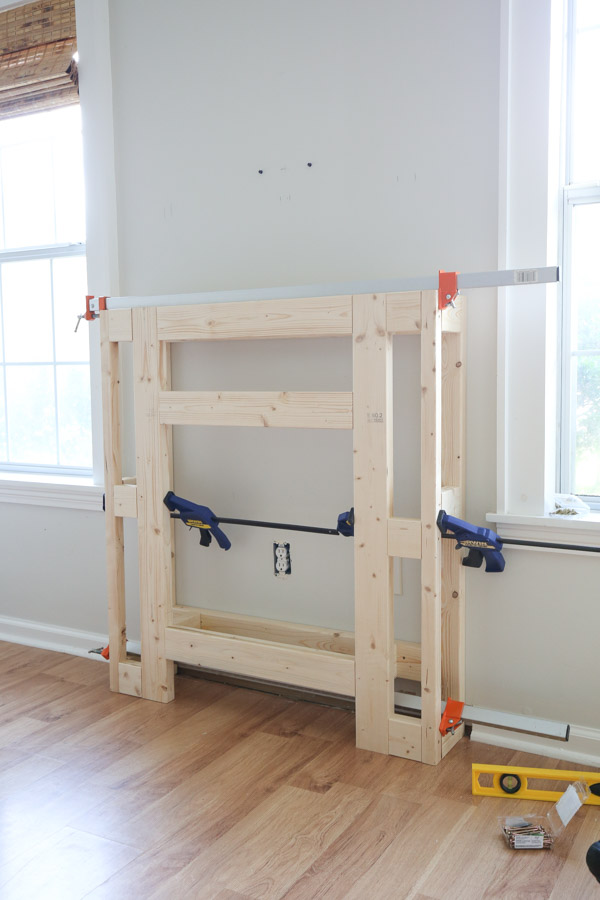
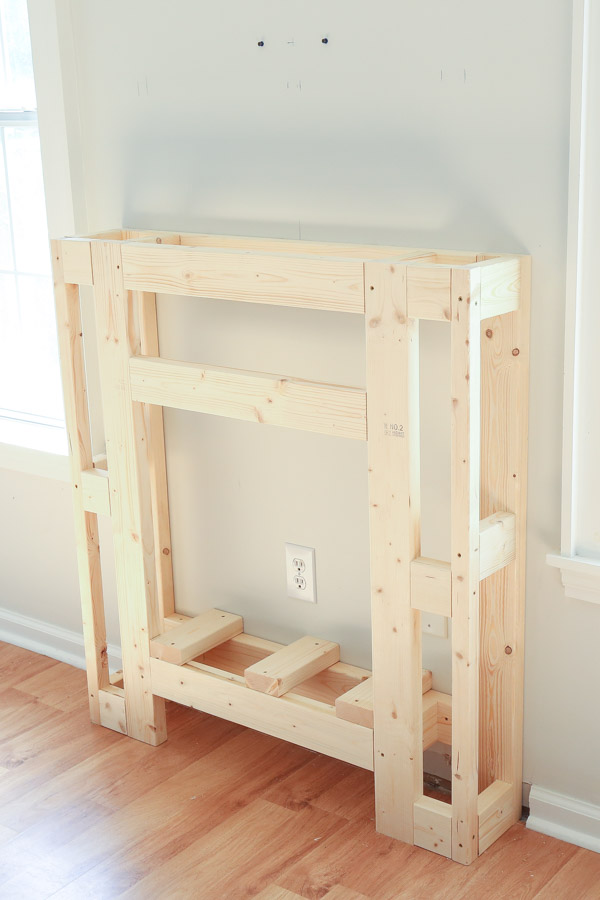
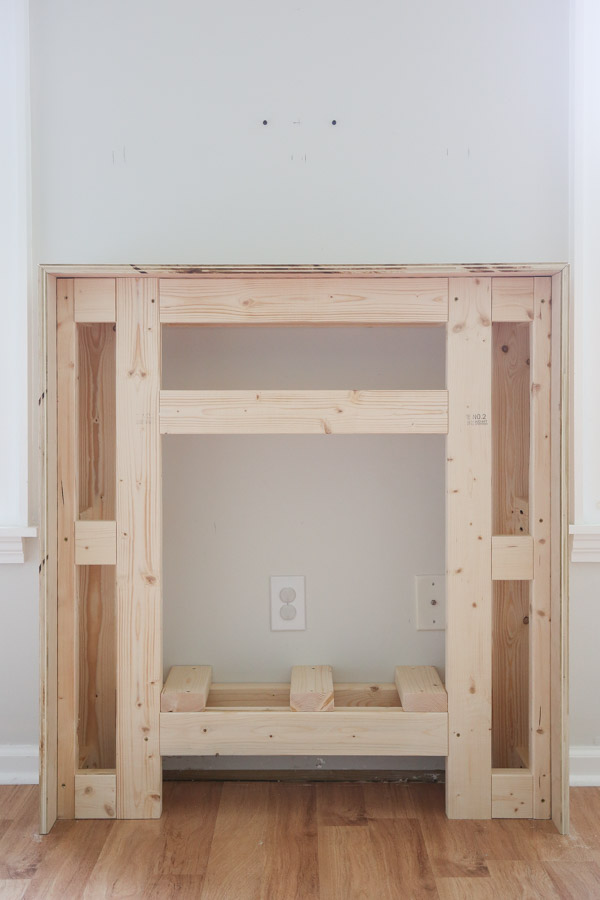
4. Build the front frame of the DIY fireplace surround
Note, you can see all of the below steps in action in the DIY fireplace how to video here!
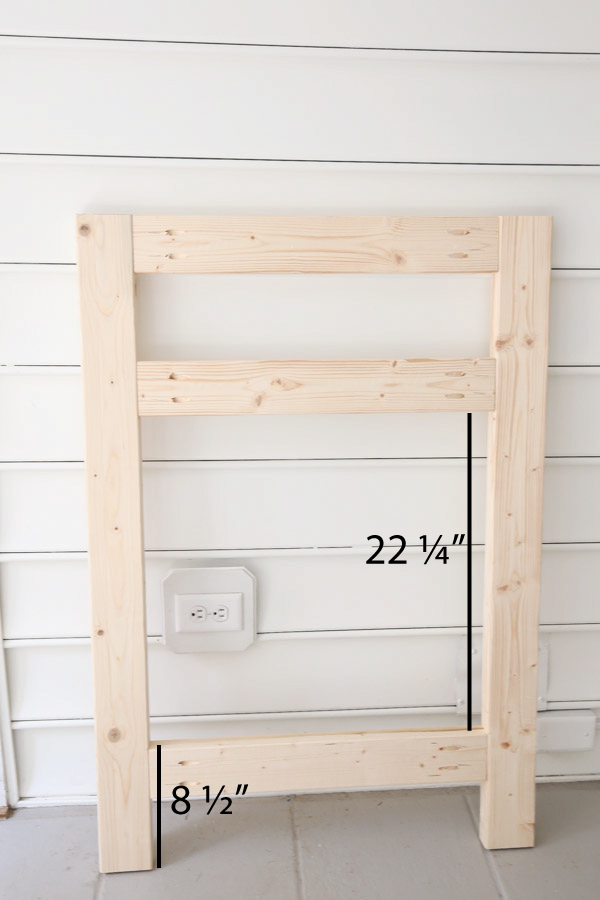
Begin to construct the front frame of the fireplace by attaching the 2×4 boards @ 23″ with pocket holes between two of the 2x4s @ 43 1/4″. Use 2 1/2″ Kreg screws for attaching.
Attach one board 8 1/2″ up from the bottom of the 2x4s @ 43 1/4″, a middle board 22 1/4“ up from the top of the first board, and one board along the top.
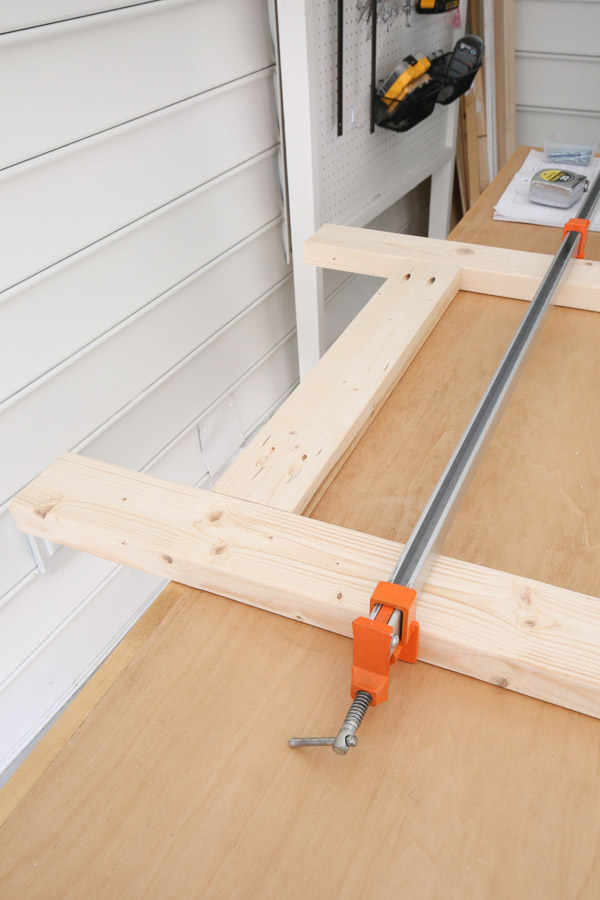
After attaching these boards together, I found it easiest to lay the frame down on the floor to attach the rest of the boards.
Next, attach three of the short 3 1/4″ boards into one of the 2x4s @ 43 1/4″ at the top, middle, and bottom using 2 1/2″ Kreg screws. I also clamped the end 2×2 @ 43 1/4″ board in place as well at this point.
Attach the 2×2 @ 43 1/4″ into the three boards with 2 1/2″ self tapping screws (or wood screws). It helps to add scrap wood under the frame for this part.
Also, I used self tapping screws so no pre-drilling was needed.
Repeat this process on the other side.
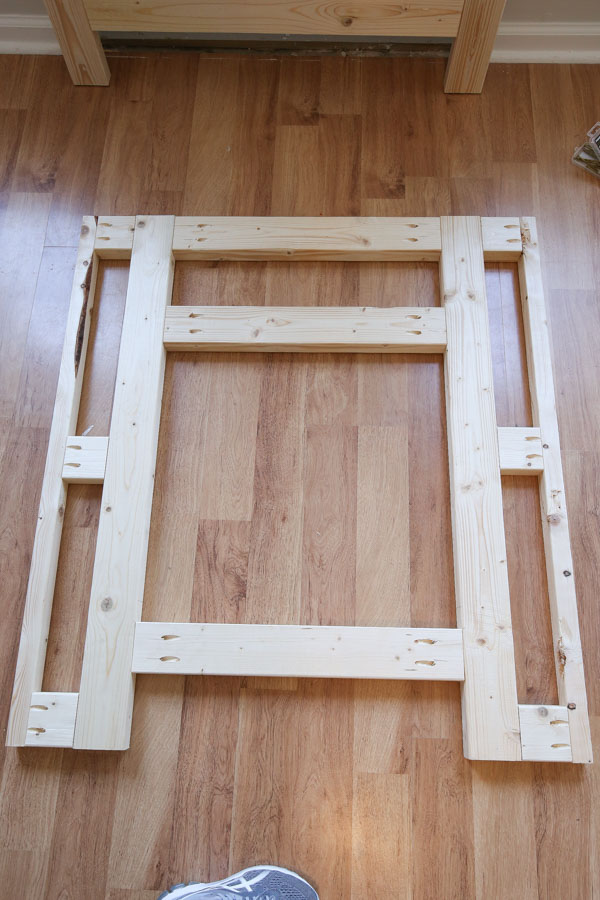
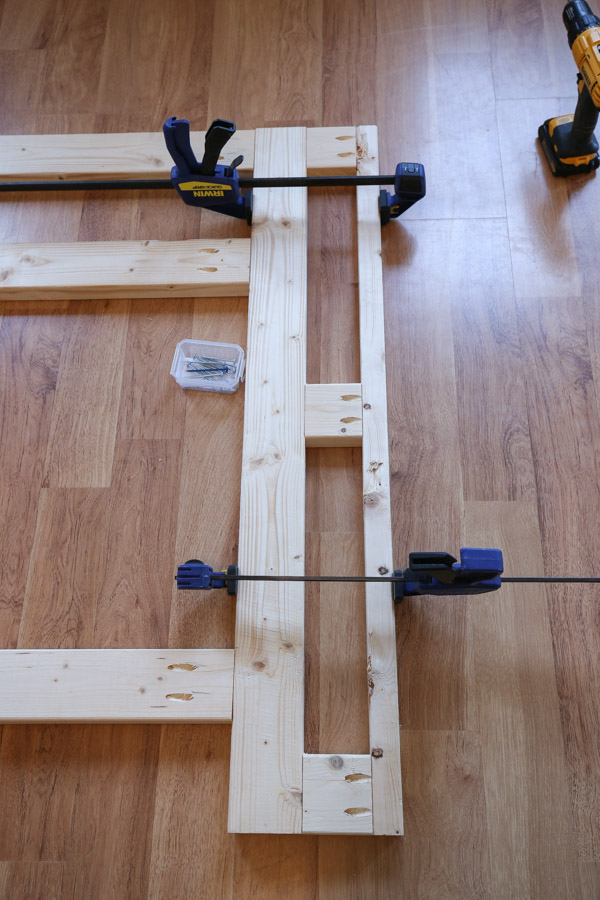
5. Build the back frame of the DIY fireplace
Construct the back frame of the fireplace by attaching the 2×4 boards @ 32 1/2″ between the two remaining 2x4s @ 43 1/4″. Attach one board 8 1/2″ up from the bottom of the ends and one board along the top.
Attach four of the 2x4s @ 5″ using 2 1/2″ Kreg screws into the middle 2×4 boards @ 32 1/2″ on the back frame, 8 1/4″ in from the sides as shown below.

Then, attach the remaining six 2x4s @ 5″ along each end at the top, middle, and bottom of the 43 1/4″ boards.
At this point, I attached the back frame into the wall studs using 3″ screws. We determined it would be easiest to build the rest of the frame while being attached to the wall. Use a stud finder to find the wall studs.
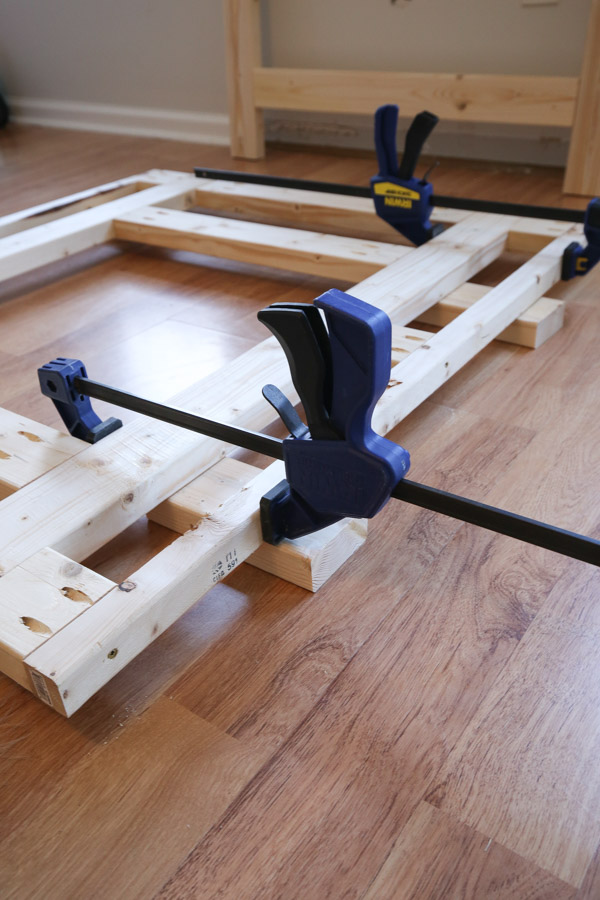
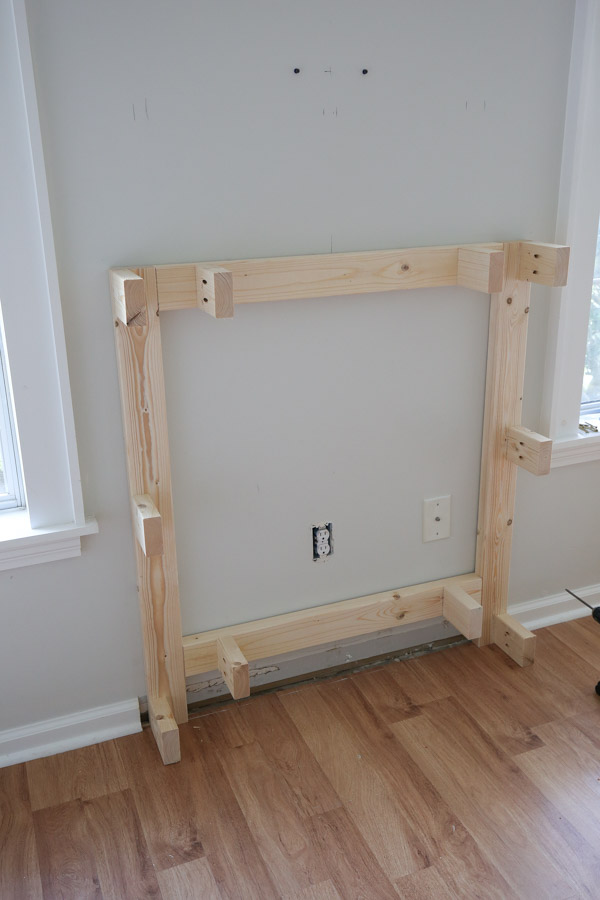
6. Attach the front frame to the side and back frame
Once the back frame is secured to the wall studs, the front frame can be attached.
Line up the front frame with the back frame. I used clamps to help hold everything in place.
📩 Want to Save This?
And then I used 2 1/2″ self tapping screws to attach the front frame to the side frame boards. I installed one screw through each of the ten 2×4 boards @ 5″.
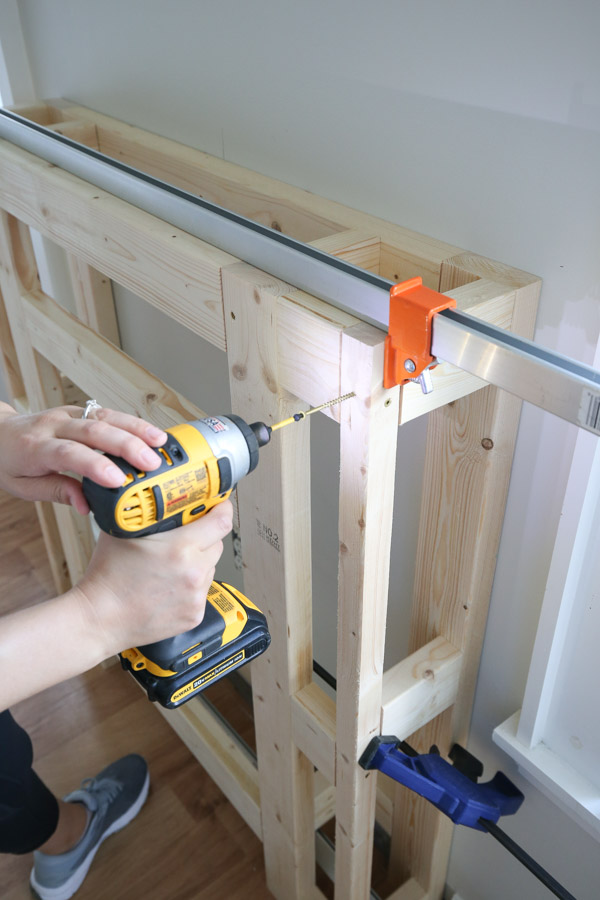
The last frame step is to install the three 8″ middle support 2x4s for the electric fireplace support using 2 1/2″ screws through the top of them into the 2×4 frame.
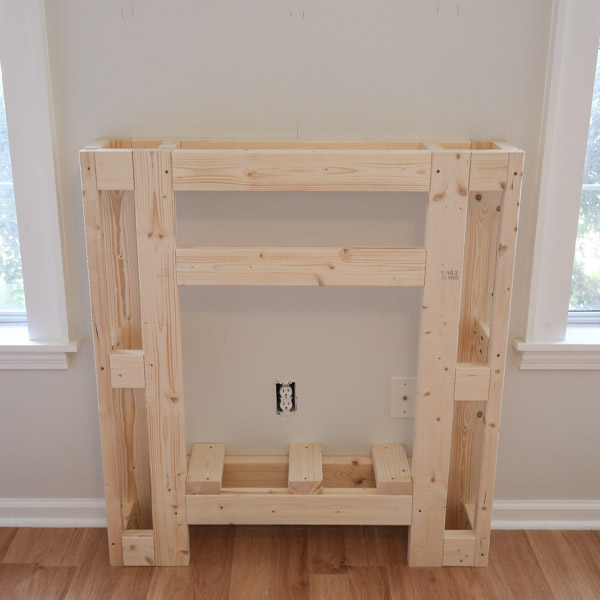
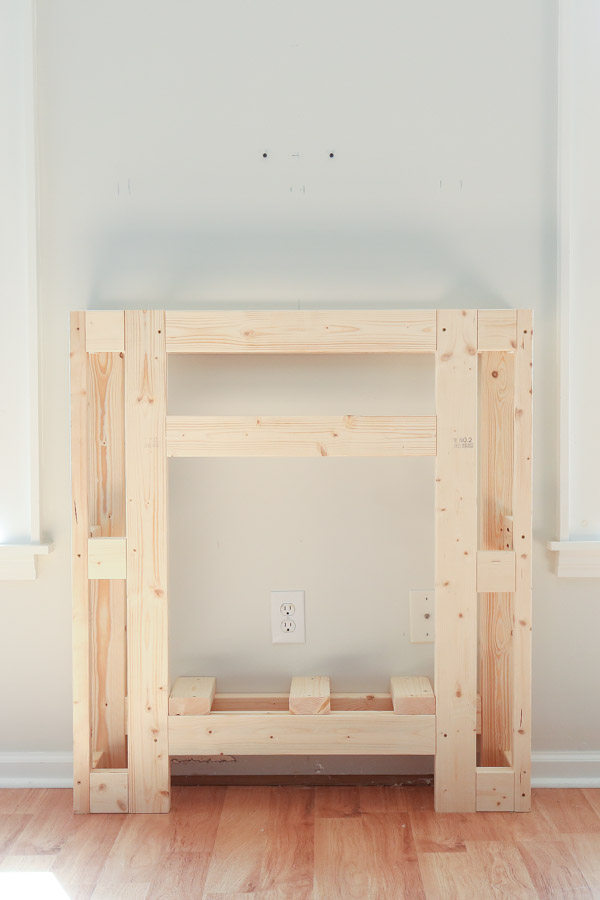
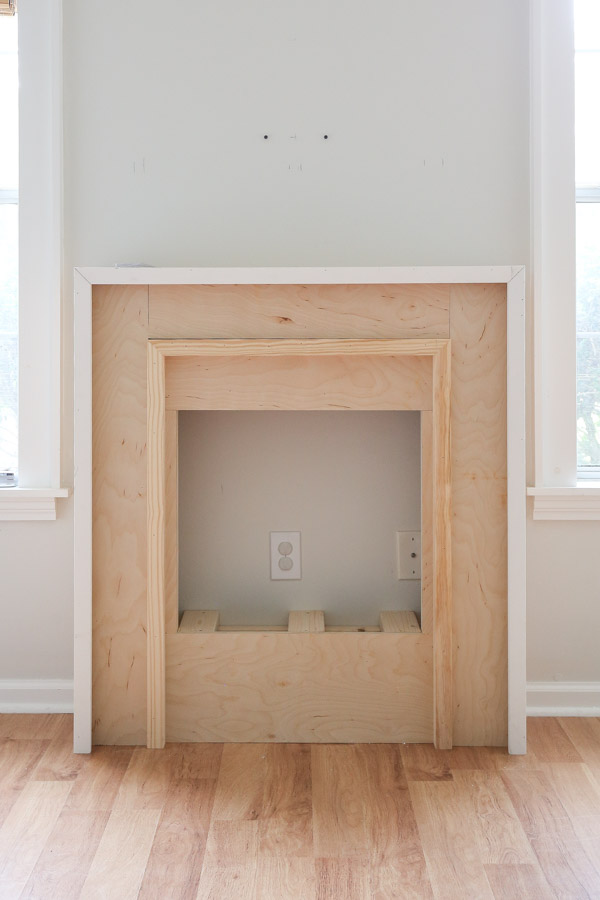
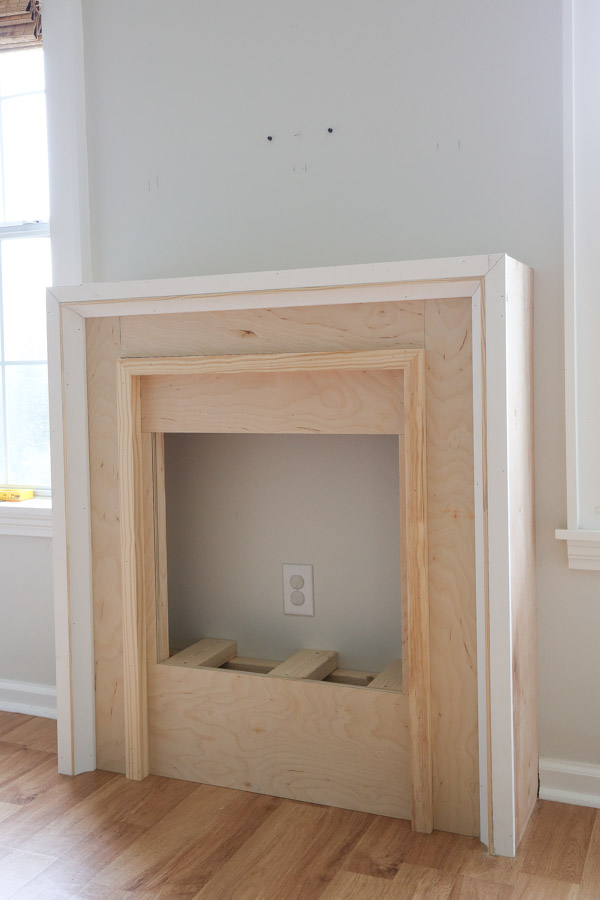
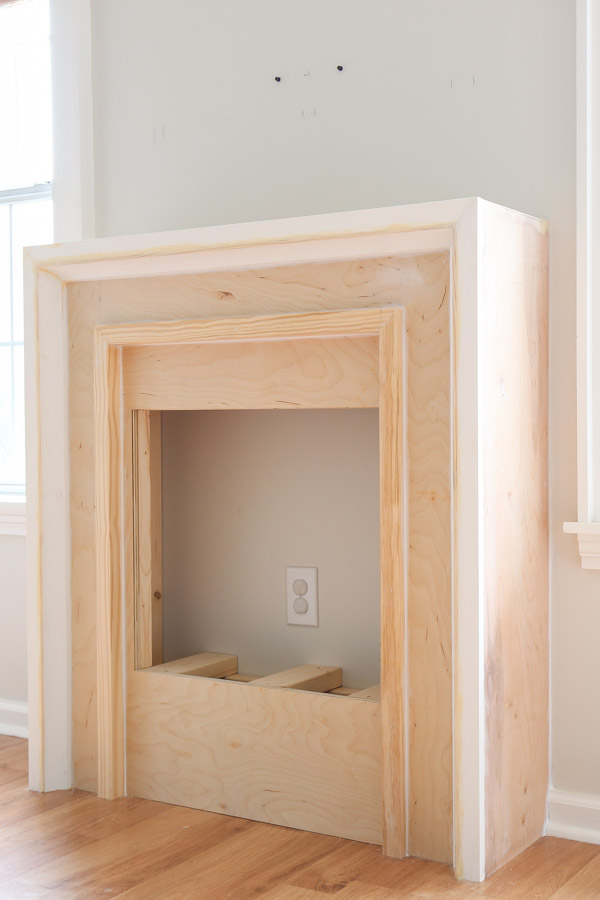
Here is how the completed DIY fireplace surround frame now looks:
Note, we built a similar frame for our DIY shiplap fireplace wall. We also used the same electric insert for that project too, but in a larger size.
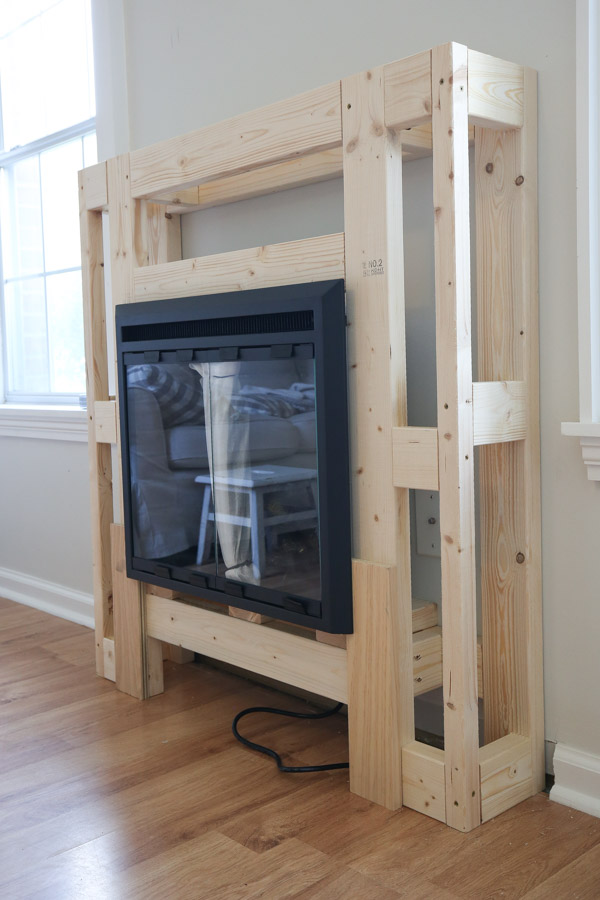
7. Test the electric fireplace insert for a good fit
At this time, we did a test fit of our electric fireplace insert to make sure it was a good fit, with the plug plugged in, to make sure no adjustments needed to be made.
There will be 3/4″ plywood in front of the frame, so I used some scrap wood for the test fit.
8. Make the plywood cuts
Click here for the printable DIY fireplace surround plans which include the cut list and step by step building steps with easy to follow diagrams!
The plywood measurements are listed below but it’s best to measure your actual build for these measurements in case there are any slight variations based on your frame build.
Make the following cuts from the 4ft x 8ft plywood:
- (2) boards @ 8 1/4″ x 20 3/4″ (layer one – sides)
- (1) boards @ 10″ x 39 1/2″ (layer one – bottom)
- (1) boards @ 12 1/2″ x 39 1/2″ (layer one – top)
- (2) boards @ 5 1/2″ x 43 1/4″ (layer two – sides)
- (1) boards @ 5 1/2″ x 28 1/2″ (layer two – top)
Make the following cuts from the 4ft x 8ft plywood with 45 degree beveled edges on the corner pieces:
- (2) 10 3/4″ x 44″ from long point to straight edge (for sides)
- (1) 10 3/4″ x 41″ from long point to long point (for the top)
For the top corners of the plywood, Brandon beveled the edges using our circular saw and a straight edge guide, but a table saw or miter saw can be used as well.
9. Install the plywood over the fireplace frame
Install the side plywood boards (two boards at 10 3/4″ x 44″) with 1 1/4″ brad nails into the 2×4 frame. Then, install the top plywood board (10 3/4″ x 41″) with beveled ends on each side.
Next, attach the bottom plywood board (10″ x 39 1/2″), followed by the side plywood (two boards @ 8 1/4″ x 20 3/4″), and then the top plywood (12 1/2″ x 39 1/2″) with 1 1/4″ nails to finish covering the fireplace frame.
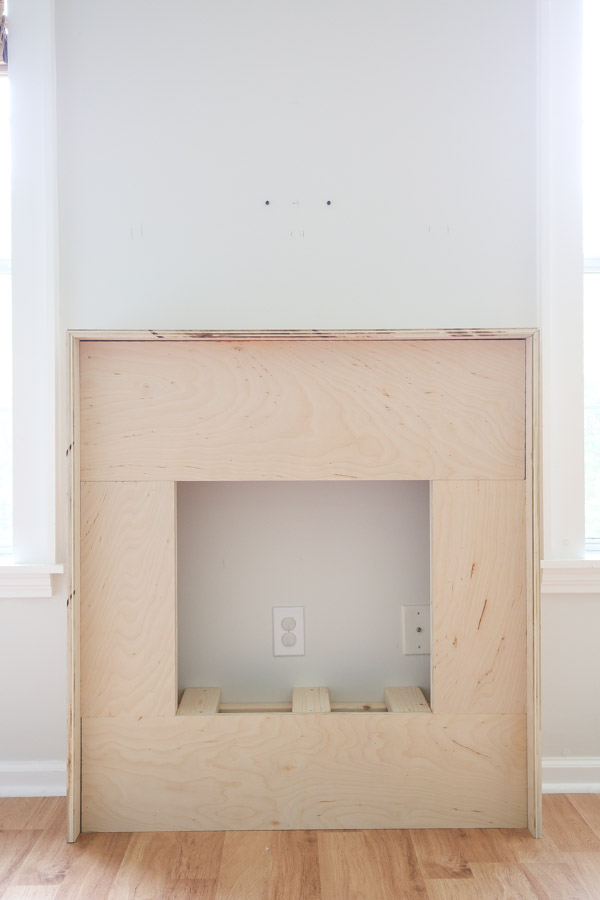
After the first layer of plywood has been attached, install the second layer as shown below. Two boards @ 5 1/2″ x 43 1/4″ for the sides and one board @ 5 1/2″ x 28 1/2″ for the top.
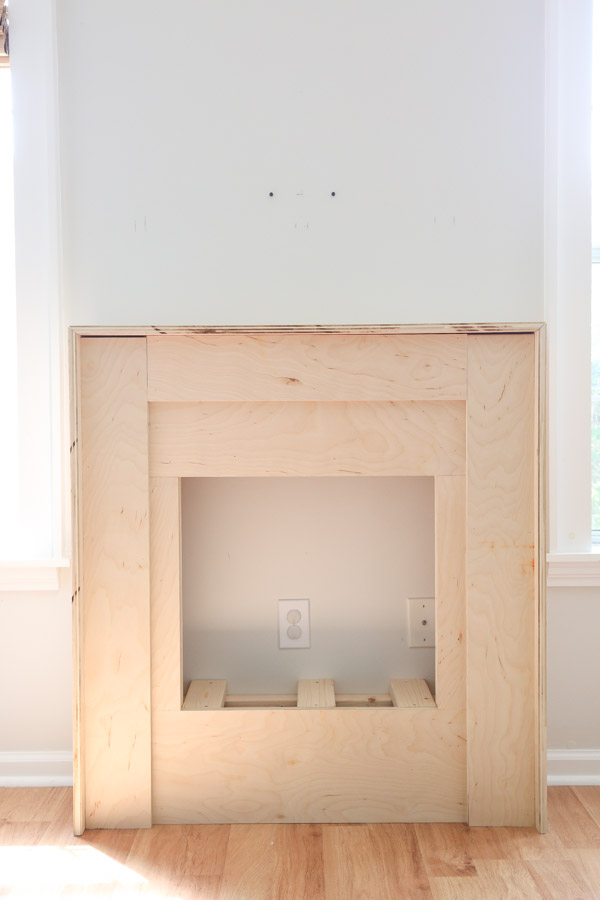
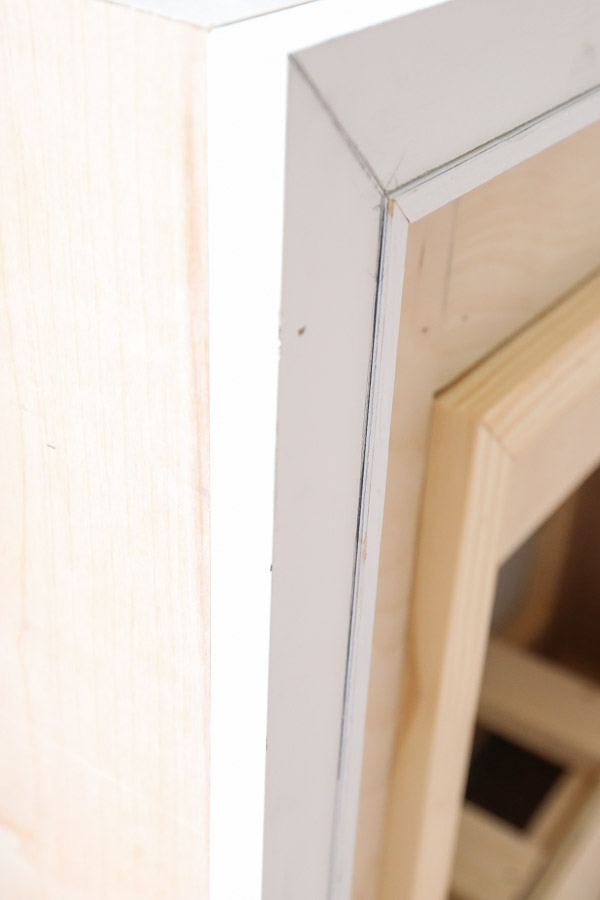
10. Trim out the DIY electric fireplace surround
Now the trim can be installed! I used 45 degree cuts for the trim corners.
The measurements for the trim are listed below, but again it’s important to measure your actual fireplace build in case there are any slight variations in the actual measurements that should be accounted for!
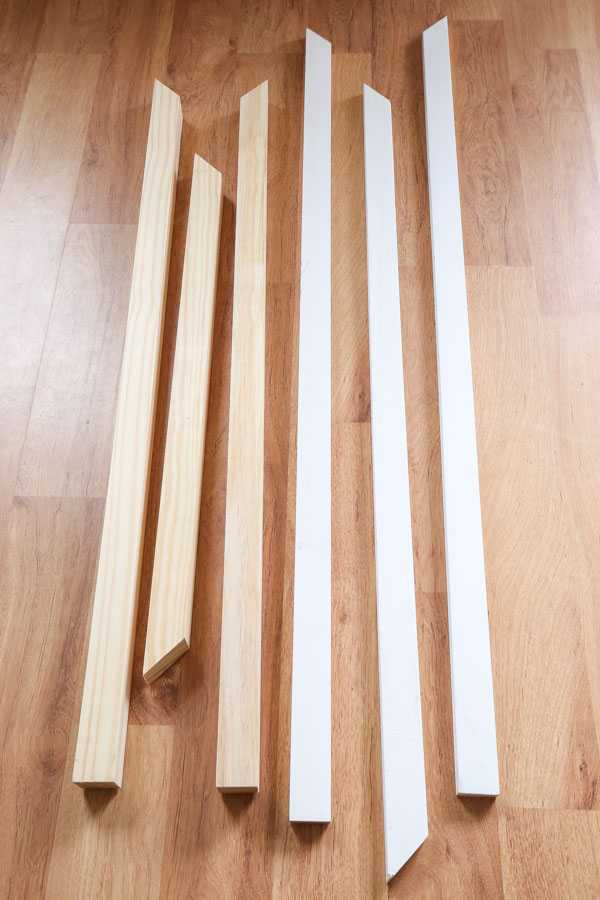
Use a miter saw and make the following cuts from the premium 2×2s, 1x2s, and 2″ molding with a 45 degree cut on one end and a 0 degree cut on the other end:
- (2) 2×2 @ 37 3/4″ from long point to straight edge
- (2) 1×2 @ 44″ from long point to straight edge
- (2) 2″ molding @ 42 1/2″ from long point to straight edge
Make the following cuts from the premium 2×2s, 1x2s, and 2″ molding with a 45 degree on both ends:
- (1) 2×2 @ 28 1/2″ from long point to long point
- (1) 1×2 @ 41″ from long point to long point
- (1) 2″ molding @ 38″ from long point to long point
See all of these steps in action in the DIY fireplace how to video!
First, I installed the 1×2 trim boards on the outer edge into the plywood with 1 1/4″ brad nails and a little wood glue.

Then, I installed the 2x2s with 2″ brad nails onto the DIY fireplace.
The last step was the cove molding, which I confirmed my measurements on these first after installing the 1x2s.
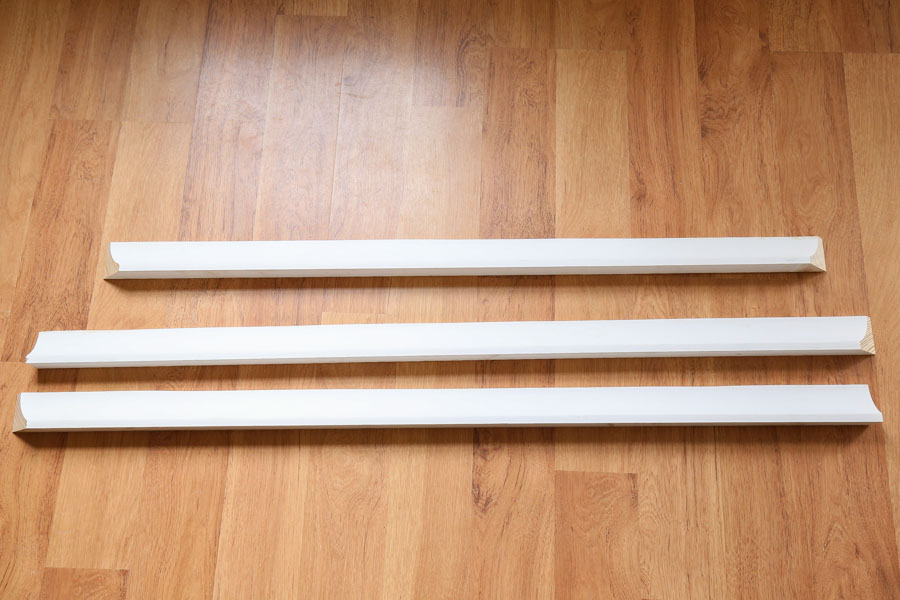
After cutting the 2″ cove molding, but before installing it, I realized it stuck out a little over a 1/16″ past my 1×2 edge.
I didn’t want to sand it down in our living room, so I drew a line on it where it was sticking out. Then, Brandon took it outside and sanded the edge down to the line.
This worked perfectly for making the 1×2 and cove molding perfectly flush with each other and saved a lot of inside sanding work!
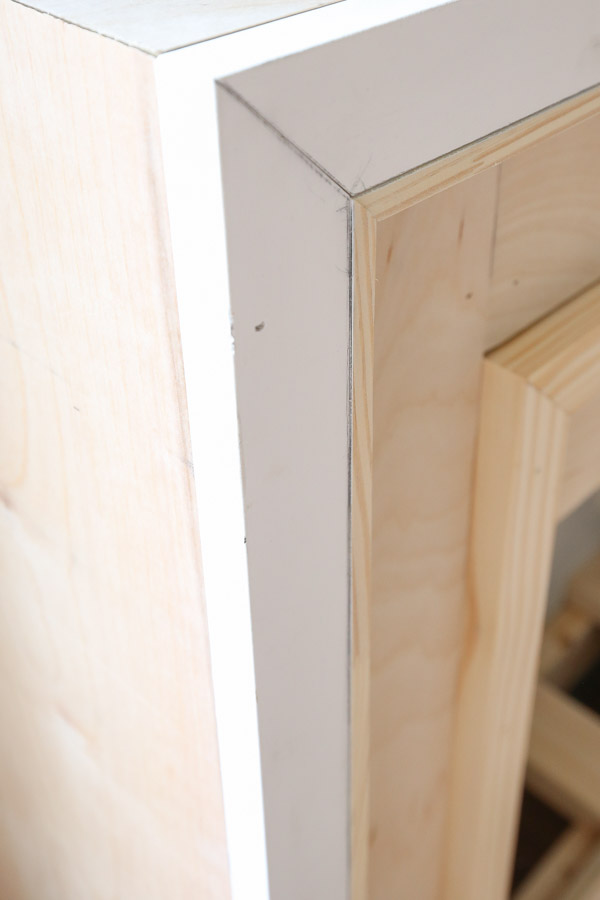
I installed the molding with 1 1/4″ brad nails into the plywood and a few 1″ brad nails into the 1×2 trim.

11. Prep the fireplace for primer and paint
There was a bit of prep work involved with all the molding and cuts on this build.
We filled the nail holes in with spackle. And then we used wood filler on most of the trim seams for a seamless look. Then, all of the wood filler was sanded for a smooth finish.
The last prep step was caulking along the larger gaps and seams between the plywood and trim and wall.
12. Prime and Paint the DIY fireplace
After the prep work was complete, we primed and painted the DIY electric fireplace Simply White by Benjamin Moore in a satin finish. The wall is the same color but in an eggshell finish.
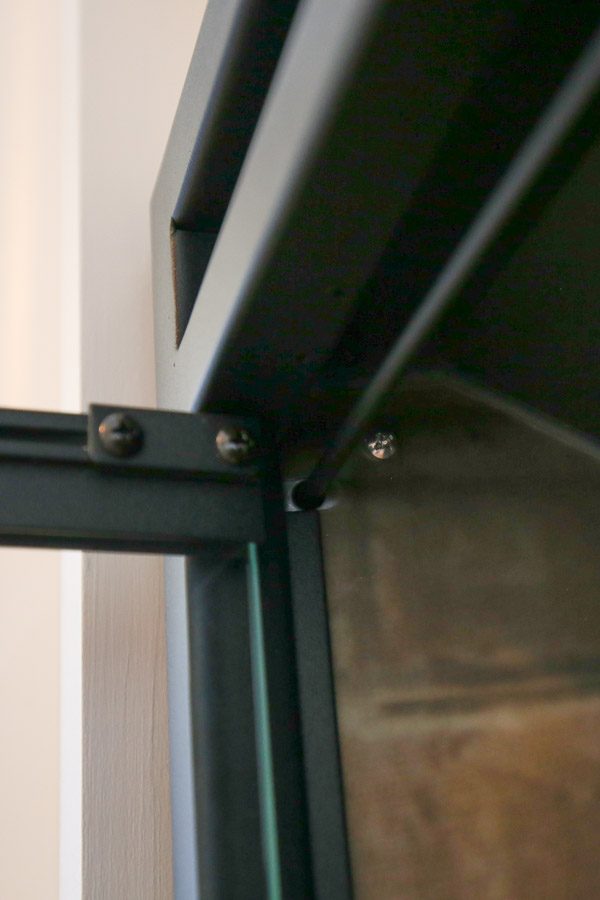
13. Install the electric fireplace
The very last step is to plug in the electric fireplace insert and slide it into the fireplace surround.
We couldn’t find anything in the fireplace insert directions about securing it with screws to the surround so we just screwed ours in through some top holes we found.
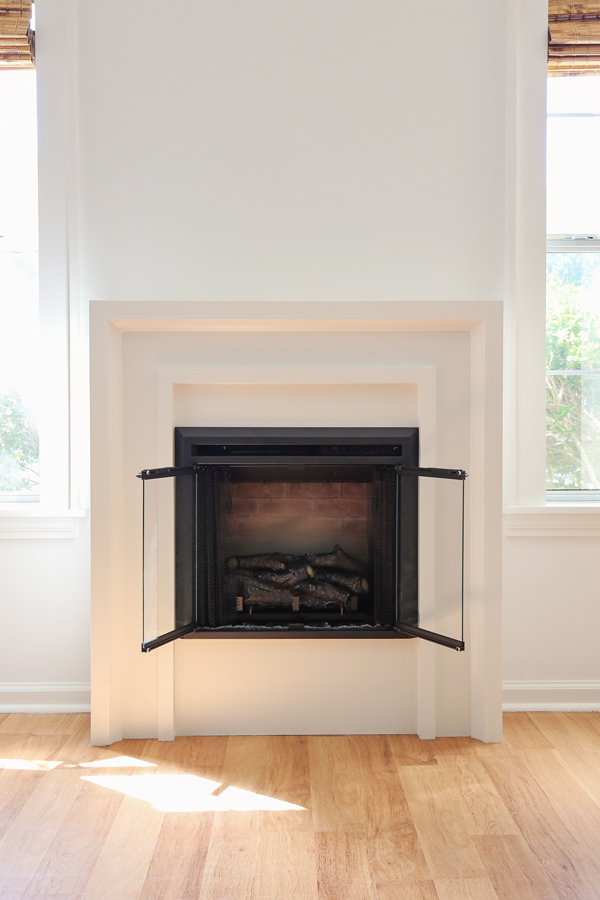
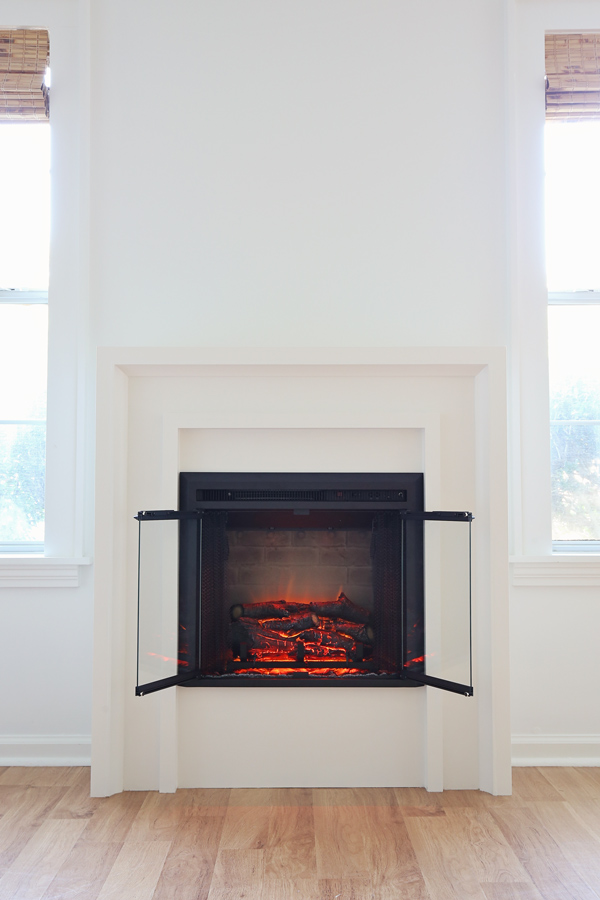
Here it is all painted and finished!
I absolutely love how our DIY fireplace turned out. It’s the perfect mix of modern and traditional/classic! It adds so much coziness to our living room and I love just relaxing on the couch watching it!
And here it is in the morning light, you can really see the fire!
Don’t forget to check out our DIY shiplap fireplace!
Let me know if you have any questions below! Make sure to follow along to see the rest of the living room makeover projects and the big reveal! Follow along on Instagram and YouTube!
Victor Guerrero
Friday 16th of August 2024
Doing some Measurements The front frame is about an inch wider 41.5 and the back frame is 40.5 Mathematically , am I doing something wrong ?
Adrienne Patridge
Monday 4th of March 2024
This is by far the most beautiful DIY fireplace I have found and your instructions are clear, organized, and easy to follow. I want to do this fireplace in our living room. The only issue stopping me is it’s about 7-9 inches smaller in width than what I would need size-wise. I may just do a bigger insert. Is there an easy way you can tell me how to adjust my measurements to make the frame or insert area bigger? I don’t know if it’s easy to make the measurement adjustments for my space or complicated. I can’t wrap my head around how to make the changes. Thanks for any feedback on this issue.
Barb Lawry
Friday 10th of November 2023
Could the fireplace surround be stained instead of painted?
Angela Marie Made
Friday 17th of November 2023
Yes it could!
Kaely
Friday 5th of May 2023
This is gorgeous! I’m thinking of building one for my bedroom and have the perfect wall and outlet for it!
Angela Marie Made
Thursday 11th of May 2023
Oh perfect!! A fireplace in the bedroom would make it so cozy!
Raychel
Sunday 5th of March 2023
I'm ready to take this project on! But just so I don't put too much pressure on myself, can you give me a realistic time-frame of how long it took you to complete? Also, what was the most challenging part for you during this build?
Angela Marie Made
Tuesday 7th of March 2023
It's hard to say because taking photos and videos of everything dramatically increases the project time. I would say it's doable in a weekend or long weekend, but if you're a total beginner it could take two weekends to complete. This was a pretty easy build since it's really just working in layers, the most challenging part was deciding how I wanted it to look haha!