Learn how to install DIY garage ceiling storage shelves and adjustable wall organization racks for garage wall storage!
Disclosure: This post is sponsored by Lowe’s Home Improvement. As always, all words and opinions are my own.
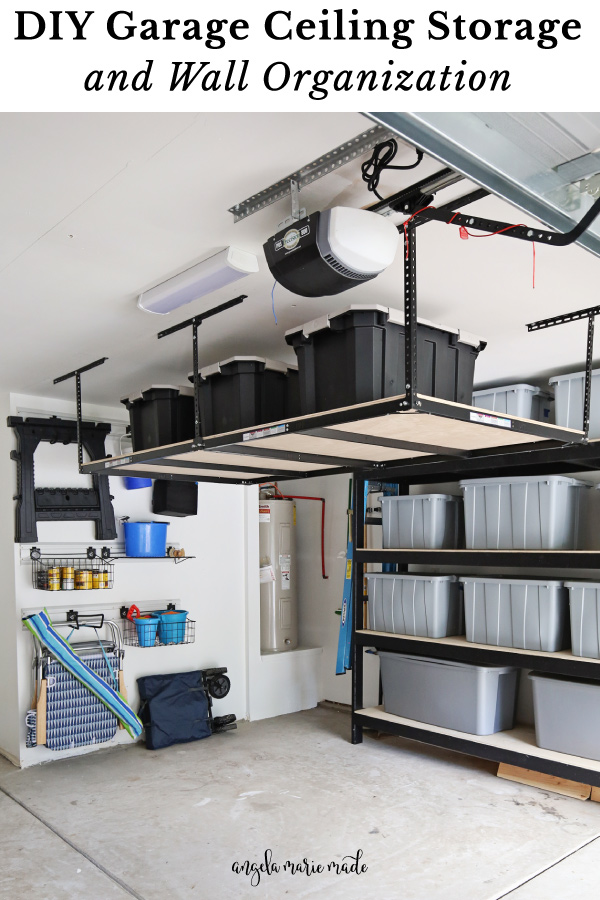
We are continuing our garage storage and organization this week with adding DIY garage ceiling shelves and wall storage!
Previously, I shared 9 easy DIY garage organization & storage ideas on a budget, which included our DIY garage shelves. But, that was just one side of our garage.
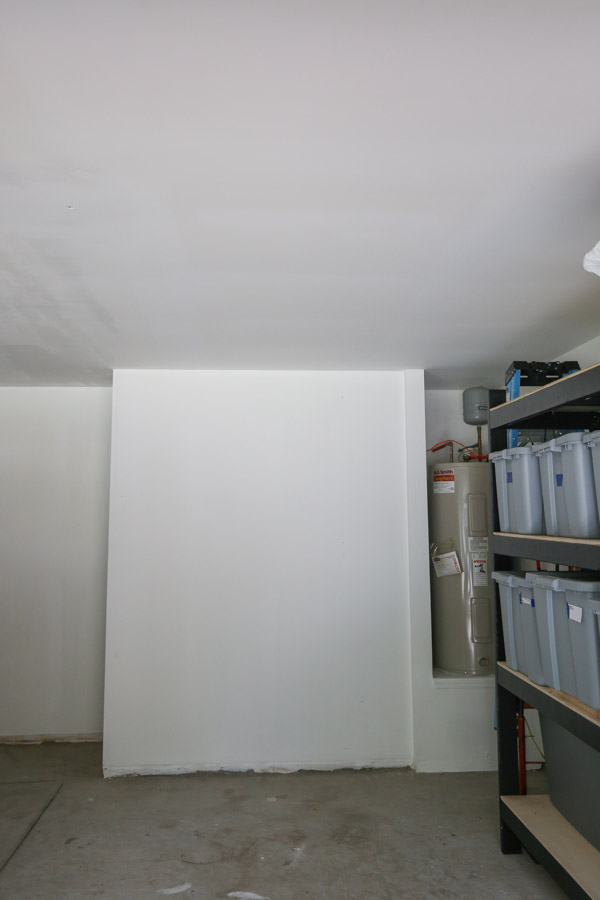
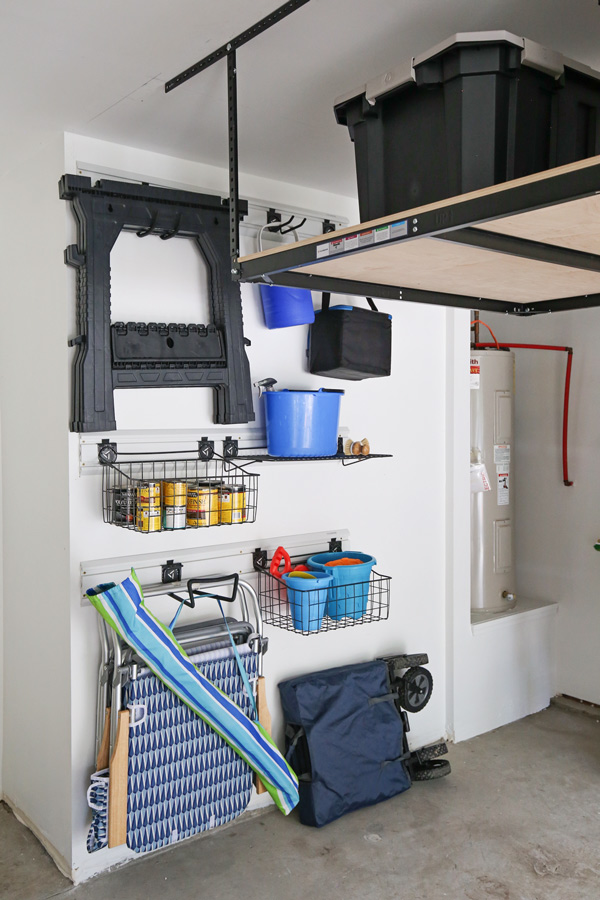
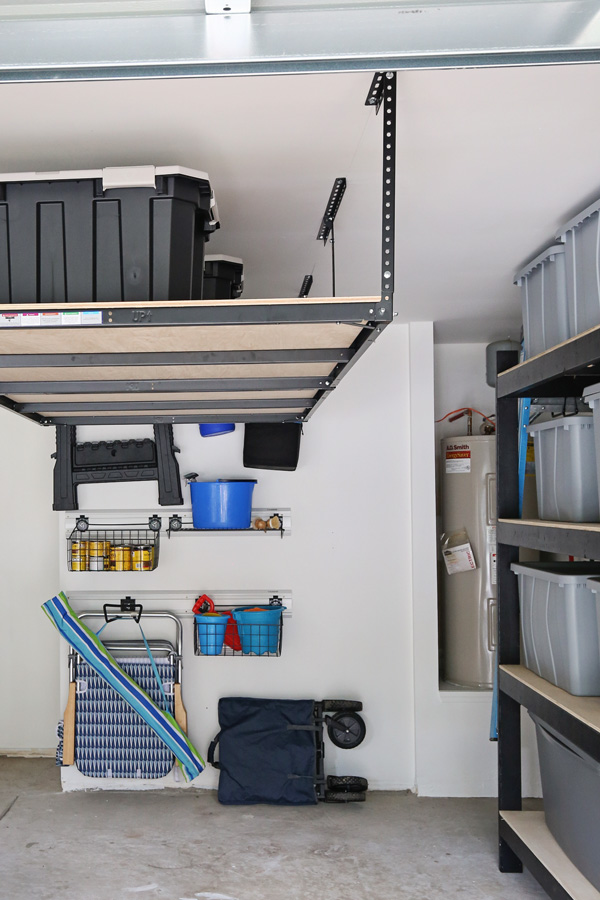
We needed to add even more storage space and organization on this blank wall for the rest of our garage items! To help maximize space, we decided to add overhead garage storage on the ceiling and more wall storage!
Here is a BEFORE and AFTER:
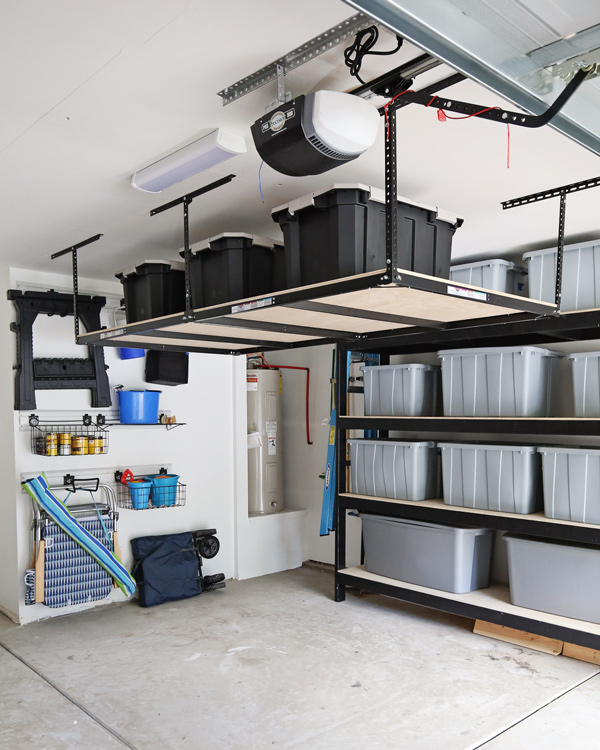
Below I am sharing the details about our DIY garage ceiling shelves and wall storage as well as how to install them both! They are both an easy DIY project.
Note, this post contains some affiliate links. I may earn a commission if you shop those links (at no cost to you). Thank you for supporting my small business. For more info see my disclosures here.
Overhead Garage Storage Steel Frame Kit
While planning for this project, I considered building the DIY garage ceiling shelves with a 2×4 frame. But, while researching, I discovered this overhead garage storage steel frame kit at Lowe’s Home Improvement.
It was perfect for this project because it allowed us to know the maximum weight capacity the ceiling shelves can hold with the steel ceiling frame (600 pounds), which is very important to know when storing things from the ceiling!
With a max weight capacity of 600 pounds, this ceiling storage is great to use for heavier items.
The frame gets assembled and then you add your plywood deck to it to create the garage ceiling shelves! Lowe’s does have this option too with the wire rack deck if you prefer.
I loved the idea of using plywood on the black steel frame. Not only does it match the look of our DIY garage shelves that stand on the garage floor, but it looks so much prettier and tidier from below when you look up!

Also, the plywood provides a smooth surface for sliding things. Plus, you can stain it too if you want!
Lowe’s always has helpful products like this that make DIY projects more doable for DIYers! And they keep it affordable too!

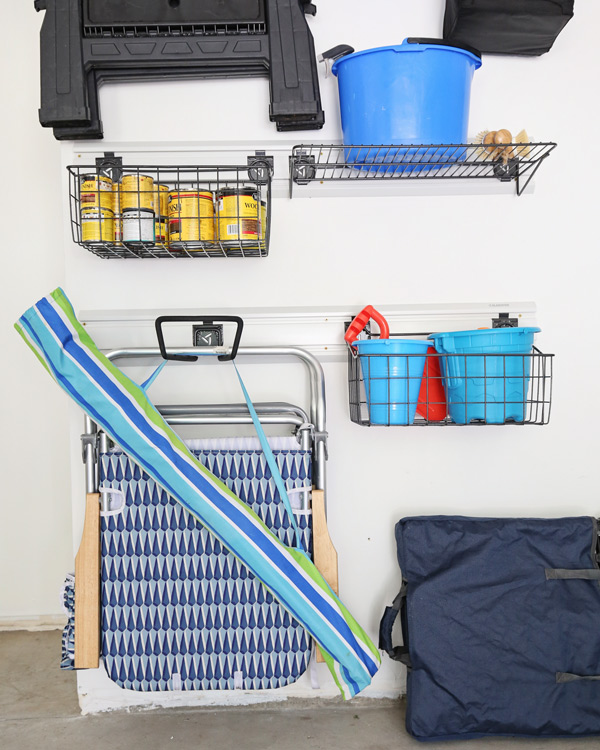
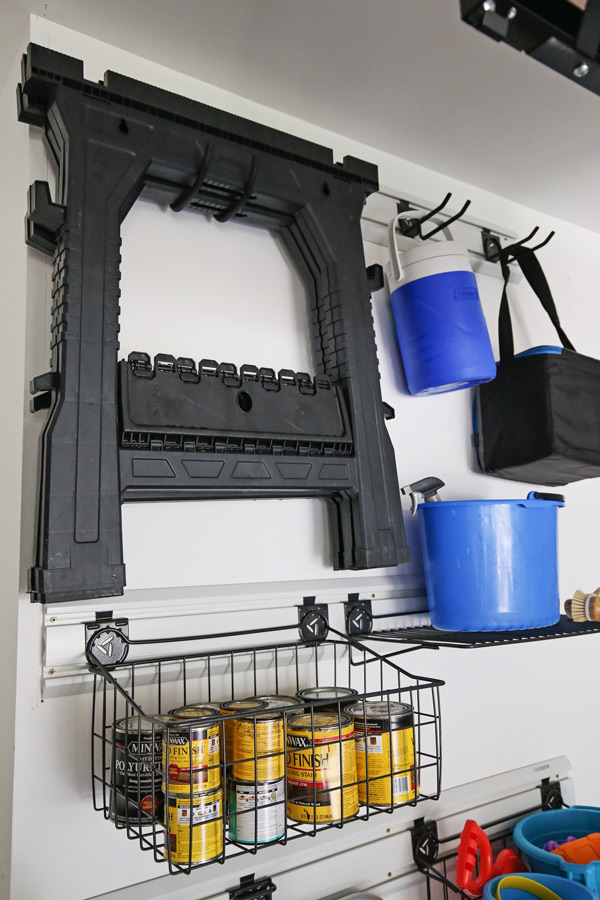
Wall Racks for Garage Storage and Organization
For a long time, I had been wanting to install these heavy duty wall racks by Gladiator called GearTrack in our garage. They are like shelf slats.
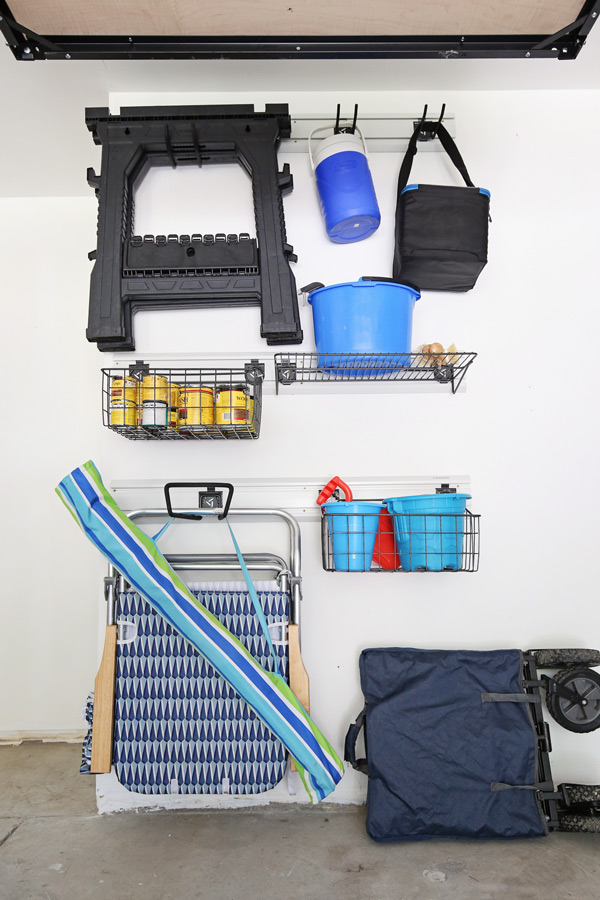
This entire wall was the perfect spot for them.
Lowe’s carries an entire section at our local store of Gladiator products, including the wall racks and all of the coordinating organizers, shelves, baskets, and hooks to go with it. The storage options are endless with these versatile organizers!
It was so helpful to be able to view all of the different organizer options at my local Lowe’s store and quickly grab what I needed to go with the wall tracks.
I also love that you can move the organizers around if you need to without leaving holes in your wall or messing with wall anchors!
The wall tracks are very easy and fast to install. I am sharing how below!
DIY garage ceiling storage shelves
Note: Below is a tutorial overview for the ceiling shelves which includes our tips and lessons learned. Make sure to follow the detailed instructions that are included with the overhead garage storage rack when installing the frame!
Materials
Tools
- Drill
- Phillips screw driver
- 48″ level (optional)
- 1/2″ drive handle ratchet (optional)
- 1/2″ drive, deep socket 1/2″ (optional)
- 24″ framing square (optional)
- Tape measure
- Stud finder
***Tip: Get your 4ft x 8ft plywood cut at the store into two 4ft x 4ft sheets for easy transportation and easier installation at the end. Also, 1/2″ or 3/4″ thick plywood may be used.
1. Plan out the garage ceiling storage rack location
The first thing to do is plan out where you want to install the garage ceiling rack. This step is the hardest part of the installation.
One of the benefits of this ceiling rack is that it can be installed parallel or perpendicular to the direction of your ceiling joists as shown in this photo below from the instructions:
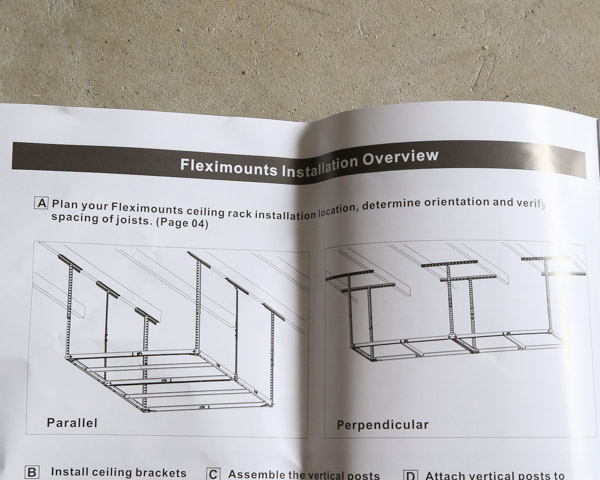
Also, the ceiling brackets are 26 inches to span ceiling joists that are spaced 24 inches apart.
You can use a stud finder to determine your ceiling joists location. But, sometimes stud finders can be wonky on ceilings, so here are my tips to confirm things:
Tips: If possible go into your attic to determine which direction your joists run. If you don’t have attic access, drill a small hole into the ceiling drywall to confirm the stud finder’s accuracy!
Here are a few more tips to consider when planning installation besides ceiling joists:
- Consider the height of your garage and if you plan to park a car under the ceiling storage. The ceiling rack is adjustable from 22″- 40″
- Consider if you want to allow room for nearby wall storage or other shelving. We made sure to leave easy access and clearance for our other surrounding storage.
- Leave enough room to slide storage items on and off of the DIY garage ceiling shelves
- If your garage light is in the way, consider replacing it with a smaller light or changing the direction of it. We did both!
- Make sure to stay clear of the garage door when it’s opened
- If you have space above the garage door, this is a great storage spot to install the ceiling rack too
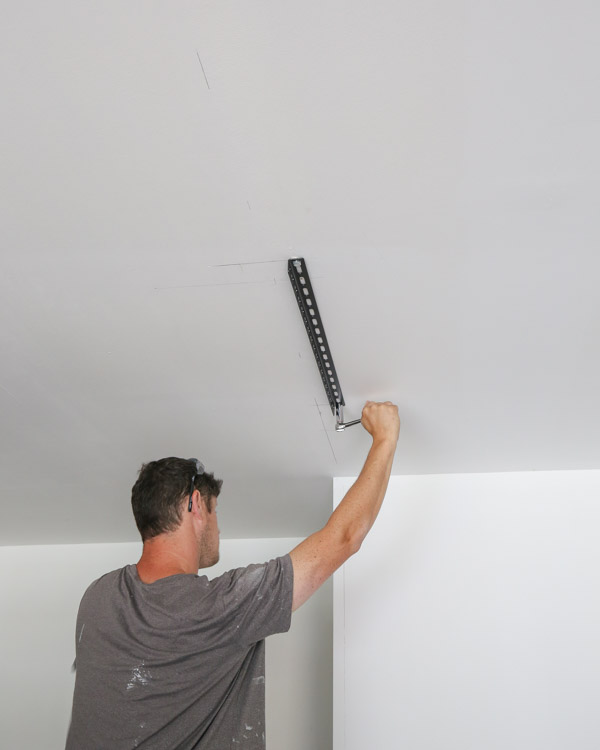
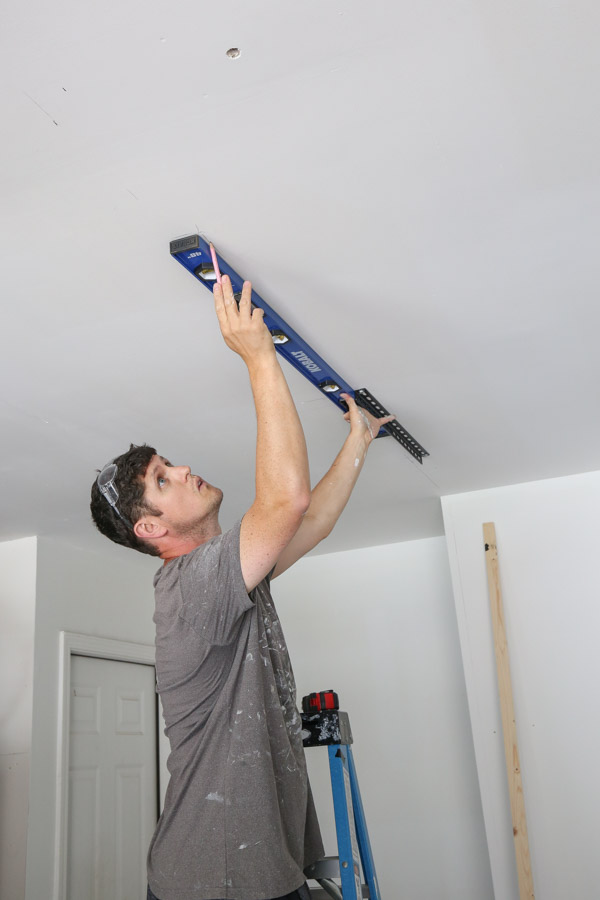
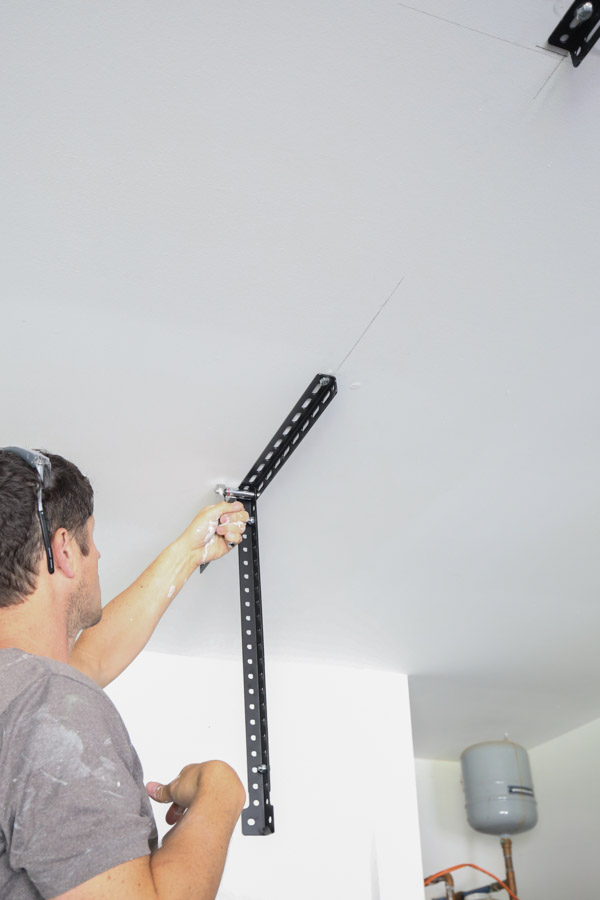
2. Install the ceiling brackets into the ceiling joists
As mentioned above, follow the step-by-step instructions that came with the rack.
But, to speed this process up with installing all of the lag screws into the pilot holes, Brandon used a 1/2″ drive handle ratchet and deep socket.
📩 Want to Save This?
We also switched to a socket bit on our drill as well to go even faster!

Also, because the brackets needed to be spaced 48″ apart from each other on center, a 48″ level came in handy to speed this process up with marking the bracket locations. You could also cut a scrap board to 48″ as well!
For the second row of brackets, Brandon also used a 24″ framing square to help ensure squareness too.
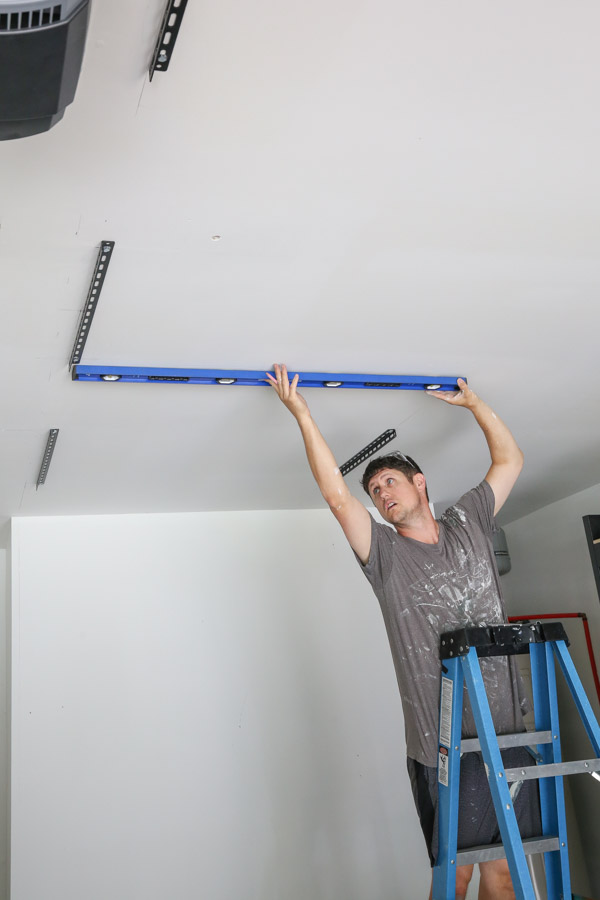
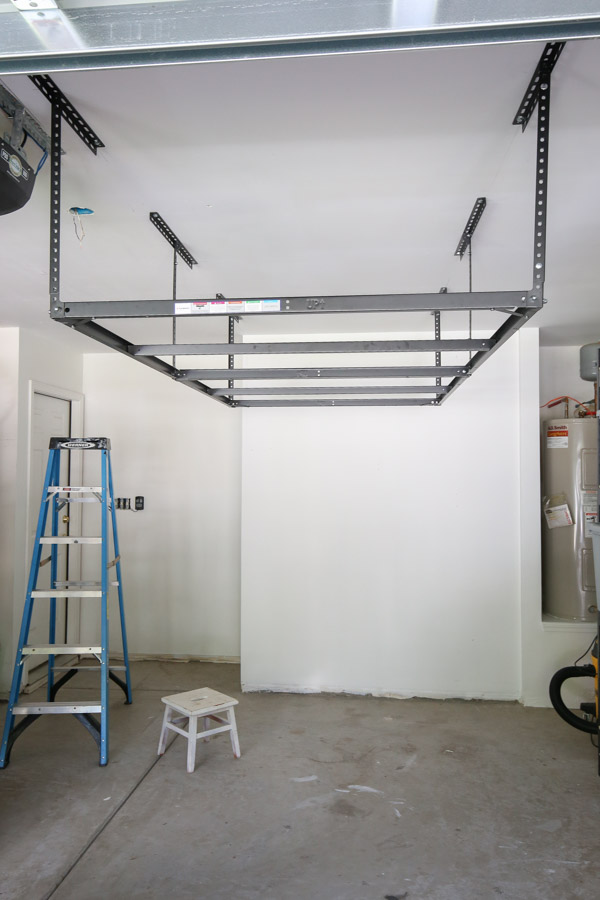
3. Assemble and attach the vertical supports to the ceiling rack
There was a lot of ratcheting involved with assembling everything! So, rather than using the tool included with the kit for this, we use the handle ratchet again to speed this step up!

4. Assemble and install the shelf frames to the vertical support posts
For some reason, I initially thought the shelf frame would all be connected in one 4ft x 8ft foot piece, but it does not. It gets assembled in two 4ft x 4ft sections, then it’s installed to make one long frame on the ceiling rack.
Make sure to have a helping hand to help for this installation step and the next step!
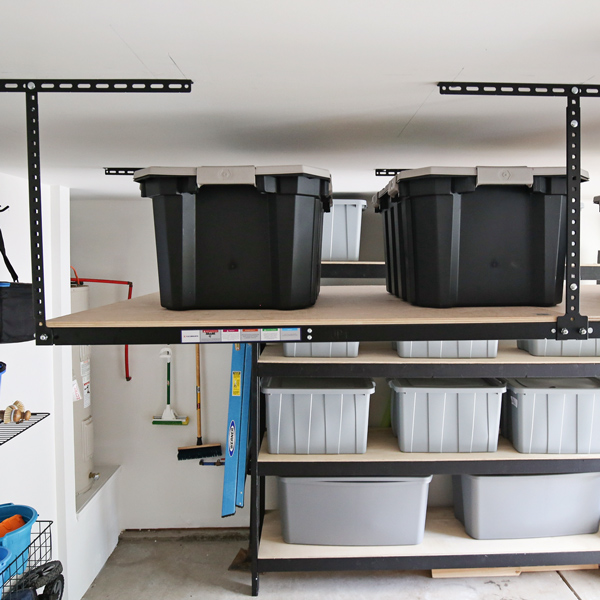
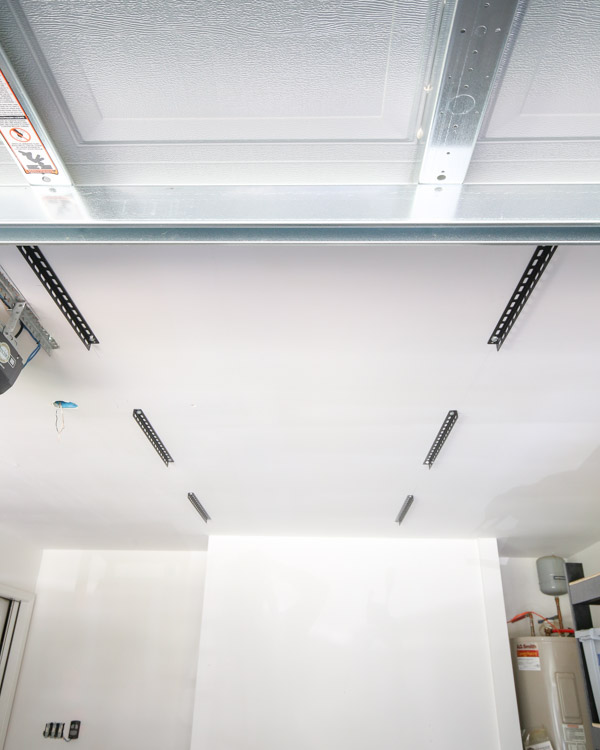
5. Install the plywood to complete the DIY garage ceiling storage shelves
Time for the most exciting part! It is helpful to install the 4ft x 8ft plywood cut in two 4ft x 4ft sheets. You won’t see the cut seam as it is hidden by the steel frame.
Also, I recommend getting a nicer, sanded grade of plywood rather than particle board because it looks so much nicer from below.
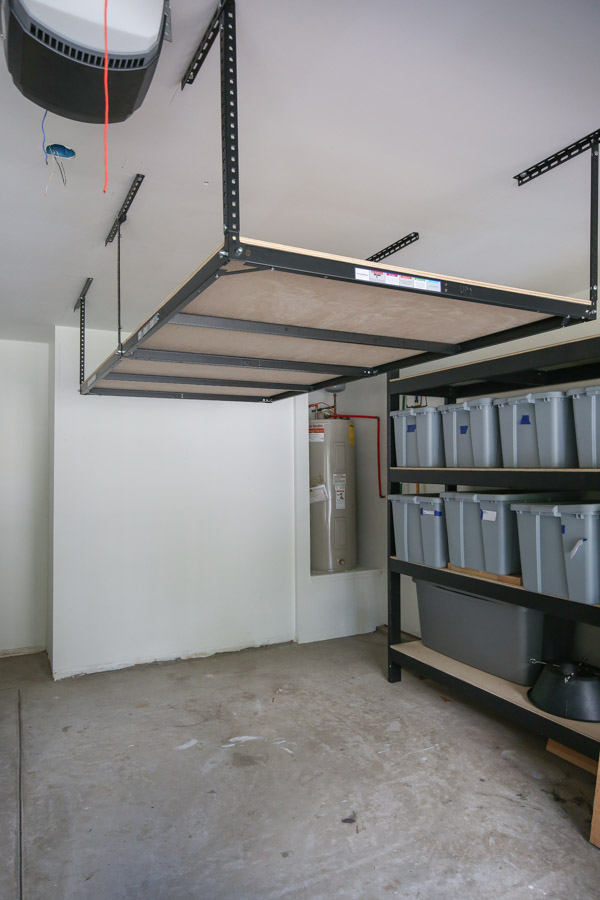
Note, at this point we realized that we installed the last ceiling brackets 1/4″ off, which caused our second plywood sheet to not fit perfectly.
To fix this, we just ripped a 1/4″ off of our plywood end with a circular saw. Fortunately, this was an easy solution to make it work rather than having to readjust the end ceiling brackets.
How to install wall track garage storage
Note, I’ve listed below all of the organizers I used on my wall tracks, but there are more options available at Lowe’s!
Materials
Tools
- 2″ Wood Screws
- Drill
- Level (we used a 48″ Level)
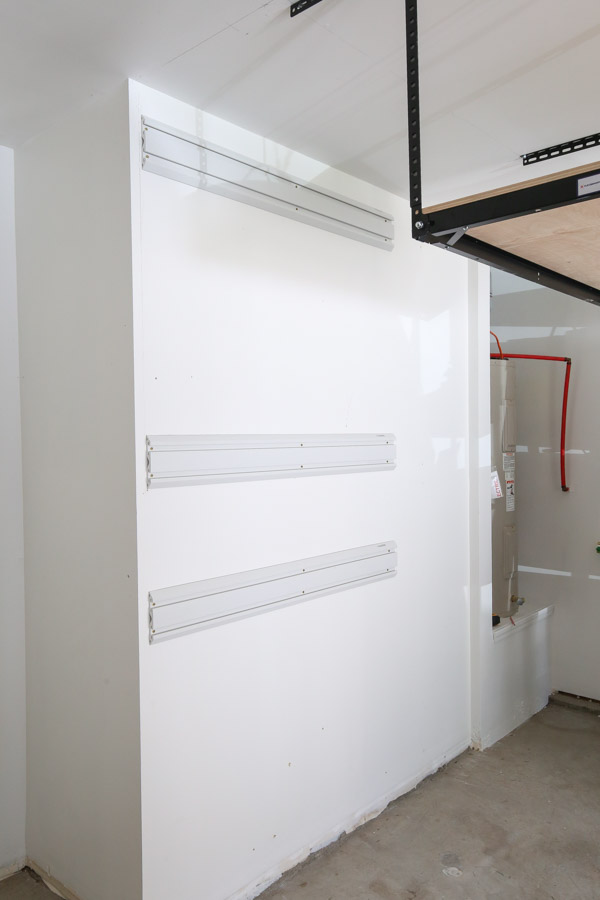
1. Determine the wall stud locations and placement of the wall tracks
Use a stud finder to mark the wall studs. *The GearTrack needs to be installed into a wall stud at the beginning and end of it.*
Determine the final placement of the GearTrack on the wall considering what you may hang from it.
2. Use a level and drill to install the wall tracks
For this step, I found it easiest to hold our 48″ level up to the wall and draw a level line where we wanted the top of the wall track to be.
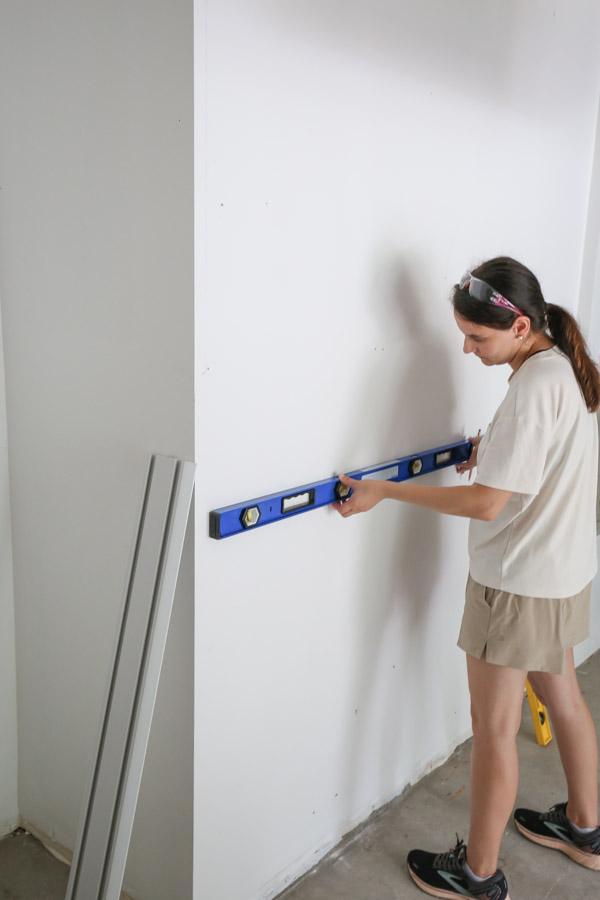
Then, I drove a screw through the small slot grooves into the wall studs with 2″ screws to secure the wall track to the wall. Super easy!!
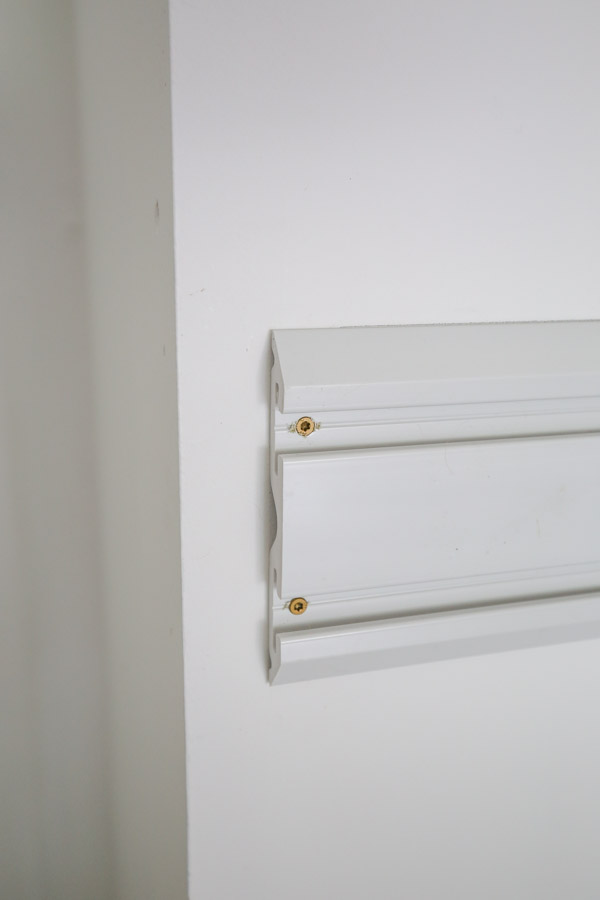
Note, you can cut the GearTrack if needed with a miter saw or circular saw.
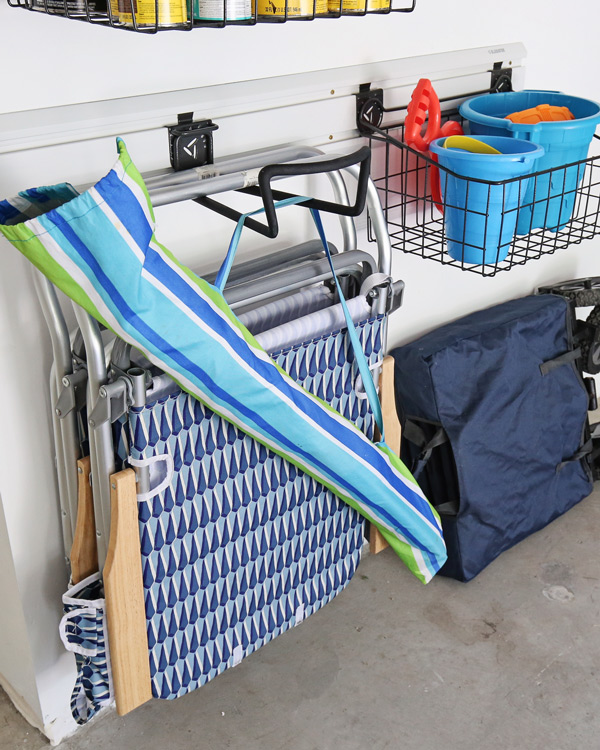
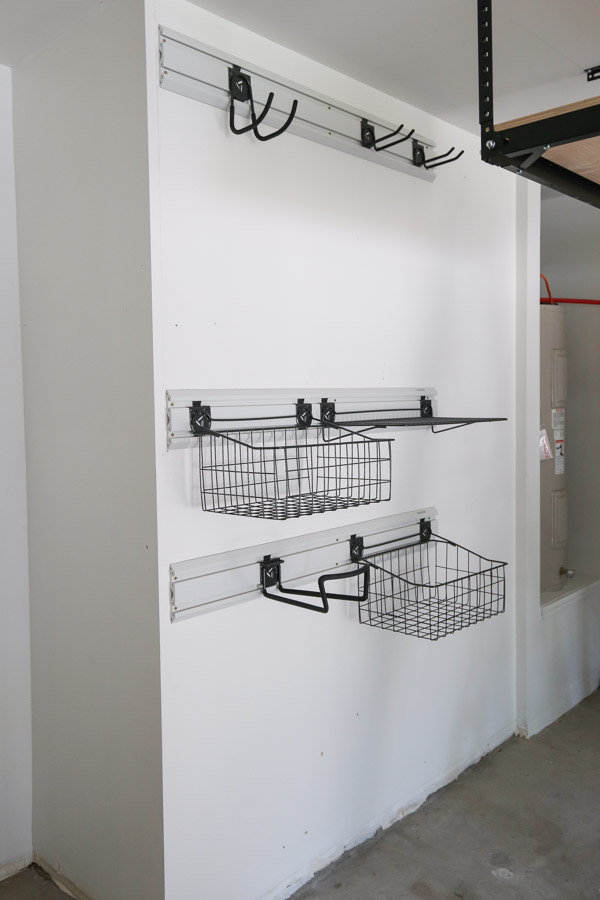
3. Install the organizers on the wall tracks and organize garage items
The last step is to snap the organizers onto the wall tracks. They can be moved around if needed!
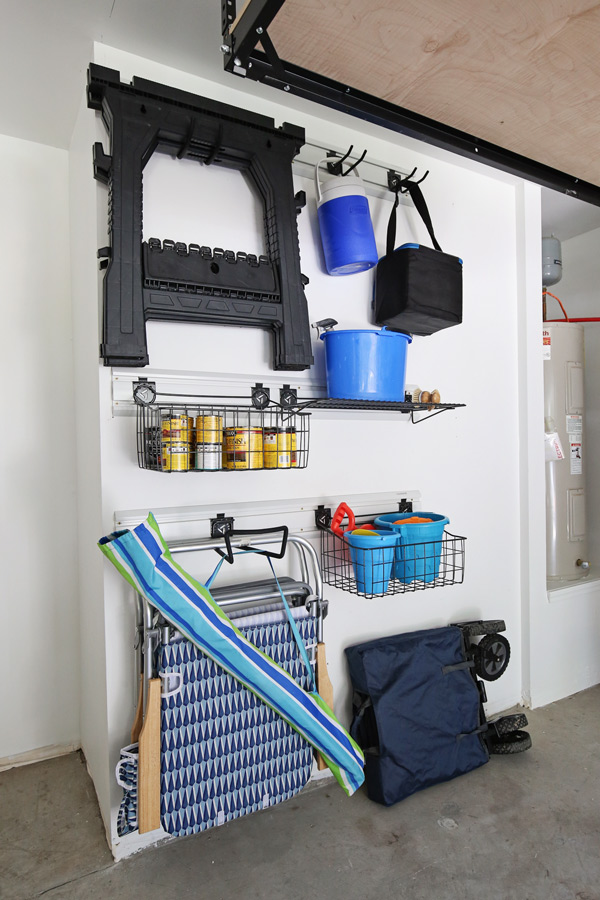
I started to store and organize our garage items on the garage ceiling shelves and wall track organizers! I’m not totally finished yet, but I love all of this new functional and pretty looking storage and organization for our garage that is helping us tackle the garage clutter!
It is going to clear up a lot of space now in our garage! I placed 3 of these plastic storage bins on the ceiling shelves, but eventually we are going to store Brandon’s kayak up here, a few other longer items, and seasonal items.
I hope these DIY garage ceiling storage shelves and adjustable wall organization racks for garage wall storage have been helpful in providing garage storage ideas for you! They are both a great way to maximize vertical space.
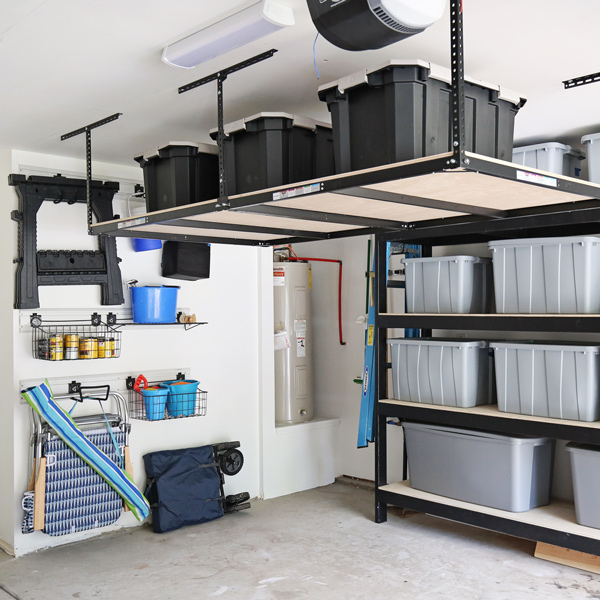
We are almost finished with this garage space, we still have the workshop side to complete. But, our garage storage side systems are complete and it’s looking like an organized garage now!
Make sure to check out our 9 Easy DIY Garage Organization & Storage Ideas on a Budget and our DIY garage shelving for more DIY garage organization ideas!
Follow along for my latest projects and sneak peaks on Instagram, YouTube, Pinterest, and Facebook!