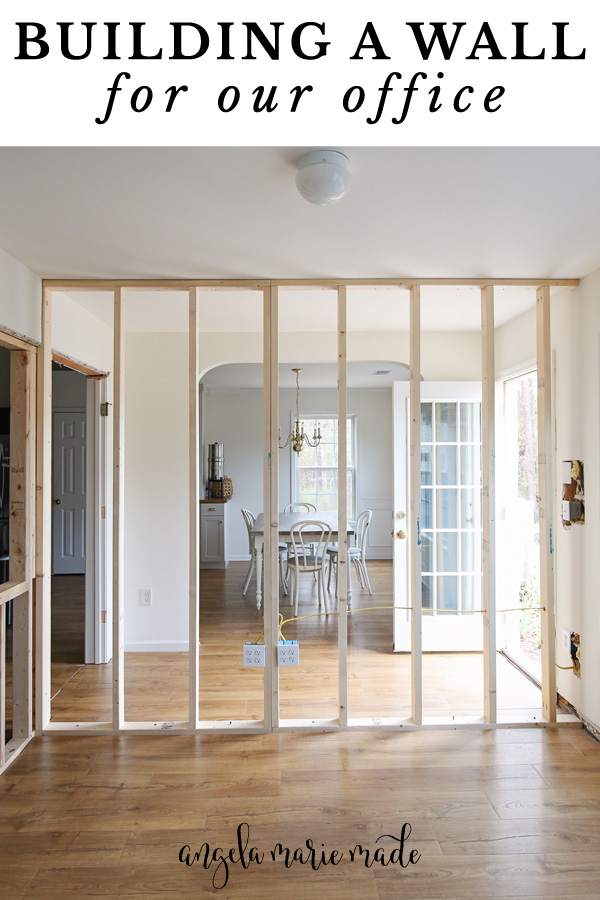
Learn how to frame a wall and how to build a wall in an existing home that is already constructed! This how to build an interior wall tutorial shares the steps and lessons learned with framing a non-load-bearing wall.
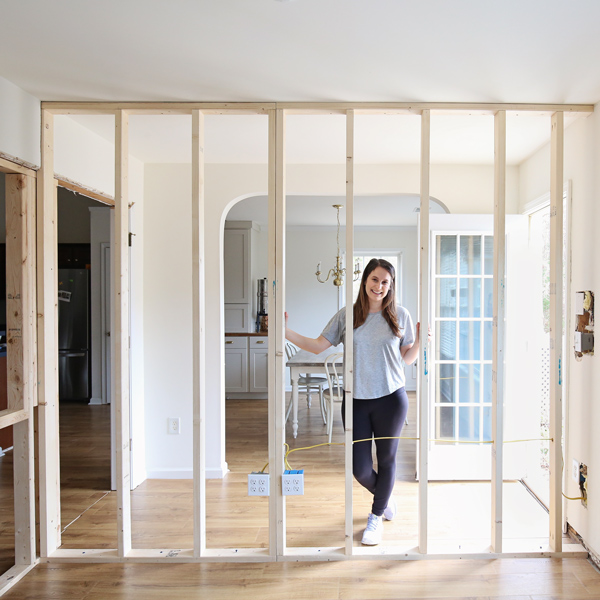
I can’t believe we did it, but Brandon and I built a wall ourselves! We actually built TWO walls! One large wall and then a smaller, corner wall with an interior window – what?!
Let me explain the back story on why we built these walls ourselves instead of hiring it out…
Why we needed to build a wall
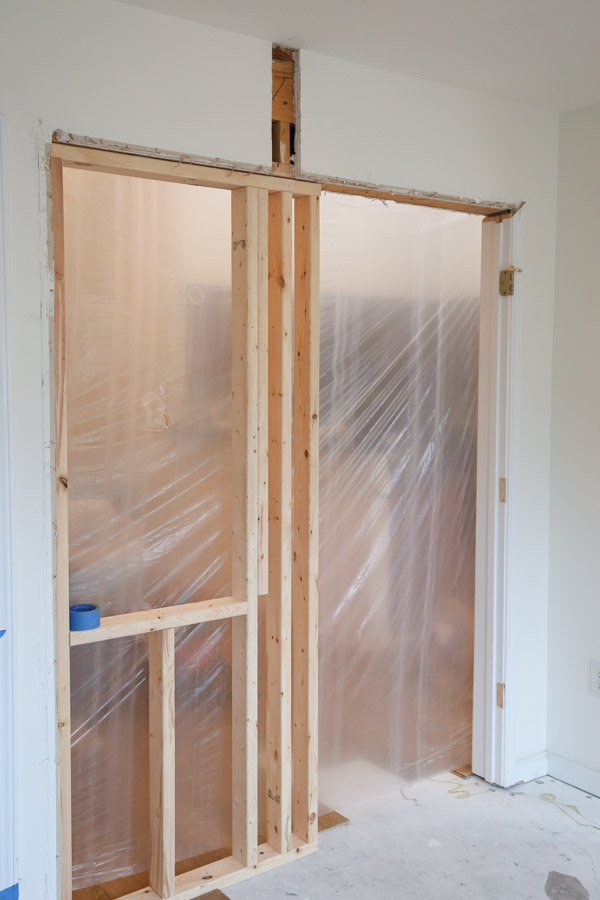
When we bought our new home this past summer, one of the first projects we new we needed to tackle was building an interior wall to create an office space.
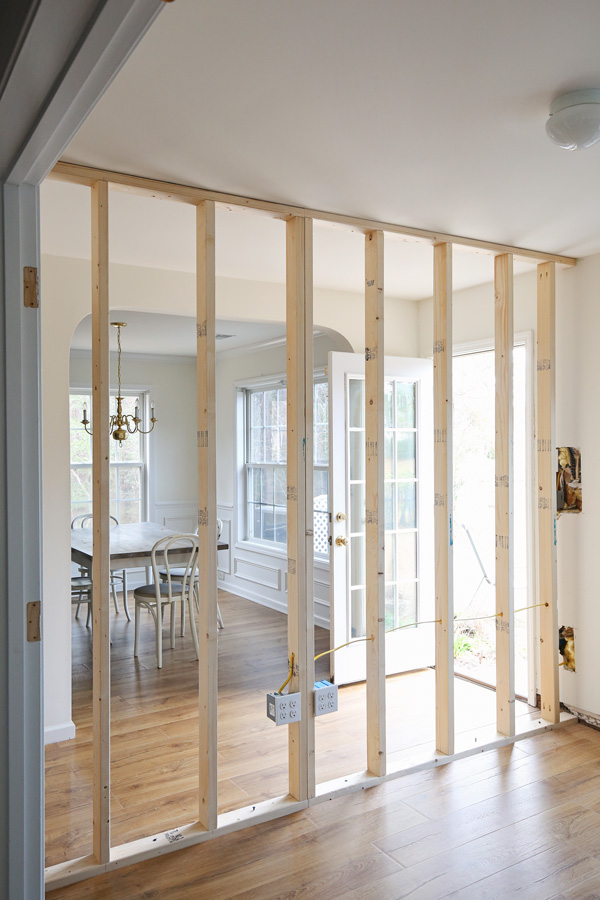
Our home has an extra bonus space that’s open and connected to our living room, dining room, and back door. The space just made no sense to me and it was obvious it needed a wall to close off the space from the back door and dining room.
We use this space often for our home office and I was getting really tired of it being open to the main living area. I also wanted to create another function with the space by adding either a guest bed (like a murphy bed) or a play area for our kids.
By adding a wall we could then create two functions with the space by having it enclosed.
Why we chose not to hire out
We originally wanted to hire this project out. We have never built a wall nor framed a wall out before. And I really had no interest in learning…at first!
Brandon and I have completed a lot of DIY and home improvement projects, but something about building a wall and framing a wall seemed a bit intimidating.
But after trying to find a reliable and affordable contractor to install our new flooring, we both wanted to avoid that major headache again. That project also ended up costing way more than we were originally quoted.
Further, the cost for home renovations these days is expensive. Contractors are in high demand, especially the good quality ones and you have to wait a while for them to even start, plus the time for them to finish.
I really can’t stand depending on others for home improvement projects when I know I can do something quicker, cheaper, and the way I want it (most of the time)….hence why I DIY haha!
Plus, with all of our furniture and things already being in our home, I knew that I would keep the space cleaner throughout the construction phase than any contractor would.
Who wants construction dust all over their house and furniture? Especially with kids and a dog.

Because the walls we wanted to add were not load bearing, I knew we could figure this project out and do it ourselves.
So, I did a lot of research on Google and YouTube to learn how to frame a wall and how to build an interior wall in existing room.
DIY Resources on how to build a wall
What I quickly discovered was that there is just not any straightforward tutorials on how to build a wall frame that explain ALL parts of the project well.
There is a lot of info on framing a wall in a home under construction that is just all open framing, and no walls, electric, floors, etc. has been installed yet.
The best resource I found was this how to frame a wall video by This Old House. It explains it in a really easy to understand way. And I used it the most to help guide us on this project.
Although, again it shows how to frame a wall in a home under construction, not an existing home. But, I definitely recommend watching it! Also, check out some other videos on YouTube on this topic.
When to hire the professionals for building a wall
Originally, I wasn’t going to even create a how to tutorial on this topic, but after completing the project, it can be totally doable for others.
And I feel like there is a lot of information based on my experience that I can share that is just not easy to find elsewhere that would be helpful for others. So, I am sharing our experience and how we built our wall.
Keep in mind this was our first time building a wall and this is just my experience!
*If you are unsure about anything with building a wall, local building codes, or if it’s a load bearing wall, hire the professionals! Get a framing contractor, structural engineer, or other professional!*
We ended up having to hire an electrician to move a light switch and add outlets to complete our wall. And it was definitely worth the money and extra time to have it done right!
They were exactly in the way of where our wall was being installed:

Note, this post contains some affiliate links. For more info see my disclosures here.
How to Build an Interior Wall in Existing Room
Material quantities will vary based on your actual wall dimensions!
Materials
- 2×4 @ 8ft (we used 10ft lengths too)
- 2 1/2″ and 3 1/2″ wood screws (we used these self tapping screws)***
- 1/4 in. x 3 3/4″ Concrete screws***
- 3/16″ x 5 1/2″ Masonery drill bit***
- Plumb bob
- Chalk line
- Speed square (optional)
Tools
- Drill
- Impact Driver (optional but very helpful)
- Miter saw
- Clamps
- Shop Vac
- Prybar
- Utility blade
- Tape Measure
- Stud finder
- Dremel tool (optional)
Note: This post will focus on the framing part of the wall and materials above are for framing. At the end I will explain what material we will be using to complete the wall build!
Note 2: If you own a framing nailer and concrete nailer, you can use those for installation of the wall. We do not so we used self tapping screws and concrete screws and a special masonry drill bit to install the concrete screws into our floor.
Building a Wall Video Tutorial:
Watch the entire process on how we built a wall to create our office and all of the lessons learned!
Subscribe to my YouTube Channel here!
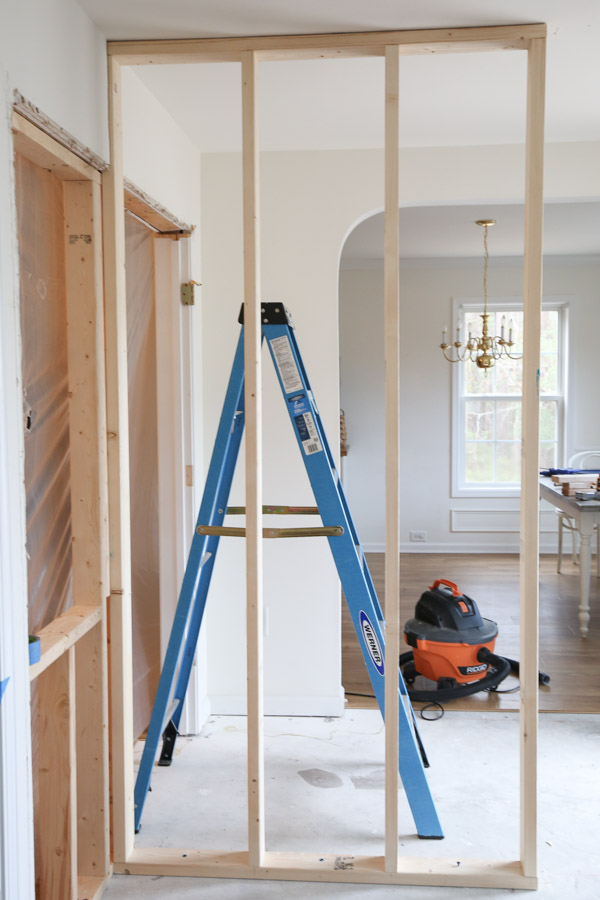
1. Determine the ceiling joists location and wall placement
First, one of the most important steps for how to build a wall is to determine the direction of your ceiling joists.
Ideally you want your ceiling joists to run perpendicular to the wall you want to build so that the wall frame can be securely attached to the ceiling joists where you want it.
If the ceiling joists run parallel, then the wall needs to be installed under one of the ceiling joists to keep this install simple and to avoid things getting more complex.
The best way to know how your ceiling joists run if you have drywall already installed is to go up into the attic and see. However, when we did this, there were layers and layers of insulation and we could not tell.
The next way is to use a stud finder, which is what I did. But, my stud finder ended up giving me several false readings.
I thought that my joists ran perpendicular, but when we were ready to install the new frame in step #9, I realized they did not.
I don’t know why my stud finder gave me false readings, but sometimes it does.
Fortunately, one of the readings was correct, and we determined they actually run parallel to our new wall and we had one running exactly over top of where we wanted to install our wall. Thank goodness!
So, the other way to know for sure is to use a drill or a nail and literally drill or poke nail holes through the drywall to see if you are hitting a stud or not.

It is super important to know exactly where your ceiling joists are so you can attach the wall framing to it.
2. Determine the wall dimensions and material needed
Measure the space your using for your wall to determine the length of your wall and how much material you will need.
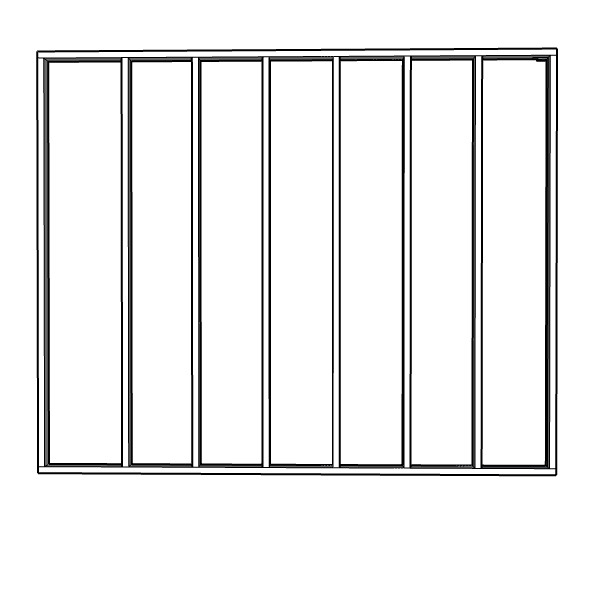
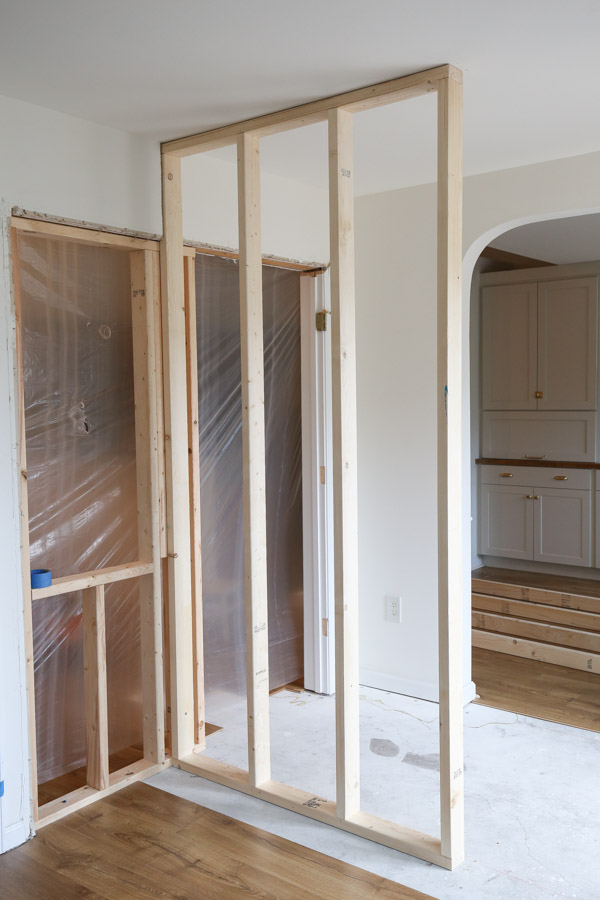
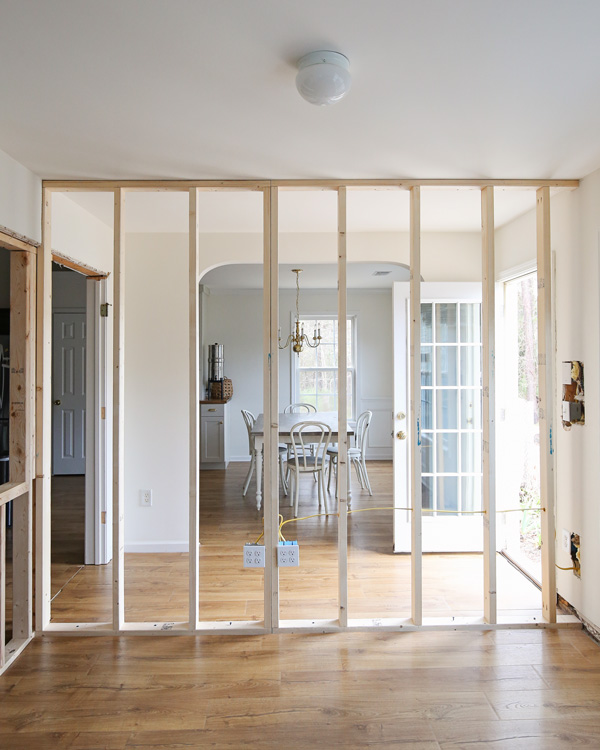
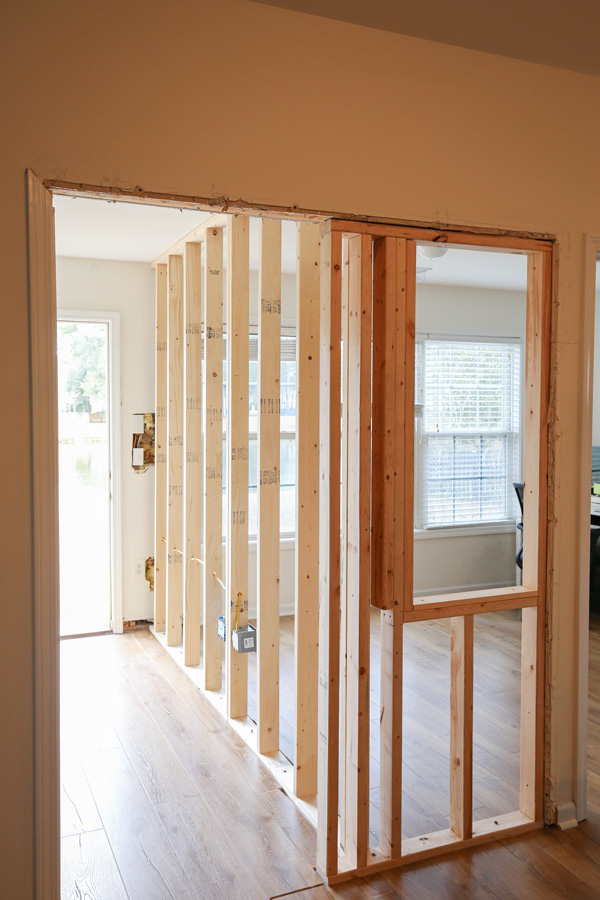
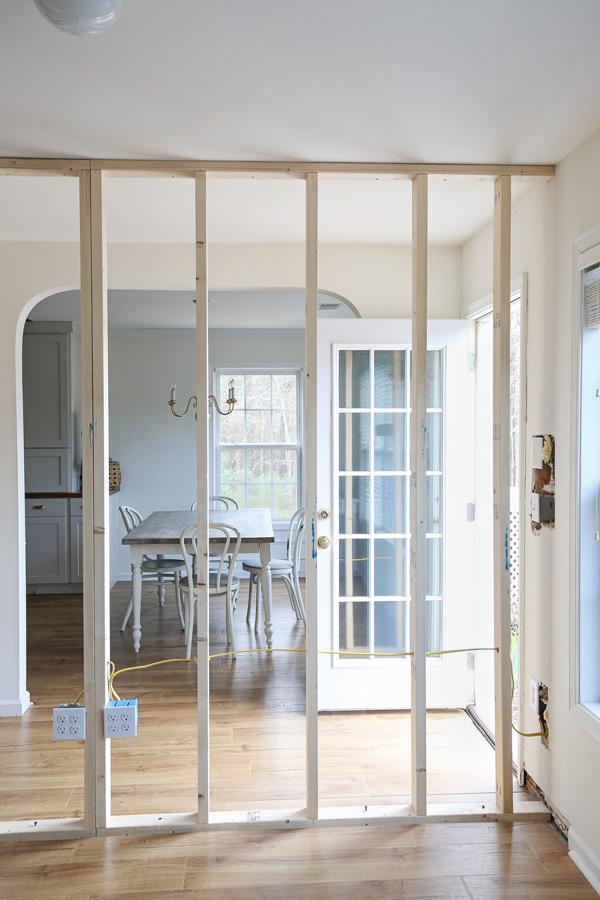
Here is a quick summary of the framing lumber boards (2x4s or 2x6s) that frame a wall. There is a top plate (the top, ceiling board), bottom plate or base plate (the bottom, floor board), and vertical studs.
The vertical studs start at one end and are installed every 16 inches (on the center of the stud board) between the top and bottom plate.
Note, because we also built a smaller, partition wall that our large wall was connecting to, we measured from the wall stud of our intersecting wall to the drywall on the opposite, existing wall for our top and bottom plate lengths.
We also, had to remove part of the drywall above our new corner wall, so that our new big wall would line up properly.
3. Remove the flooring and floor molding where the wall will be installed
It’s best to secure the floor to the sub floor or slab, which means that the existing flooring needs to be removed.
We considered cutting our newly installed laminate flooring with the Dremel where we were going to install our wall. But to avoid excessive extra dust going everywhere, we decided to just take our floor up from the closest wall.
This meant we would only have to reinstall the flooring in a small section.
However, I tried to save our flooring since it was brand new and cut to size perfectly already, but several the of the tongue and groove connecting edges broke in the process since they are made out of MDF.
Be VERY careful not to damage the boards where you are stopping. We ended up damaging some of the flooring that we were not planning to take out and we had to end up using a threshold between the boards to fix this mistake at the end.
Remove the floor molding
As you can see in our building a wall video, to remove the floor molding, Brandon used a utility blade, prybar, and our Dremel tool to cut the molding where we were installing the wall.
Also, I used the shop vac while he did this prevent dust going everywhere.

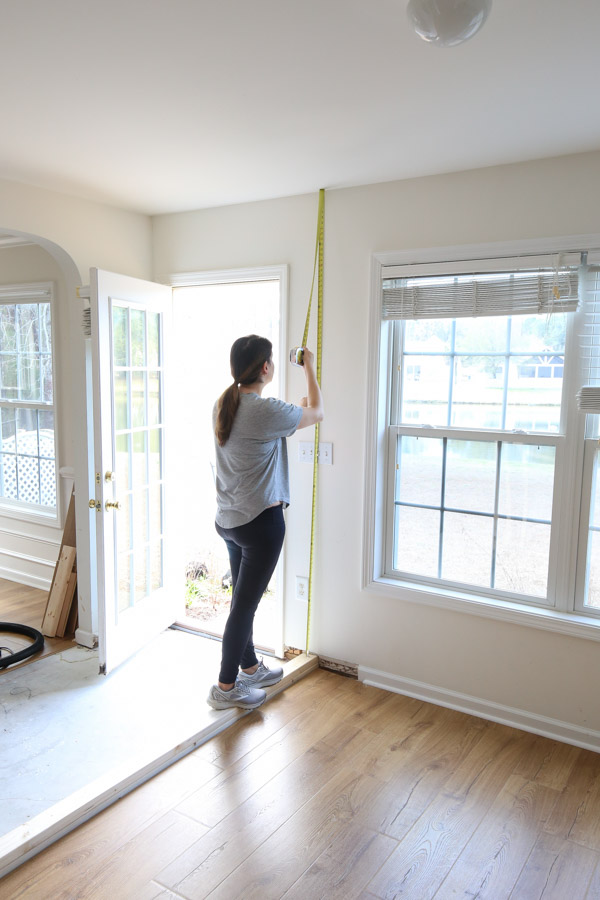
4. Mark on the floor and ceiling the location of the new wall
Snap a chalk line on the floor in the exact location where your wall will be installed.
📩 Want to Save This?
The best way we found to do this was by measuring from a parallel wall on each side of the wall to mark our lines and make sure they were the exact same distance.
Also, there was a chalk line next to our other wall as well from when the house was originally built. We used that line as a reference point too for checking our measurements.
Next, use a plumb bob to mark a chalk line on the ceiling. This helps to make the wall plumb and straight. We used the plumb bob the way This Old House used it in their video tutorial here.
However, the plumb bob was annoying to use. We found measuring from the parallel wall again to work best and be the easiest method to ensure our wall would be installed straight and at the same location at the top and bottom.
This is another difference with building a wall in a home that’s already built! There are other walls already constructed that can be used as a reference.
5. Cut the top and bottom plates to size
Cut your top and bottom plate 2×4 boards to size using a miter saw.
We used 2×4 @ 10 ft. boards for our top and bottom plated since they needed to be about 9 ft. long.
6. Determine the vertical stud length
Next, determine your vertical stud length. I used the method shared in this how to frame a wall video by This Old House.
Basically, you stack your two 2×4 boards (the top and bottom plates) on top of each other where they are going to be installed. Then, you stand on top of them and measure the distance between the boards to the ceiling.
However, if you already have drywall on your ceiling and not open framing or if your ceilings aren’t totally square or straight, because not all houses are built perfectly square and straight like they should be in theory, you need to measure the height of the ceiling in multiple spots.
I measured at each end of our wall and the middle. Sure enough, there was a 1/2″ difference of our ceiling height from one end to the other which complicated things. I’ll explain why when we get to the install step.
7. Prepare the vertical studs and mark the stud locations
Mark on your top and bottom plate every 16 inches for the vertical wall studs. I used my speed square to help with this part.
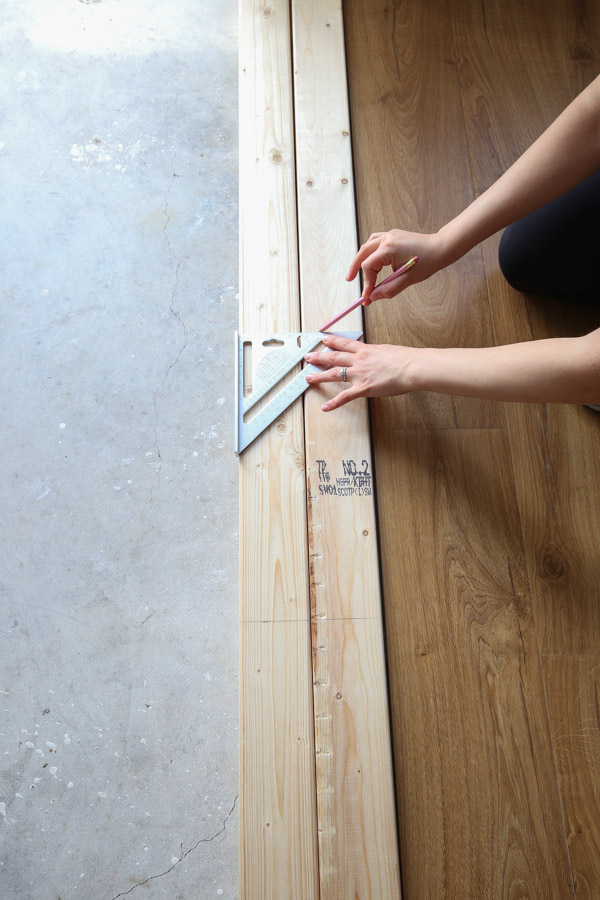
For the first stud, start 3/4″ from one side of the top and bottom plate (since half of a 2×4 width is 3/4″, total width is 1 1/2″) and you will be installing every 16″ on the center of the stud.
Fun fact: I learned during this process that on my tape measure it had the 16″ stud measurements highlighted red. So 16″, 32″, 64″ etc was all marked in a red bubble. Super helpful for fast marking and not sitting there doing the math in my head!
Cut your 2×4 vertical studs to size using a miter saw.
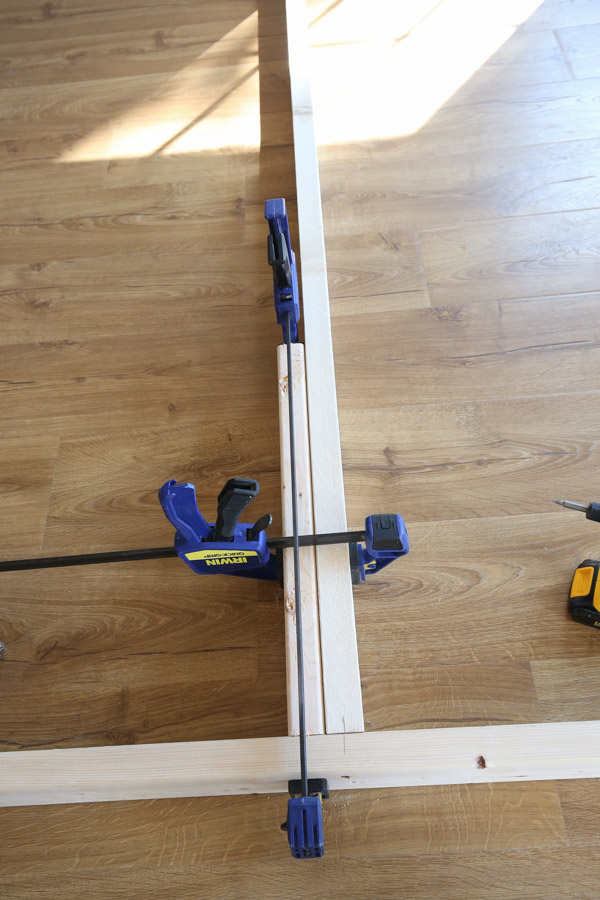
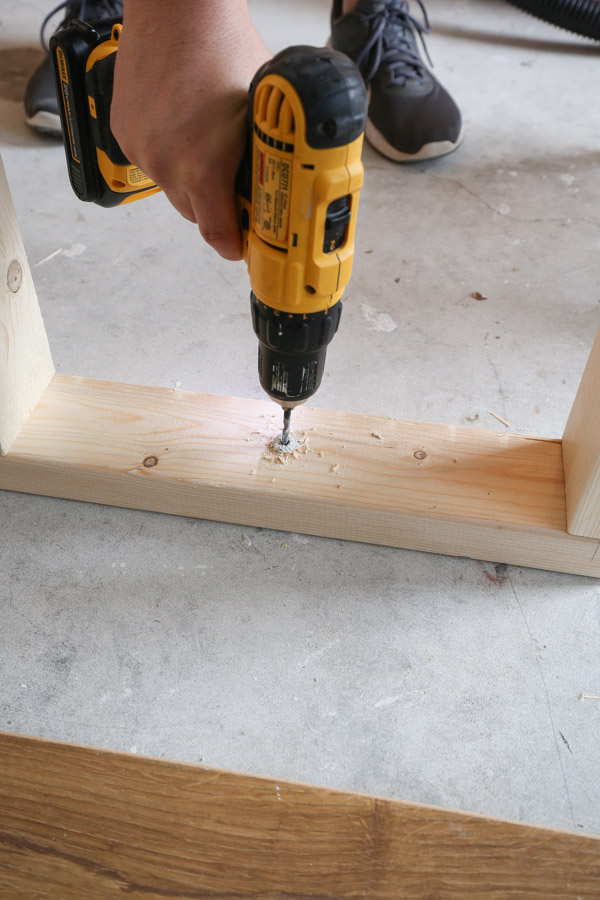
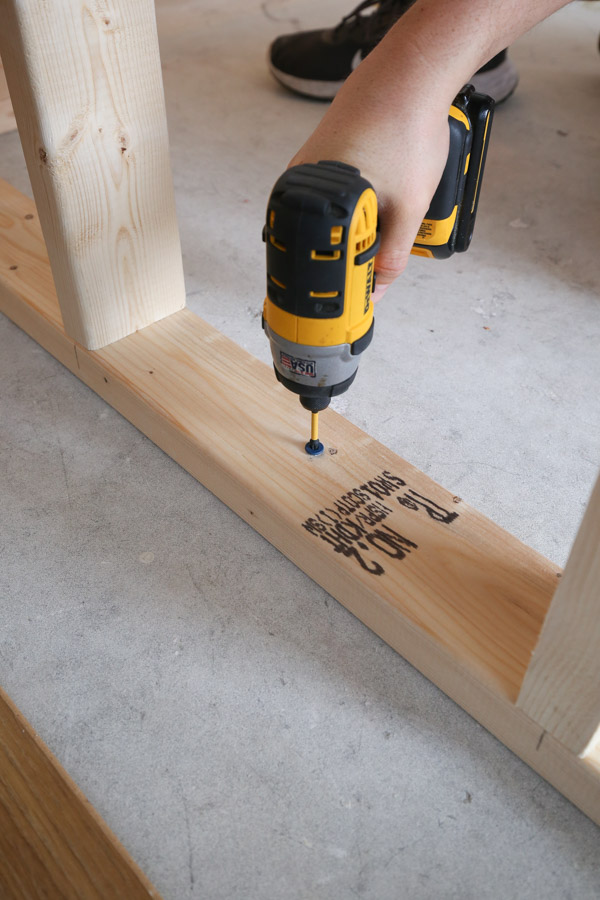
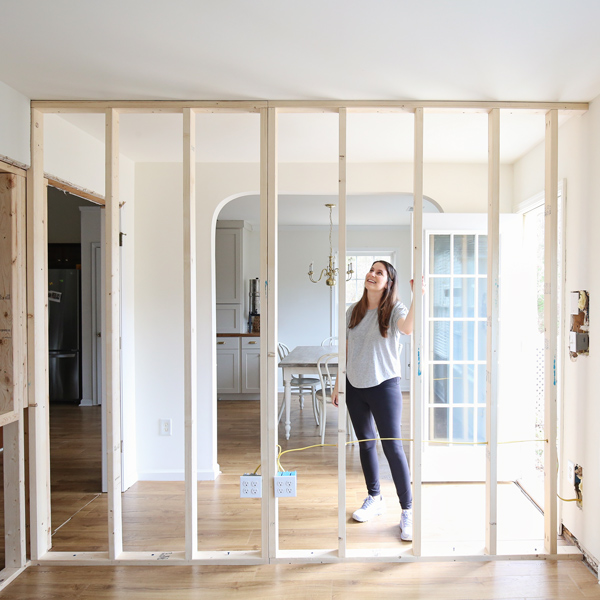
8. Build the interior wall frame on the ground
Lay out the 2×4 boards on the ground in place at your marks. Attach the vertical studs to the top and bottom plates to complete the wall assembly.

If you have a framing nailer, use this for easy attaching. But, if you don’t (like us) you can use a drill or impact driver and 2 1/2″ self tapping screws instead.
Also, to keep things square with a right angle while screwing the boards together, we used a scrap 2×4 and clamps to help hold everything in place:
9. Install the new interior wall
At this point, ideally you would just lift your wall frame into place, line up at the chalk lines, and install.
But, it wasn’t that easy for us and we ran into a few challenges that we had to troubleshoot.
Wall Installation Challenges
Because our ceiling was not square and a 1/2″ difference in size at each end (as described in step #6, we decided to start by just building our wall with the two end studs and one middle stud.
Then, we would test fit it and make sure the measurements for the vertical studs would be a snug fit, then add the rest of our remaining studs, and install the wall.
But, as you can see in our building a wall video, we couldn’t even get the wall frame into place because of our already installed drywall and flooring getting in the way. It was causing a lot of drywall damage trying to force it into place.
We considered building the wall in place with pocket holes. But, I really didn’t want to do that. So, I came up with an alternative plan: Build the wall in two smaller sections, or two small walls that would connect to each other.
And it worked great!
How to Install the wall frame to the ceiling and floor
Again the easiest, most efficient way to install the new wall is with framing nails and a framing nailer to the ceiling joists, other connecting wall studs, and flooring joists for a wooden floor.
For installing the floor into a concrete slab, it would be easiest to use a nailer that can nail into concrete with a concrete nail.
We don’t own those kinds of power tools and I wasn’t about to buy them for one project.
So, we used our impact driver and self tapping screws to quickly screw into the ceiling joists and connecting studs. Self tapping screws are easy to use and don’t require pilot holes.
Drilling into a concrete slab floor
To drill into our concrete floor slab we used a masonry drill bit to pre-drill holes for concrete screws called Tapcon screws. We pre-drilled holes through the bottom plate and part of the concrete floor.
Our drill bit was only 4 1/2″ long, so we ended up having to move our wall out of place to finish pre-drilling a deep enough hole, then we had to move the wall frame back into place.
This was annoying! Definitely get the 5 1/2″ size drill bit so you don’t have to move the wall and you can drill the holes deep enough without having to move the wall!
Also, these concrete screws could be used on a concrete wall or brick wall as well.
Another tip is to have a second person use a shop vac while you are screwing into the concrete. It creates a lot of dust, so the shop vac helps prevent the dust from flying all over the place.
The shop vac also came in handy for us where we had to cut some drywall and flooring.
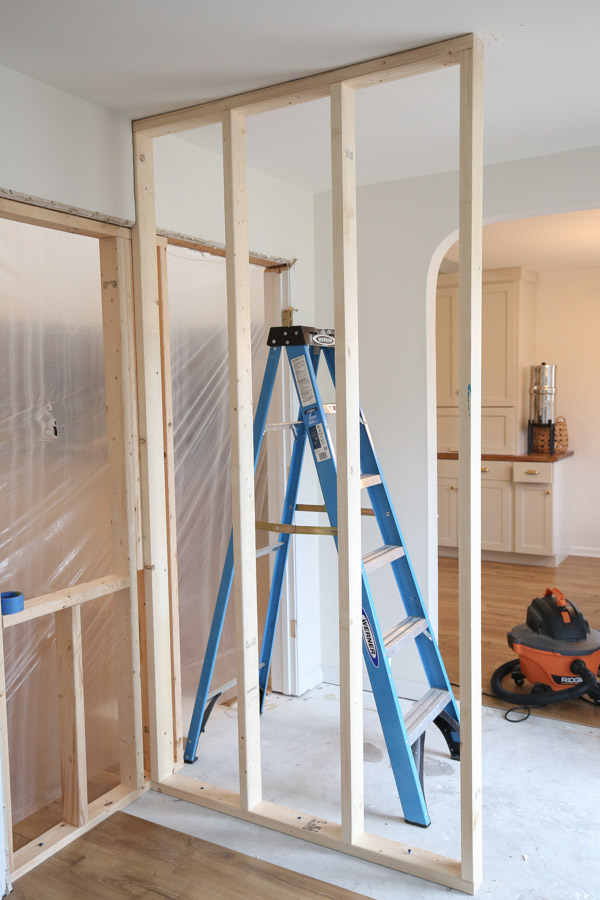
We installed our smallest wall first and then finished off with our second wall. Then, we screwed them together. See it all come together in our building a wall video!
10. Consider adding blocking and finish off the electric
Blocking for cabinets and wall features
One of the best parts about building a wall is that you have the opportunity to easily add blocking (horizontal studs) in between the vertical studs for extra support.
If you are planning to install cabinets, built ins, sconces, floating shelves, heavy art or mirrors, etc, now is the time that you can add those extra support studs exactly where you need them.
Here is a good blocking article and video, again by This Old House, about how to do blocking.
Once we determine where our built ins and wall sconces are going we will be adding some extra 2x wood into place.
Electric
Now is the time to finish off any electrical wiring. We hired an electrician to install two wall outlets exactly where we wanted them, as well as to move a light switch.
11. Finish the wall with drywall or another material
At this point you can finish your wall off with drywall sheets. But, I can’t stand working with drywall, I despise it and the dusty mess it creates!
So, I came up with an alternative material! For the office side of the wall we will be using 4ft x 8ft beadboard wall panels.
And for other side of the wall, we will be using wood shiplap boards to create a vertical shiplap wall!
We will have to use a little bit of drywall on our small corner, window wall as well as where the electric was changed. But, it will be minimal!
Wow, I just can’t believe we built a wall!! It’s super exciting and I am so proud that we accomplished this project!
I hope this tutorial overview and lessons learned on how to build a wall frame was helpful! Let me know what you think in the comments below.
Make sure to follow along and don’t miss the rest of our wall finishing projects and office makeover!
Shala
Tuesday 16th of September 2025
I am so glad I came across this . After being quoted for 3 small walls from 3000 to 5500 I thought I was going crazy . This makes me feel confident we could do it on our own .
Tana Daniel
Friday 11th of July 2025
That's really crazy to think that you have not ever built a wall before because you sound like a wall building contractor lol no kidding. I've got an engineering degree so I don't think that easily but I don't have as much anxiety about trying to do this. I'd feel better with the buddy system though