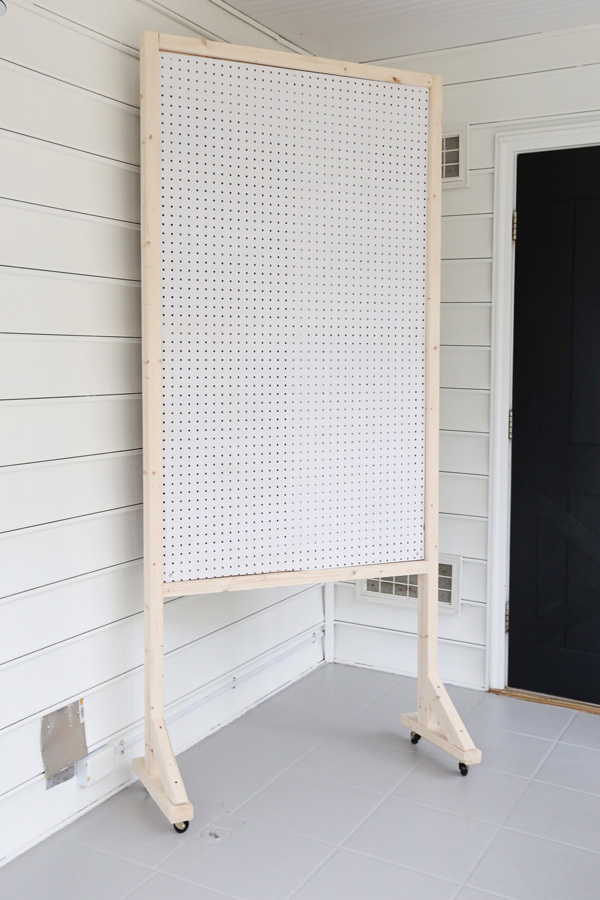
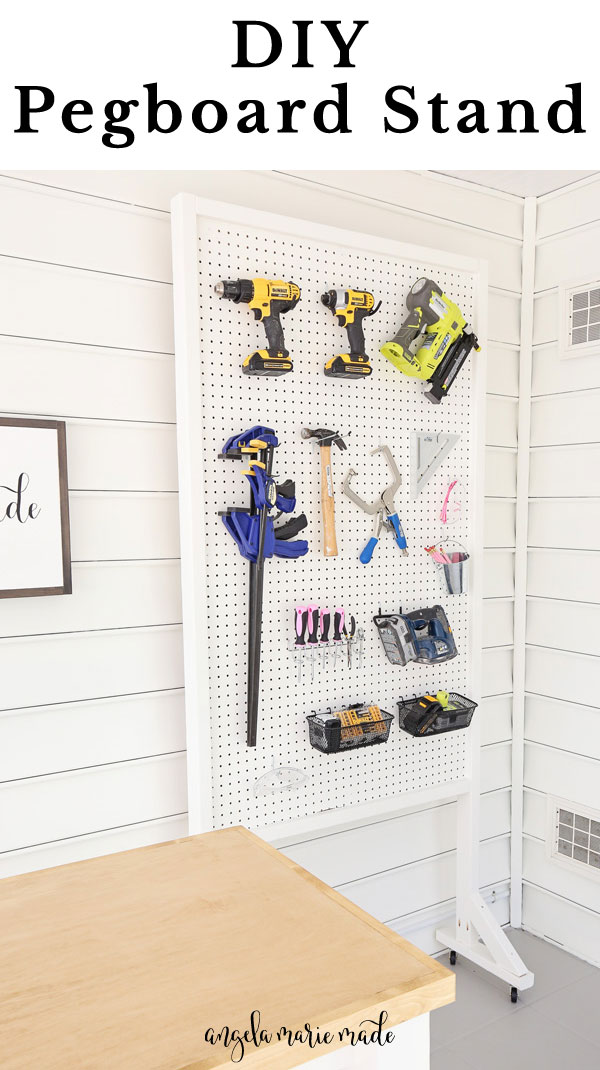
Learn how to build an easy pegboard stand DIY that’s budget friendly and mobile too!
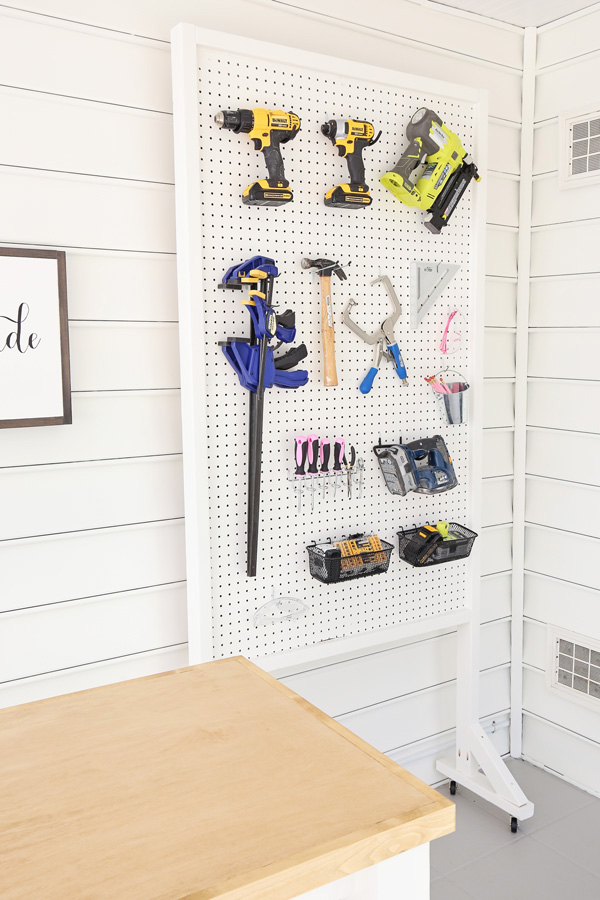
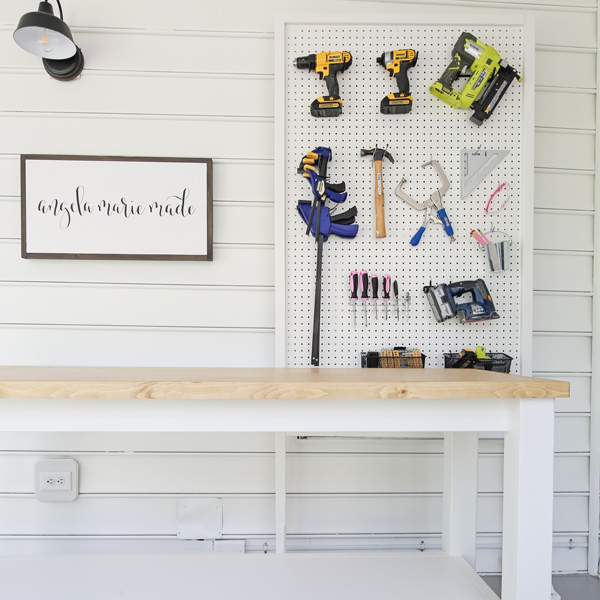
Our free standing pegboard wall DIY is an easy and quick build that’s perfect for organizing small items or tools! The tutorial for this freestanding pegboard display DIY is below.
Our workshop makeover inspired the idea to create a DIY pegboard display stand because I needed a functional and cute place to organize and store my frequently used tools.
I needed the DIY pegboard stand to be mobile because I wanted to be able to move it easily since it was also being used to cover a large window while filming our YouTube project tutorial videos. Plus, it’s super convenient to be able to move the pegboard around on wheels!
However, you don’t have to add casters to make the peg board stand mobile. The casters can be omitted if you prefer.
Although I used this peg board stand for my tools, it would be perfect for craft supplies, a craft room, home offices, or wherever you need some extra organization.
Also, make sure to check out my DIY pegboard wall for another pegboard idea!
Type of wood used to make the free standing pegboard display
This tutorial uses ready to go pegboard panel with pegboard holes which makes it super easy to make. They are perfect for making oversized pegboard projects.
No special drill bit, drill guide, or lots of drilling is needed to create the large pegboard.
The rest of the pegboard stand is constructed with 2×3 framing lumber and 1×3 furring boards which are sturdy and very inexpensive.
Freestanding Pegboard Display DIY Dimensions
This pegboard stand DIY measures 82″ tall x 38″ wide x 14″ deep. Note, the height does not include the height of the caster wheels since they are optional and caster wheel heights can vary based on the casters used.
The dimensions may be modified for custom sizes.
Note, this post contains some affiliate links. For more info see my disclosures here.
Cost of the pegboard stand
This freestanding pegboard wall DIY cost about $65 with current lumber prices and including the cost of the caster wheels. It’s a very budget friendly and affordable project!
How to Build a DIY Pegboard Display Stand
Materials
- (3) 2×3 @ 8ft
- (2) 1×3 (or 1×4) @ 8ft furring strip boards
- Wood glue
- (1) 4ft x 8ft pegboard panel**
- 1/4″ scrap wood (I used this board)
- 3/4″ wood screws
- 3″ self tapping screws or wood screws
- 1 1/4″ and 2 1/2″ Kreg screws
- (4) Caster wheels
- Primer and paint
- Pegboard hooks and tool holders
**Tip: Pegboard panels can be found in the lumber aisle of your home improvement store near the plywood sheets or specialty wall panels. I found mine at Home Depot.
Pegboard Stand DIY Video
Subscribe to my YouTube Channel here!
Watch how to build this freestanding pegboard display DIY in my small workshop makeover video here!
1. Make initial lumber cuts for the DIY pegboard display stand
You can cut the pegboard with a table saw or circular saw and straight edge guide (or a table saw). Or just have it cut at the home improvement store, which is what we did for this project.
Make the following cuts from the 4ft x 8ft pegboard:
- (1) board @ 59″ x 35″
Use a miter saw and make the following cuts from the 1×3 (or 1×4) furring boards:
- (3) 1×3 @ 35″ (for pegboard back supports)
Use a miter saw and make the following cuts from the 2×3s:
- (2) 2×3 @ 82″ (for side frames)
- (2) 2×3 @ 35″ (for the top & bottom frames)
- (2) 2×3 @ 14″ (for the base supports)
Make the following cuts from the 2×3s with a 51 degree angle cut on one end and a 38 degree angled cut on the other end:
- (2) 2×3 @ 10 1/2″ from long point to long point (for base support braces)
2. Add pocket holes to the boards
Tip: Check out my how to use a Kreg Jig tutorial for more information on pocket holes.
Use a Kreg Jig and add pocket holes to both sides of the following pieces of wood:
- (3) 1×3 @ 35″ (for pegboard back supports)
- (2) 2×3 @ 35″ (for the top & bottom frames)
Add pocket holes to just one end of the following boards:
- (2) 2×3 @ 82″ (for side frames)
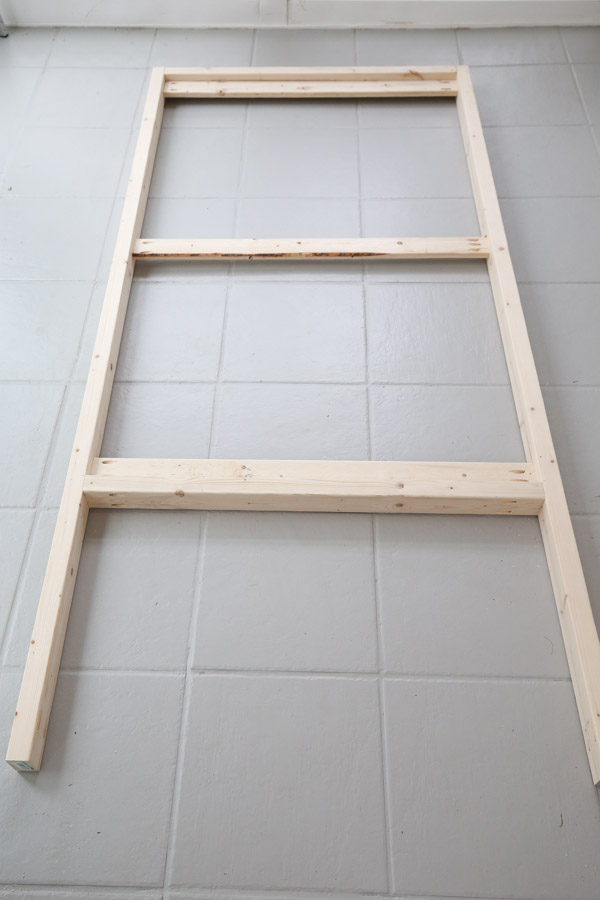
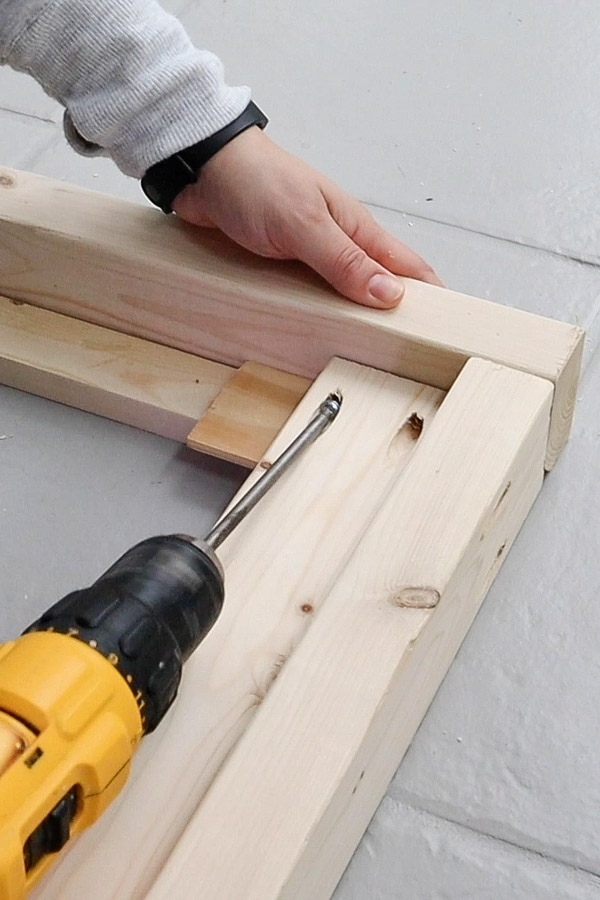
3. Build the frame of the DIY pegboard stand
Use wood glue and 2 1/2″ Kreg screws and attach the frame together with the (2) 2×3 @ 82″ on the sides and the (2) 2×3 @ 35″ at the top and bottom as shown in the below photo.
The bottom 35″ board should be attached so the top edge of it is 59″ down from the bottom edge of the top 2×3 (to fit the pegboard panel perfectly).
Next, attach the three 1×3 furring boards to the side frames with wood glue and 1 1/4″ Kreg screws along the top, middle, and bottom as shown in the below photo.
Attach the furring boards so they are about 1″ up from the edges of the 2×3 sides. We used scrap 1/4″ thick wood and 3/4″ thick wood stacked on each other to do this.
Tip: Any 1x wood is 3/4″ thick, like a 1×2, 1×3, etc. See my lumber size guide for more information on lumber dimensions.
Also, make sure the pocket holes on the two 2×3 @ 82″ side boards are at the bottom end, facing inwards.
📩 Want to Save This?
And make sure the pocket holes on the top 2×3 @ 35″ board is facing upwards and then facing downwards for the bottom 2×3 @ 35″ board, so they are hidden when the pegboard stand DIY is assembled.

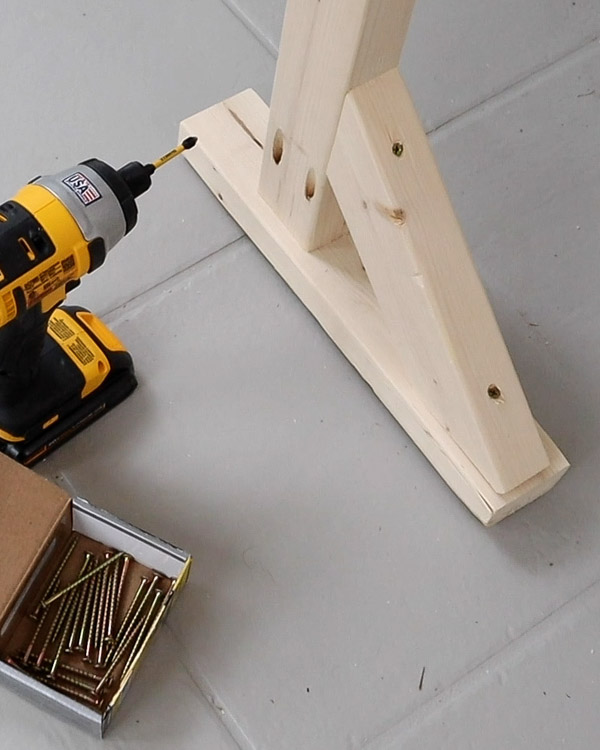
4. Attach the base supports to the free standing pegboard wall DIY
Use wood glue and 2 1/2″ Kreg screws and attach the two 2×3 @ 14″ for the base supports to the ends of the side frame boards. The boards should be attach so the side frame ends are 3″ down from the top of the 14″ boards and about 1/2″ in from the inside edges of the 14″ boards.
Then, use wood glue and 3″ wood screws to attach the 10 1/2″ angled brace boards with the 38 degree ends attached to the side frame boards, as shown in the photo below.
Again you can see all of this in action in my small workshop makeover video here!
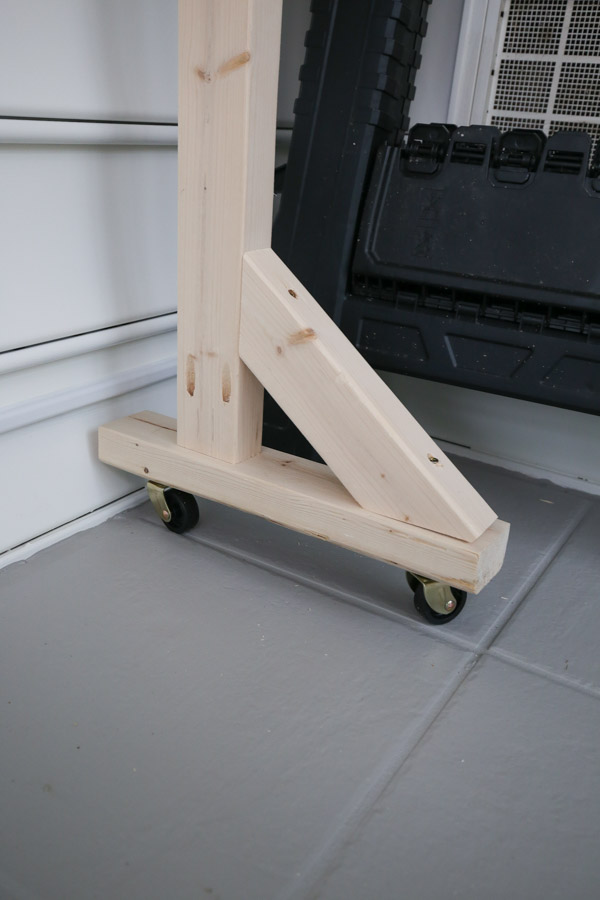
5. Attach the casters (optional)
As noted above, caster wheels are optional if you want to make the free standing pegboard display DIY mobile.
Install the caster wheels to the bottom of the 14″ support boards with the screws included with the casters.
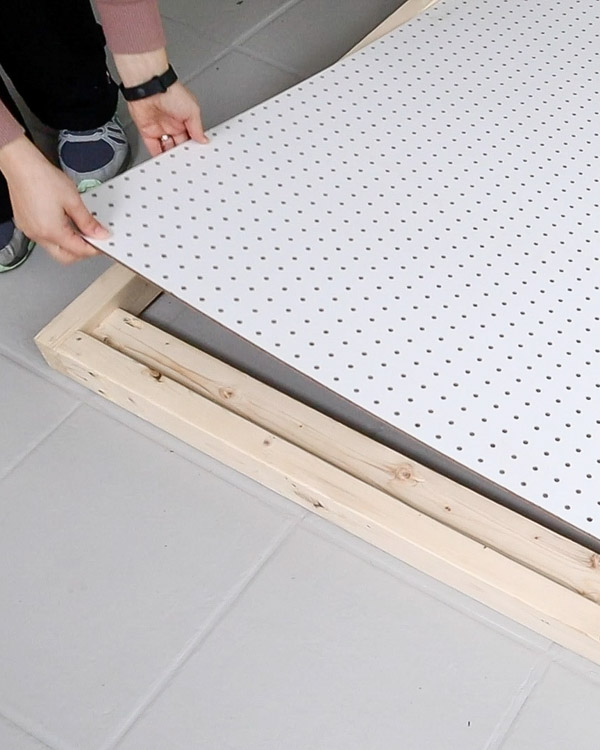
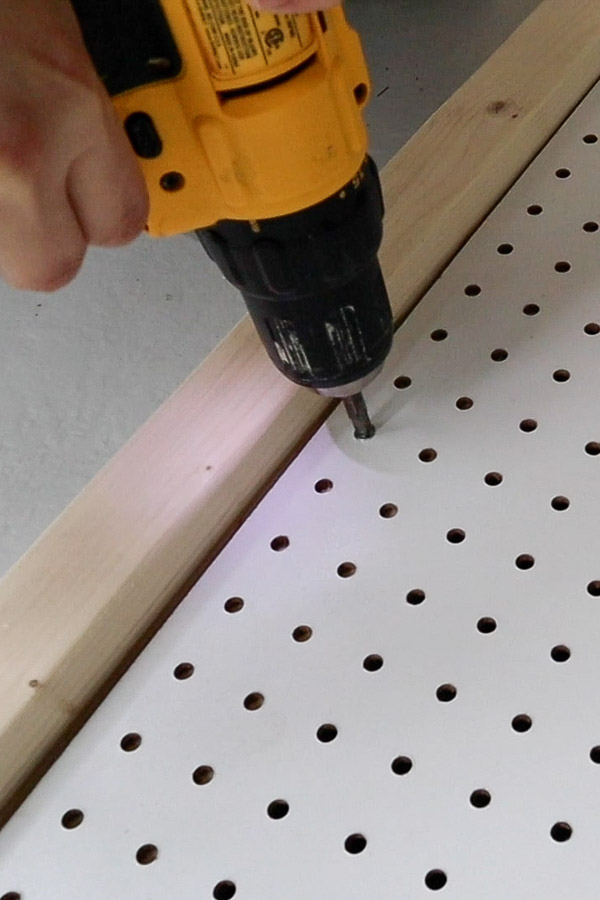
6. Install the pegboard to the pegboard stand DIY
Install the pegboard to the free standing pegboard wall DIY by laying it on top of the 1×3 furring boards and attaching it with 3/4″ screws through the pegboard onto the three furring boards.
And that’s it for the building part!
7. Prime and paint
To complete the pegboard stand DIY, apply primer and paint. You can also caulk the edges of the pegboard if desired for a cleaner finish like we did. We also did this for our DIY pegboard wall.
We used two coats of white dove by Benjamin Moore.
8. Add pegboard hooks and holders
Finally, add pegboard hooks and holders to the DIY pegboard display stand to help organize your pegboard items!
I used these pegboard hooks and tool holders (also here) to complete our DIY pegboard tool organizer!
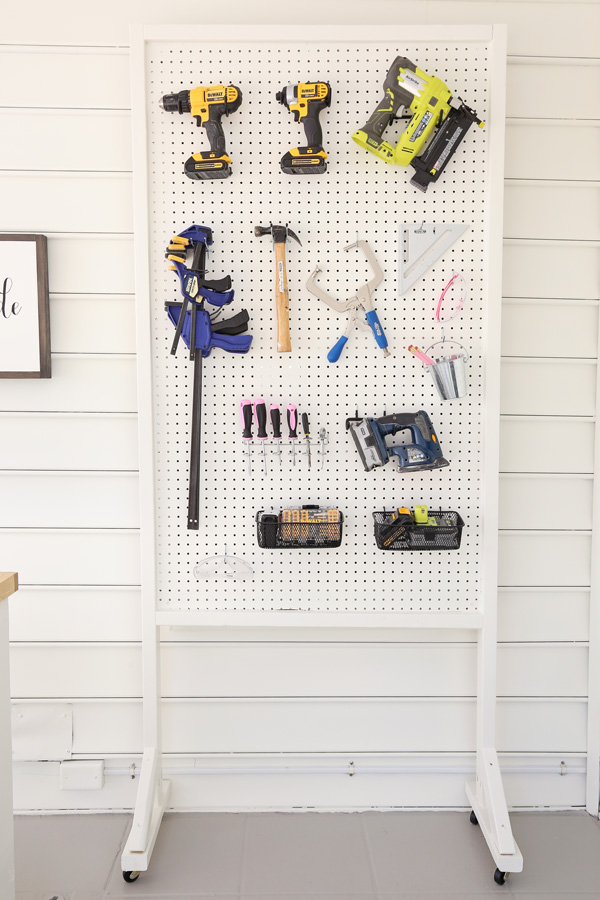
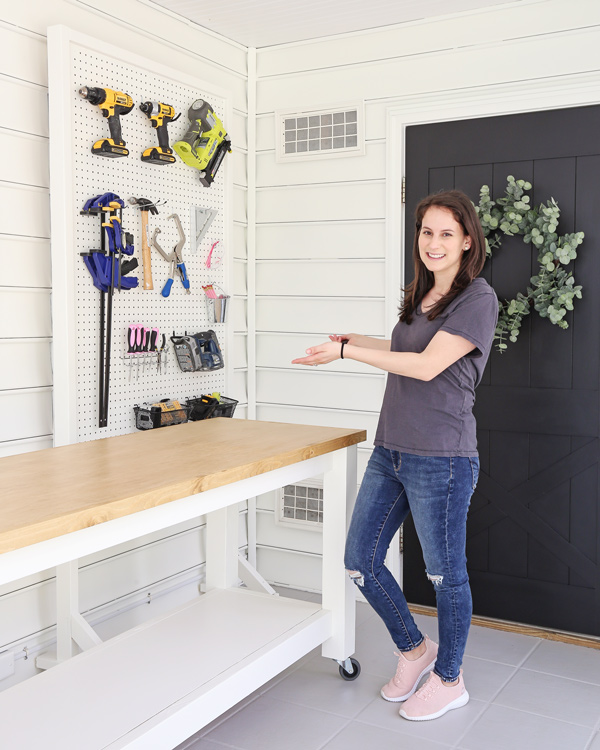
I’m so excited about our free standing pegboard wall DIY that’s mobile and provides plenty of display organization! It’s the perfect solution for holding my most commonly used tools in my small DIY workshop!
What do you think about this pegboard stand DIY? The best part is that it’s freestanding!
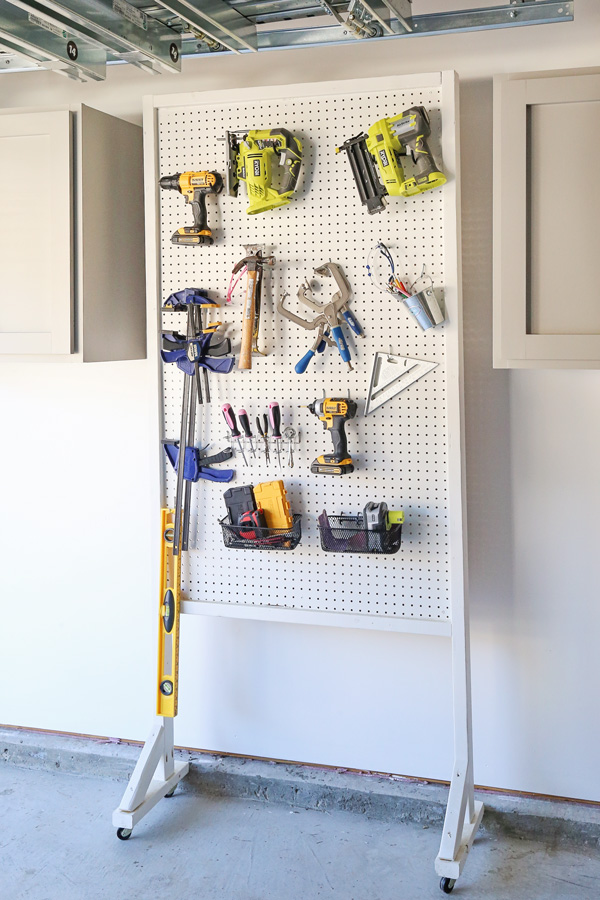
Here is a photo of it in the garage of our new home. It has held up great for over two years now!
If you’re interested in a pegboard wall that’s attached to the wall, make sure to check out my super easy DIY pegboard wall tutorial!
Follow along for my latest DIY projects and sneak peaks on Instagram, YouTube, and Pinterest!
Want to save for later?! Pin it here:
Emma
Sunday 2nd of November 2025
WOW, just "WOW".
Dan
Monday 2nd of June 2025
Thank you for this, just what I needed for my basement! But wouldn’t the overall height measurement would be 83.5” once the bottom support leg is attached (not including the casters)?