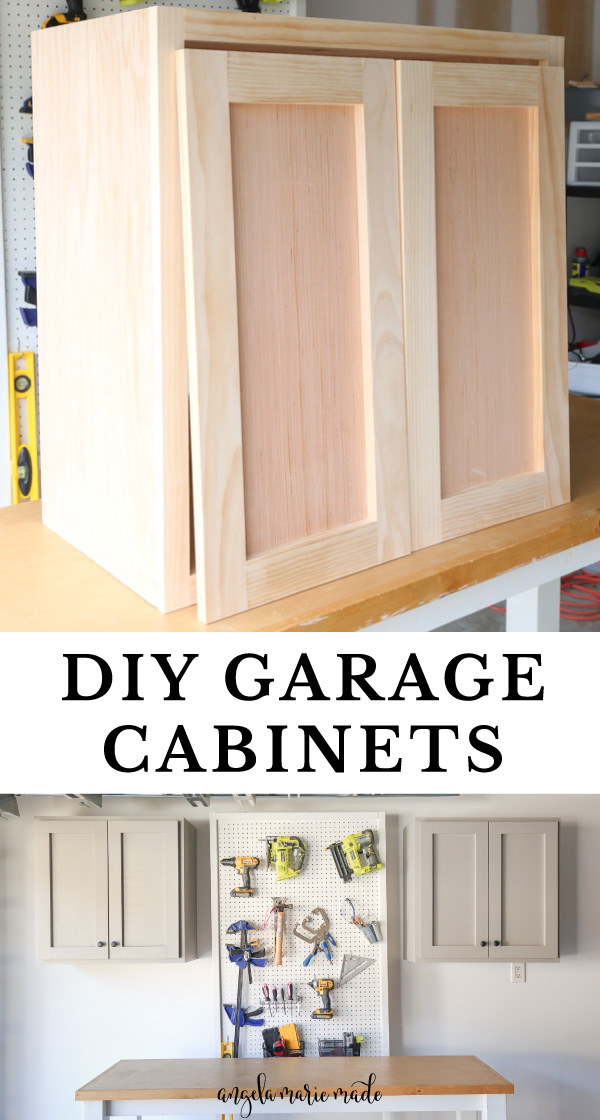
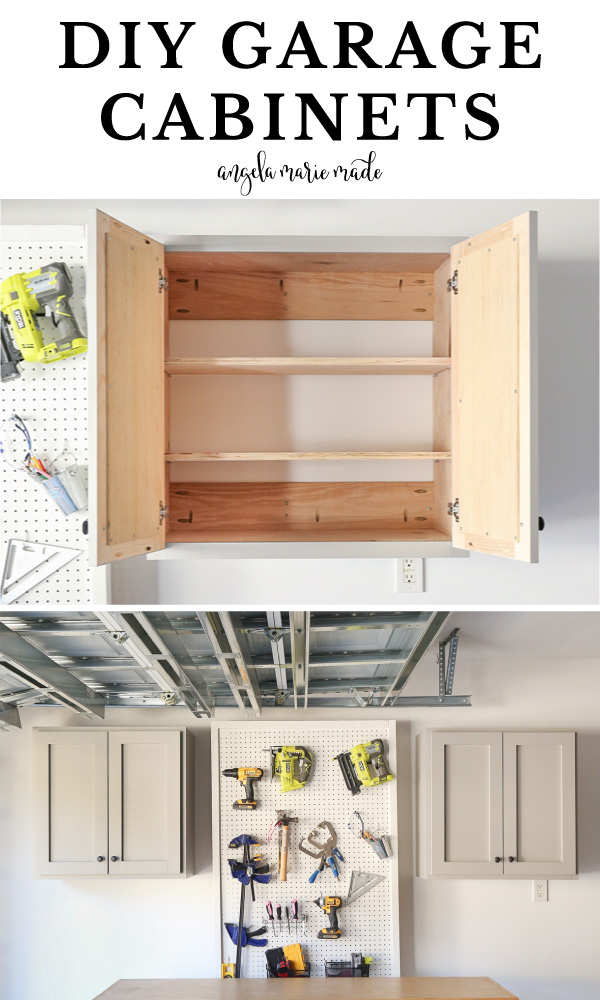
Learn how to easily build DIY garage cabinets for a garage wall that provide extra storage space!
We moved into our new home this past summer and the garage has been a mess ever since. The first step to getting organized and making progress on the rest of our house projects was to build DIY garage wall cabinets for our tools and building supplies as part of our garage storage system.
Type of DIY cabinet and door
My goals with these garage storage cabinets were to make the cabinets look good and be easy to make as well. So, I went with a face frame style cabinet with shaker style doors that have a 1/2″ overlay on the face frame. This is the same style and type of door that I used for our DIY office storage cabinets.
Check out my DIY cabinet door construction techniques for more details on different methods of making DIY cabinet doors!
The cabinet and door construction are simple though making this project easier! There are several steps in this tutorial since that’s just the nature of DIY cabinet building, but they are simple steps!
Also, if you are interested in more garage storage projects, check out our DIY wood garage shelves and DIY wall pegboard!
DIY Garage Cabinet Dimensions
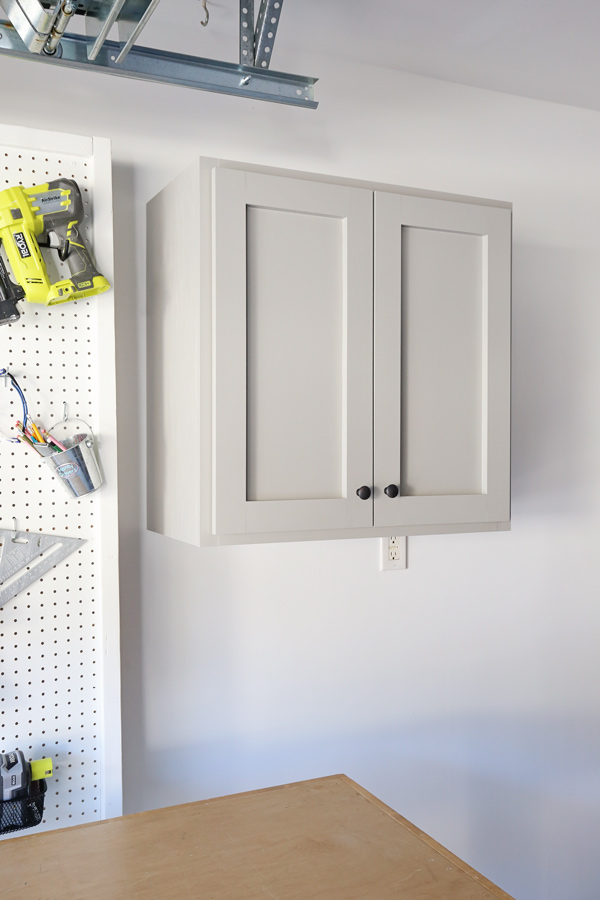
The DIY garage cabinet measures 30″ wide x 30″ tall x 15″ deep. Note, the 15″ depth is from the back of the cabinet to the face frame, it does not include the door depth of 3/4″.
I went with a 15″ depth for these upper cabinets over the standard 12″ depth of wall cabinets to provide extra storage for bulky items and tools.
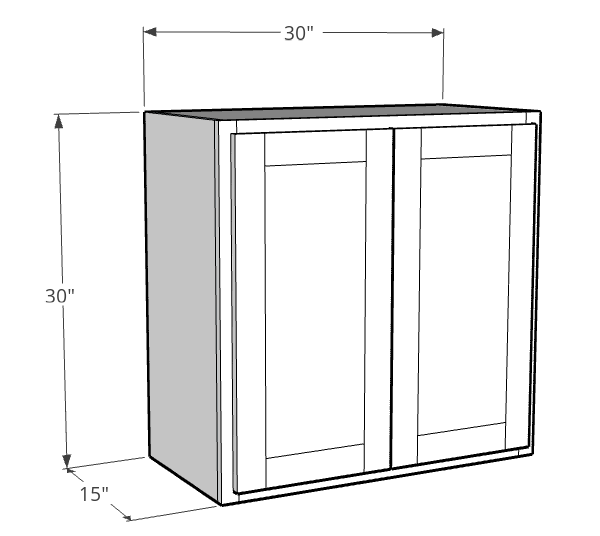
The dimensions can be adjusted for these custom cabinets if needed.
Printable DIY Garage Cabinet Plans PDF
To make the build process even easier, make sure to get the premium printable DIY garage cabinet plans which include the cut list and step by step building steps with easy to follow diagrams!
How much does it cost to build garage cabinets?
The cost to build garage cabinets will vary based on the material used, size of the cabinets, and number of garage cabinets.
The cost to build one garage cabinet in this tutorial is about $150 and $260 to build two cabinets. This is the cost for the lumber and hardware (including the hinges) using premium lumber. Less expensive wood may be used for more cost savings.
It’s a very budget friendly project compared to buying stock cabinets.

Note, this post contains some affiliate links. For more info see my disclosures here.
How to Build DIY Garage Cabinets:
*Note: Material quantities listed are for ONE garage cabinet at 30″ wide x 30″ tall x 15″ deep! Adjust quantities for more cabinets or different dimensions!*
Materials
- (1) 4ft x 8ft @ 3/4″ thick plywood (we use formaldehyde-free plywood)
- (1) 2ft x 4ft @ 1/4″ thick plywood
- (1) 1×3 @ 8ft
- (2) 1×2 @ 8ft
- 3/4″ wood screws
- 2 1/2″ self tapping screws (or wood screws)
- 1 1/4″ Kreg screws
- 1 1/4″ brad nails
- Wood Glue
- (2) Door hinges for 1/2″ overlay doors (I used these hinges)
- (1) Cabinet knob (I used this knob)
- Primer and Paint (or stain)
- Wood filler/spackle
- Shelf pins
Tools
- Kreg Jig
- Brad nailer
- Miter saw
- Circular Saw or Table saw
- Kreg Concealed Door Hinge Jig
- Drill
- Self Centering drill bit (optional, for hinges)
- Clamps (48″ clamps and Kreg right angle clamp work great too!)
- Tape Measure
- Stud finder
- Kreg Shelf Pin Jig (optional)
- Level
DIY Garage Cabinets Video
Subscribe to my YouTube Channel here!
Watch how to build these garage cabinets in my how to video here!
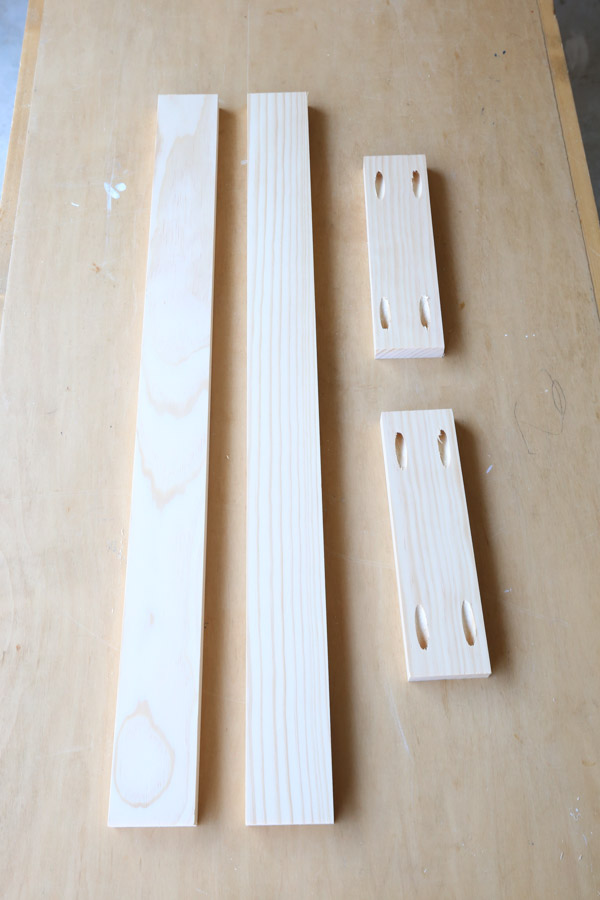
1. Make initial lumber cuts
Click here for the printable garage cabinet plans PDF which include the cut list and step by step building steps with easy to follow diagrams!
We had our local home improvement store cut some of our plywood sheets for the DIY garage wall cabinets. Then, we made the rest of the cuts with a circular saw and straight edge guide and our miter saw. A table saw can be used too.
Note there will be more lumber cuts later in the tutorial for the face frame and cabinet door.
*All of the cuts listed below are for ONE wall cabinet!*
Make the following cuts from the 4ft x 8ft plywood @ 3/4″ thick:
- (2) boards @ 14 1/4″ x 30″ (cabinet sides)
- (2) boards @ 14 1/4″ x 28 1/2″ (cabinet bottom and top)
- (2) boards @ 5″ x 28 1/2″ (back supports for attaching to wall)
- (2) boards @ 13″ x 28 1/4″ (interior shelves)
Make the following cuts from the 2ft x 4ft plywood @ 1/4″ thick:
- (1) board @ 25″ x 10 1/2″ (back of cabinet door)
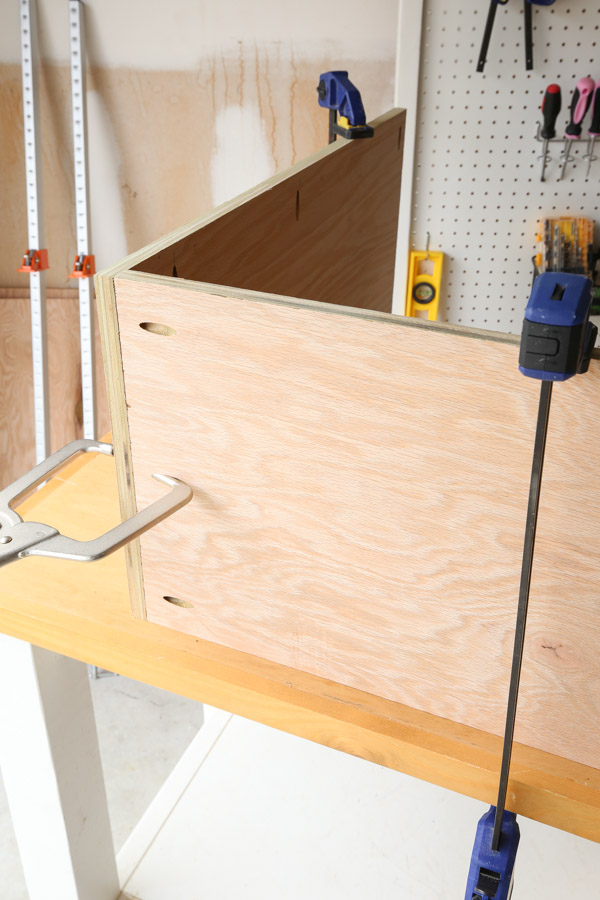
2. Add pocket holes to the plywood
The next step is to add pocket holes with a Kreg Jig to the plywood for easy assembly of the box frame for the DIY garage cabinets.
The frame of a cabinet is actually called the carcass, which I never liked. So I’m going to use the term cabinet frame for this tutorial.
Use a Kreg Jig and add pocket holes to the cabinet frame bottom and top and back supports (make sure the Kreg Jig is set for 3/4″ wood):
- (2) boards @ 14 1/4″ x 28 1/2″ (cabinet bottom and top)
- (2) boards @ 5″ x 28 1/2″ (back supports for attaching to wall)
Also, add pocket holes along one side of each of the side boards (2 boards @ 14 1/4″ x 30″). These pocket holes will be used for attaching our face frame extra securely to the cabinet frame.

Note, make sure to drill the bottom pocket hole on the side boards at least 5 1/2″ up from the bottom of the board so that it’s easy to drill a screw into the hole and the hole does not get covered up by the bottom plywood board. We made the mistake of drilling this hole to low and we had to re-drill it in step #3.
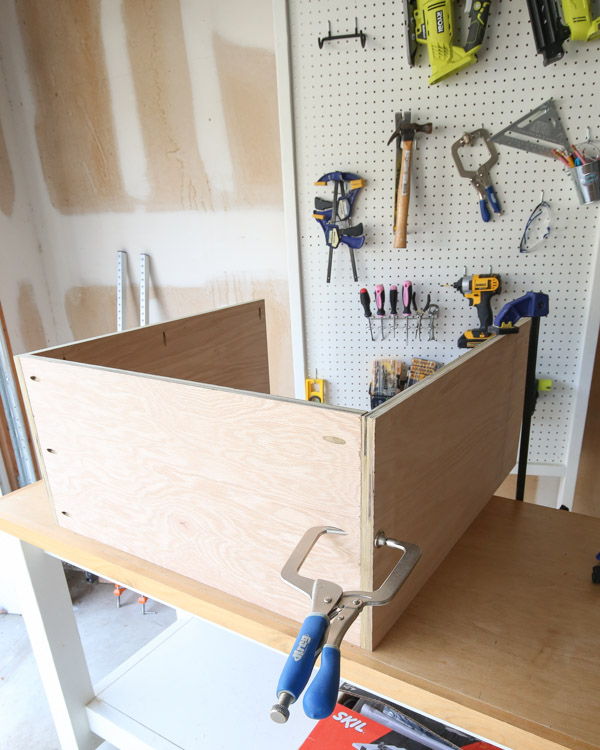
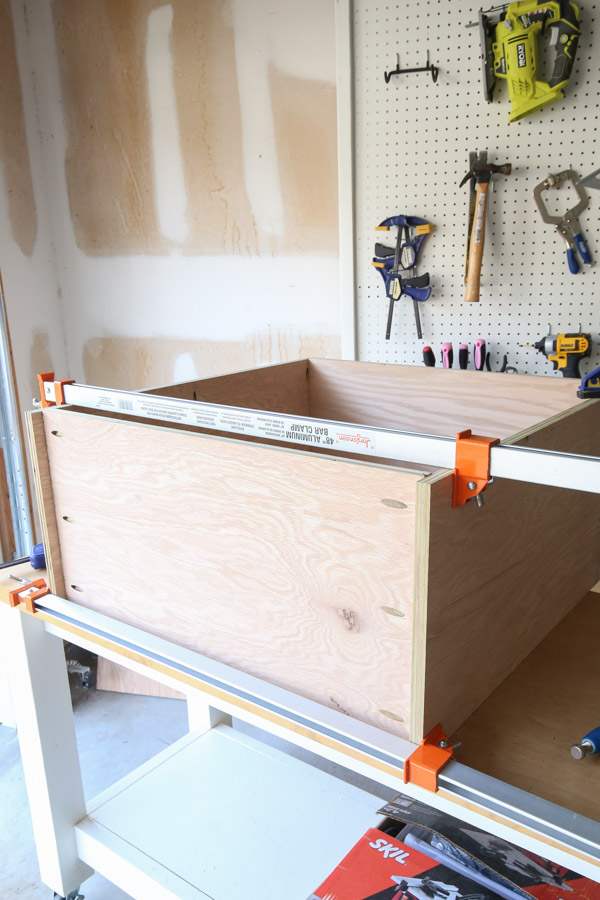
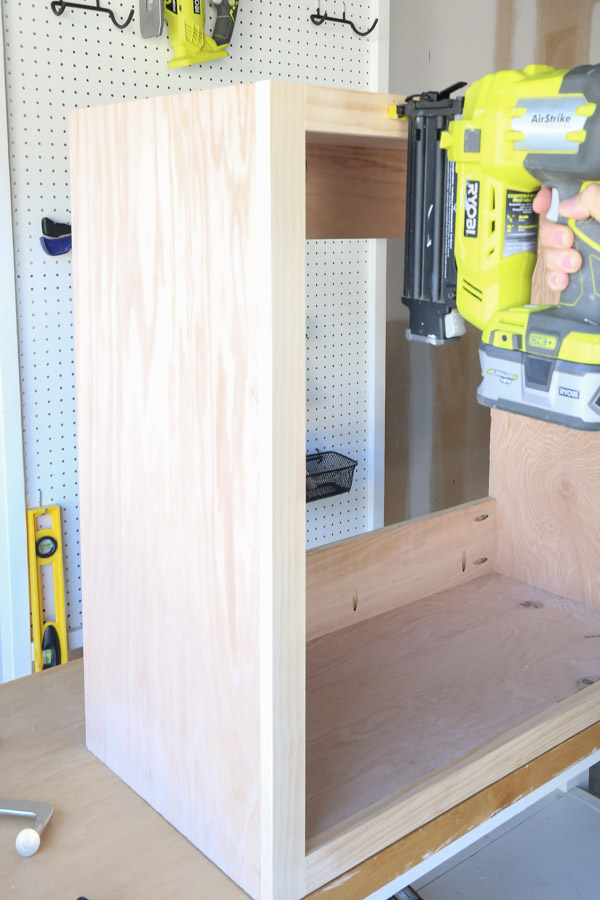
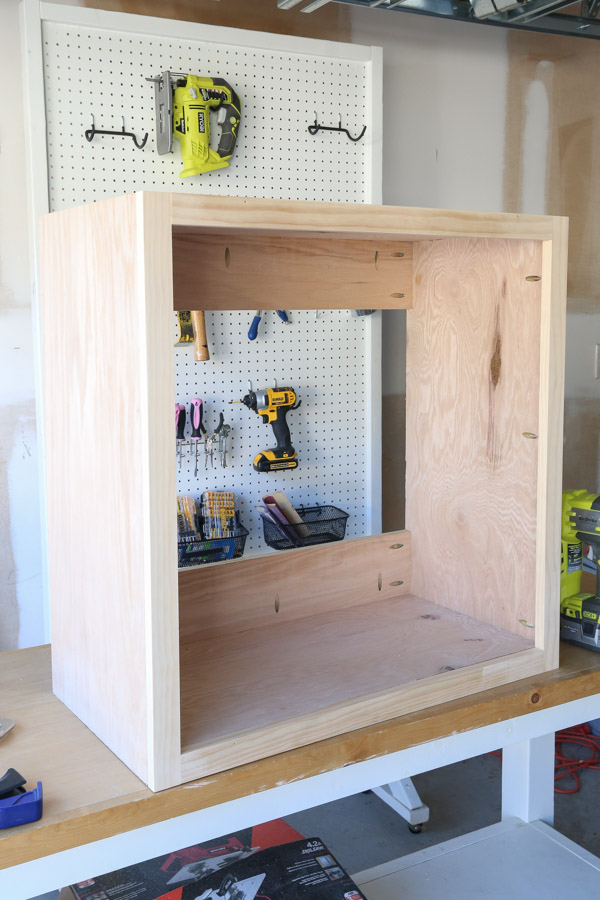
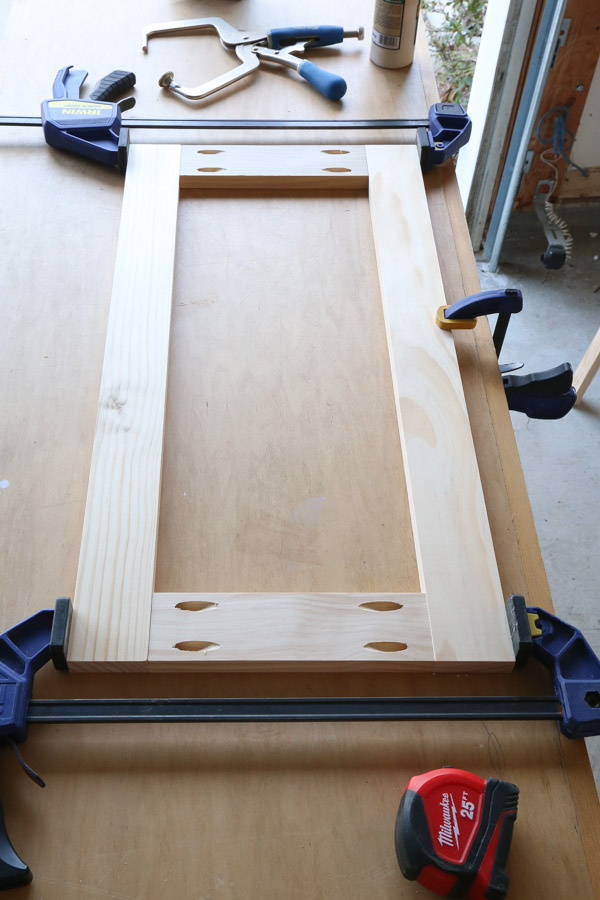
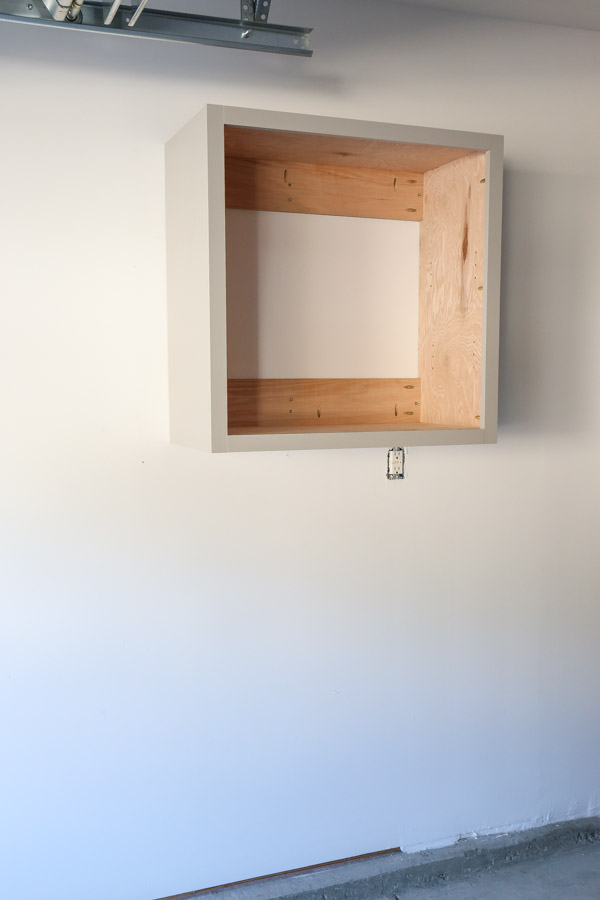
3. Build the frame of the DIY garage wall cabinet
I began building the frame by attaching the top plywood board to one of the sides with wood glue and 1 1/4″ Kreg screws.
Make sure the pocket holes are on the top side so they won’t be seen.
Then I added the other side. Clamps help with step, especially the Kreg right angle clamp.
Before attaching the bottom board, I realized that we drilled one of the pocket holes for attaching our face frame to low and the bottom plywood board was going to cover it up.
So, Brandon re-drilled the hole higher up as I explained in step #2.
Attach the bottom plywood board to the side boards. Attach the bottom of the board 3/4″ up from the bottom of the side boards so the face frame and bottom shelf will be aligned with each other.
Make sure the pocket holes are on the underneath side.
Tip: We placed our back support boards in place to help hold everything together while clamping. You can see this in action in the DIY garage cabinet video!
After I attached the bottom of the cabinet to the sides of the cabinet, I installed the back support boards to complete the frame of the cabinet. These help hold everything together and will be used for screwing the cabinet into the wall studs.
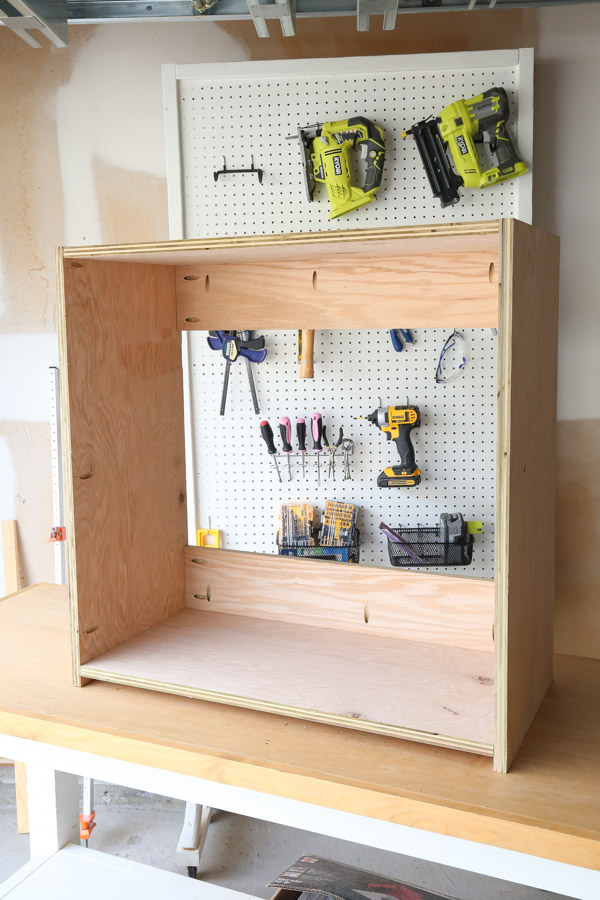
At this point, check to make sure your cabinet frame is square! It makes everything easier when installing the face frame and doors for the DIY garage cabinets.
A 1/4″ backing board can be used to cover the back boards with pocket holes if desired. We did this for our DIY wall cabinets in our laundry room and our DIY office storage cabinets, but since these are just DIY garage storage cabinets I didn’t bother to do it.
You could also install the pocket holes facing the wall side too if you don’t want to see them!
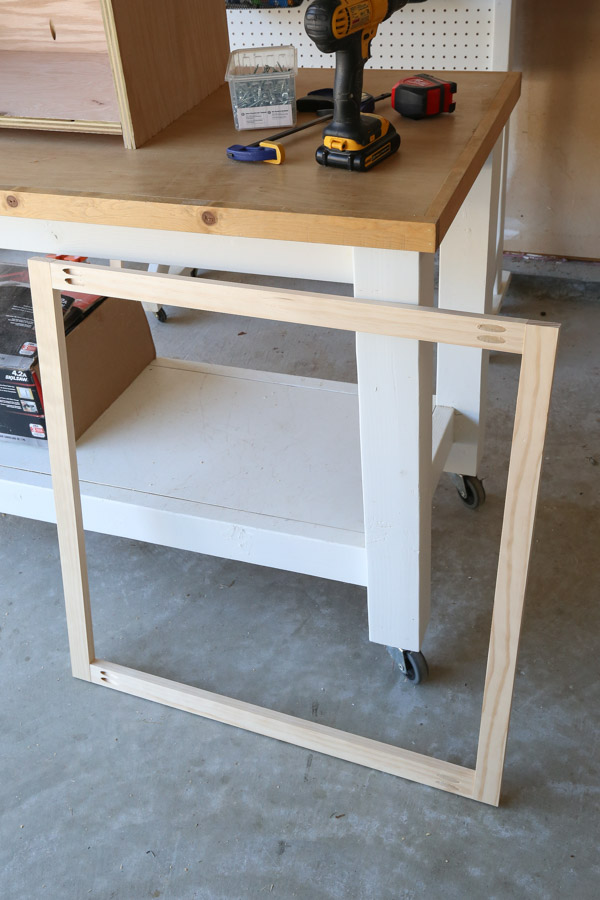
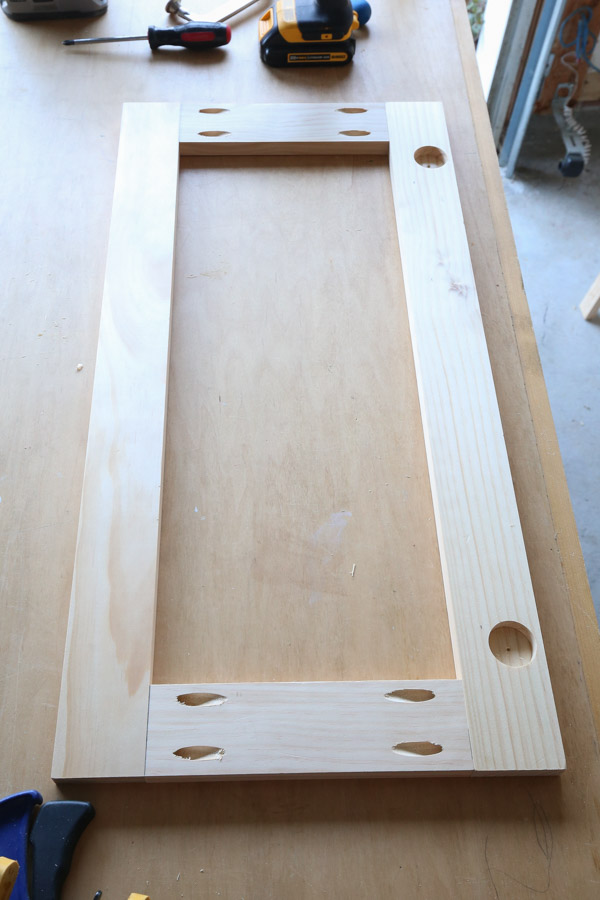
4. Build the face frame of the garage cabinets DIY
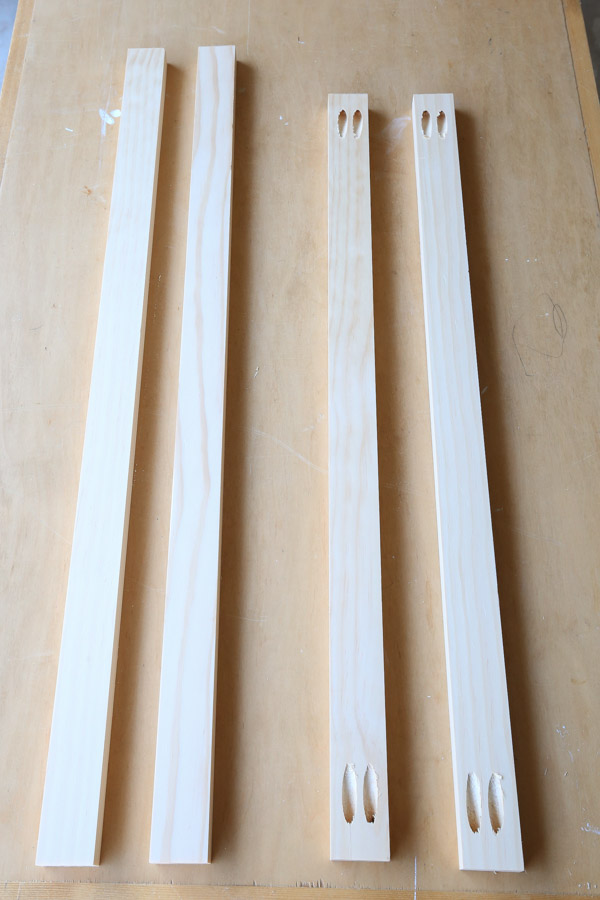
For the face frame construction, we are using premium 1x2s.
Measure the exact height and width of your cabinet frame. It should be 30″ tall x 30″ wide. If there are any slight variations make sure to adjust the following face frame cuts for those differences.
Use a miter saw and make the following cuts from the 1x2s for the cabinet face frame:
- (2) 1×2 @ 30″ (cabinet face frame sides)
- (2) 1×2 @ 27″ (cabinet face frame top and bottom)
Just like with our laundry room DIY wall cabinets, DIY built in office cabinets, and our kitchen built in cabinet, we built the face frame separately before attaching it to the cabinet frame.
Add pocket holes to the face frame top and bottom boards:
- (2) 1×2 @ 27″
I used wood glue and 1 1/4″ Kreg screws again for attaching them together.
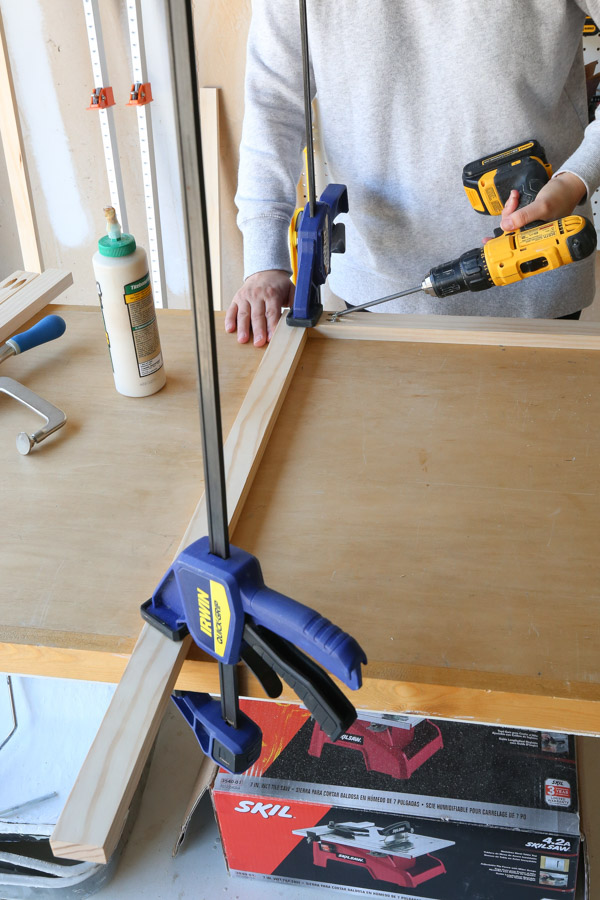
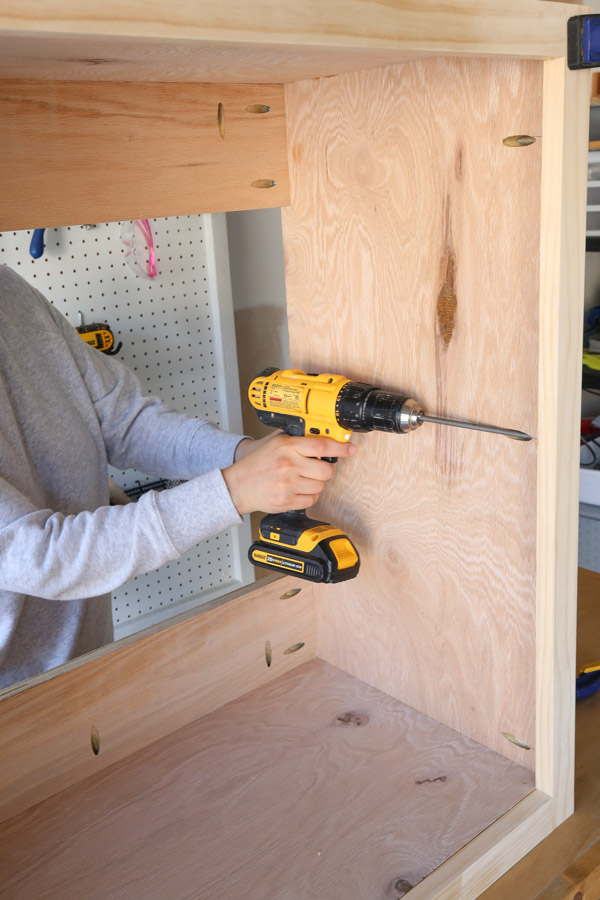
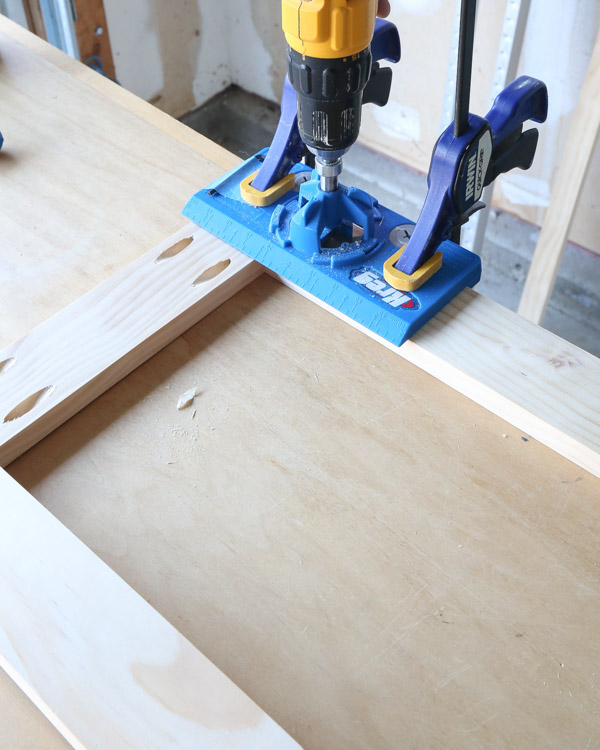
5. Attach the face frame to the cabinet box
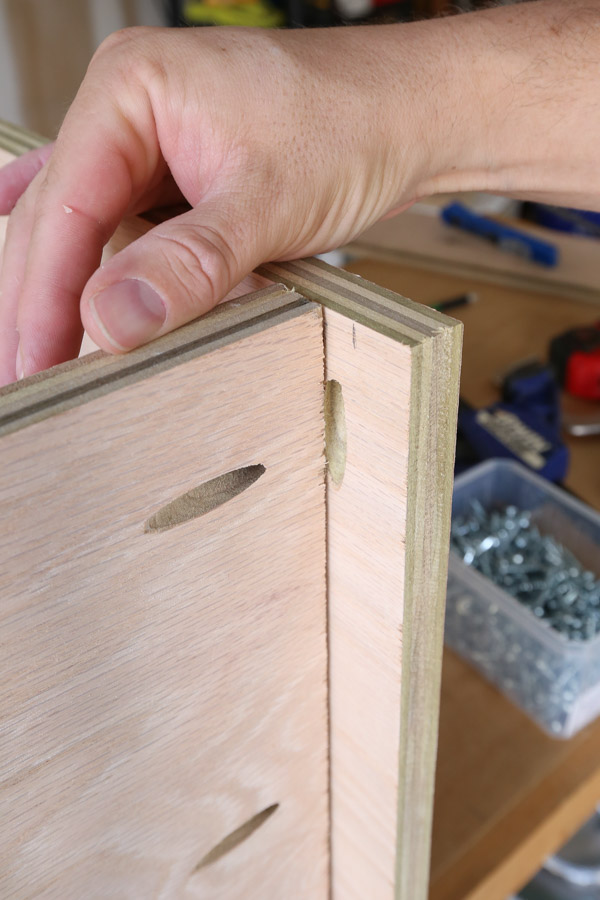
We are going to use pocket holes to attach the face frame to the cabinet for an extra strong connection since our door hinges will be attached directly to the face frame.
We are using the pocket holes we drilled in step #2 on the side plywood boards along with 1 1/4″ Kreg pocket hole screws and wood glue.
📩 Want to Save This?
This is the same face frame connection method we used for our kitchen DIY built in cabinets.
However, for our laundry room DIY wall cabinets and entryway DIY built in cabinet, we just used brad nails and wood glue because those were inset style doors, not face frame, overlay doors.
These pocket holes will be visible when the cabinet is open, but this doesn’t bother me since they are on the inside of the cabinet and they are garage cabinets. If they do bother you, you can always fill them!
Alternatively, you could attach the face frame with just wood glue and nails instead. Make sure to use a generous amount of wood glue.
After the face frame was attached on the sides with Kreg screws, I did add two brad nails into the top and bottom boards. This isn’t totally necessary, I just like everything to be a tight fit with no little gaps.
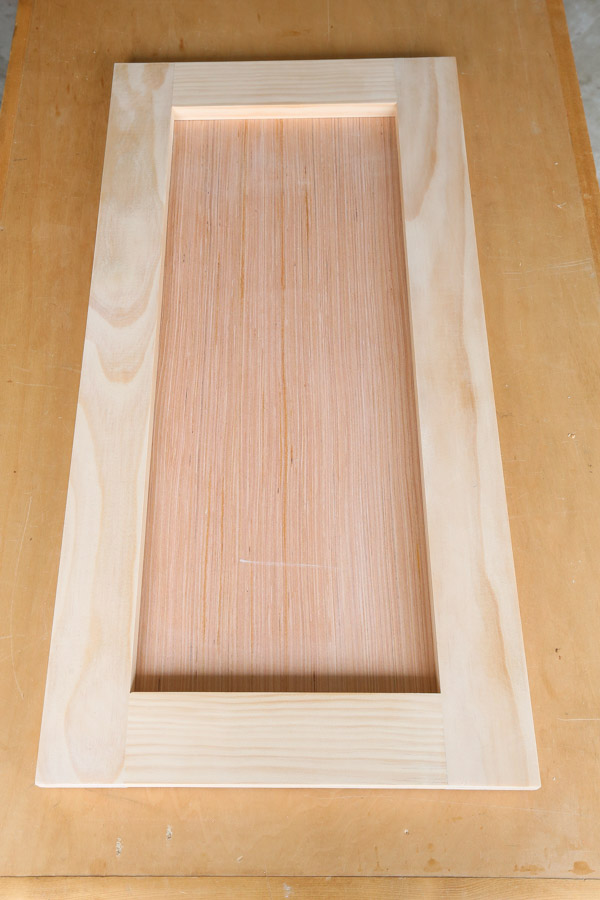
6. Build the DIY cabinet doors
For the doors we are making face frame, ½” overlay cabinet doors with a shaker style. This means that the doors will overlay the face frame by 1/2″ on the top, bottom, and sides of the face frame.
To make these even easier, you could do just a slab, flat front style door using just a piece of plywood. But I love the shaker door look and they are very easy to make with no special cuts based on the method I am using.
Note, check out my DIY cabinet door construction techniques post for other methods for making DIY cabinet doors!
Cut the cabinet door frame lumber to size from the 1×3. The following cut measurements are for an 1/8″ gap between the doors and a 1/2″ door overlay over the face frame:
- (4) 1×3 @ 8 15/16″ for door rails (horizontal boards)
- (4) 1×3 @ 28″ for door stiles (vertical boards)
Next add pocket holes to the door rails on both ends. Make sure to set the Kreg Jig for 3/4″ wood.
I assembled the cabinet door frames the same way as the face frame, using 1 1/4″ Kreg screws and wood glue.
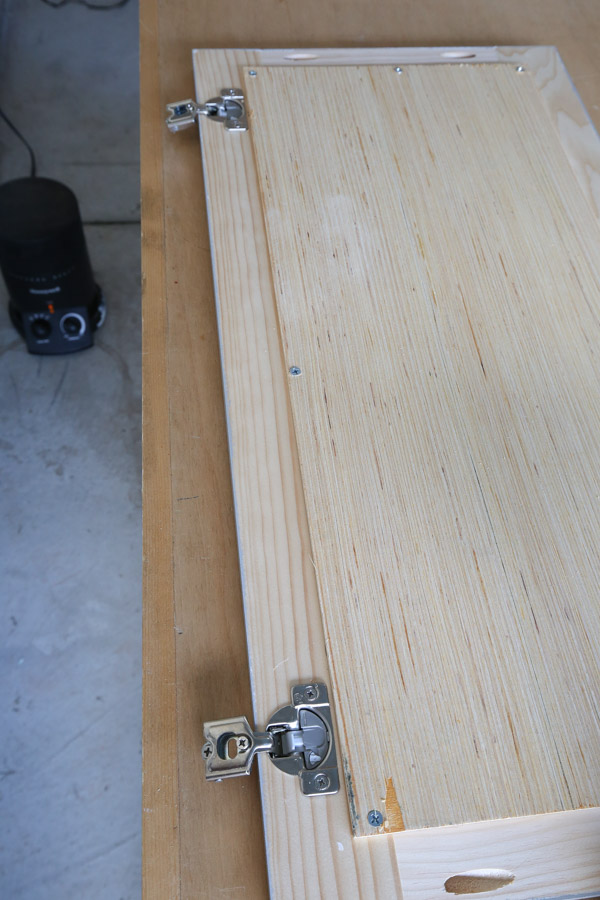
7. Drill hinge holes on the cabinet doors and finish building the doors
**For installing the door, make sure to follow the directions that came with the overlay door hinges you are using.**
The next step is to drill the holes for our door hinges. We drilled them 3 1/2″ from the top/bottom of the door stiles.
Brandon used our Kreg Concealed Door Hinge Jig for this step which makes it super easy.
We’ve used this jig on many of our door builds, including our DIY wall cabinets, entryway DIY built in cabinet door, and DIY bathroom vanity doors.
The last step for the doors is to attach the ¼” plywood backing board (cut in step #1) with 3/4″ screws. This method makes building these doors super easy and quick.
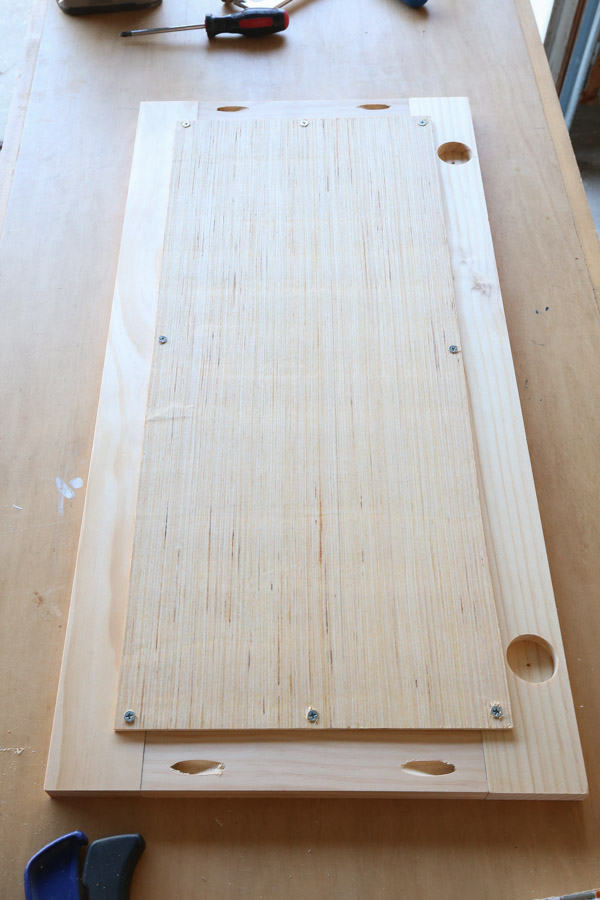
There are many different ways to build doors like using pocket holes and ½” plywood (like we used on our DIY wall cabinets) or using a router for a very professional looking door with no holes on the back.
Because these are garage cabinets, I went with this simple construction method. The end result is a beautiful shaker style door!
Then, we repeated the above steps to build the second door!

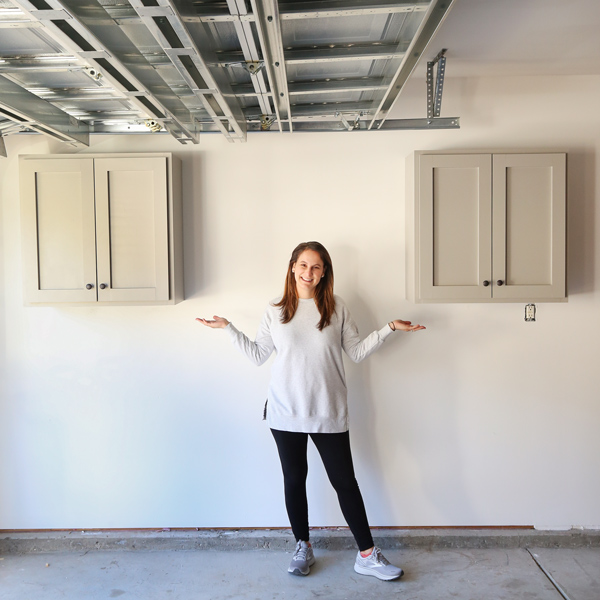
Before installing our doors on the cabinet frame, we hung them on the wall and painted them (step #8-10). We also built a second DIY garage cabinet!
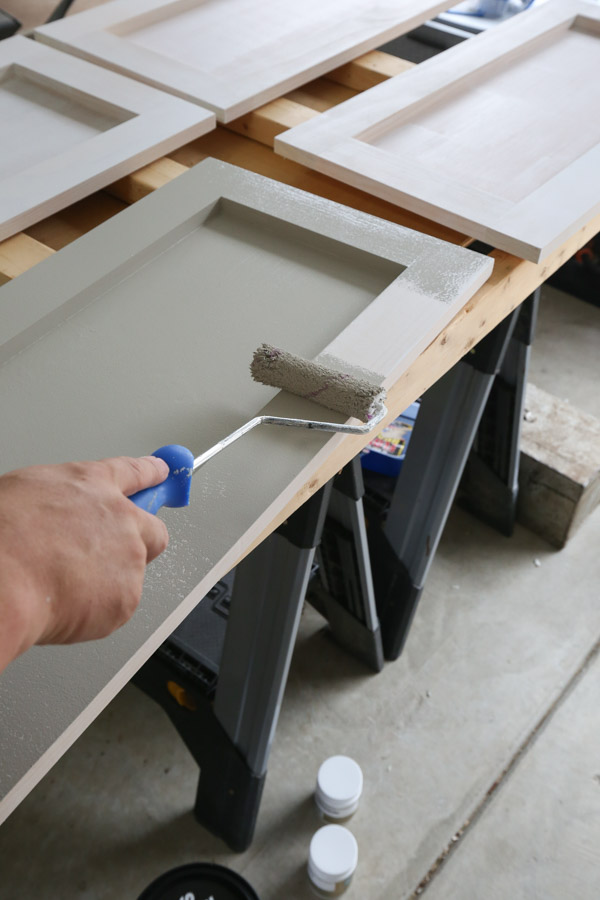
8. Prime and paint the DIY garage cabinets
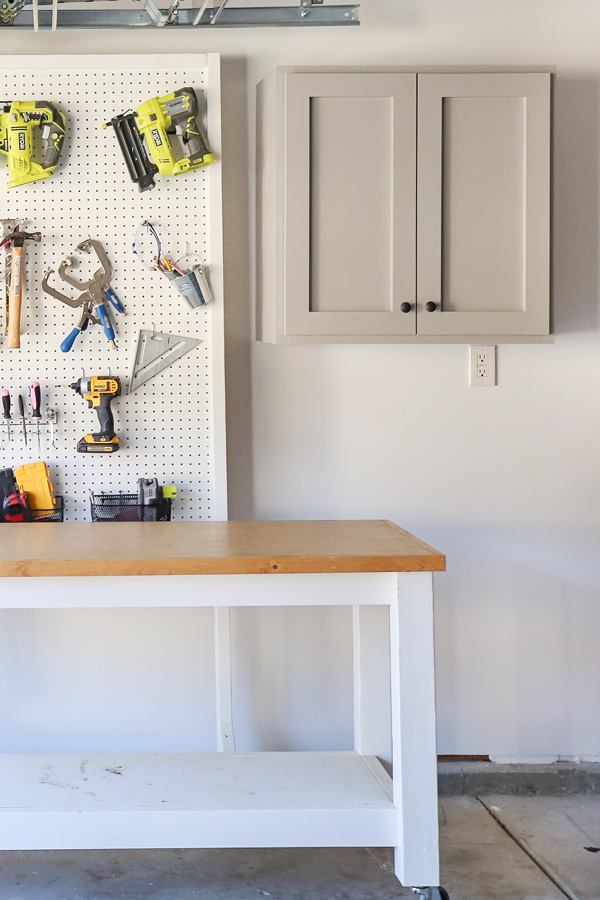
At this point Brandon took over with the cabinets by priming everything. Then, he painted the cabinet with two coats of Dorian Gray by Sherwin Williams using the best paint for cabinets and trim.
I love how this color looks with the white paint color we painted our garage and the black paint color we used on our DIY garage shelves! They are all favorite garage paint colors of mine!
We found it easiest to paint first before installing on the wall.
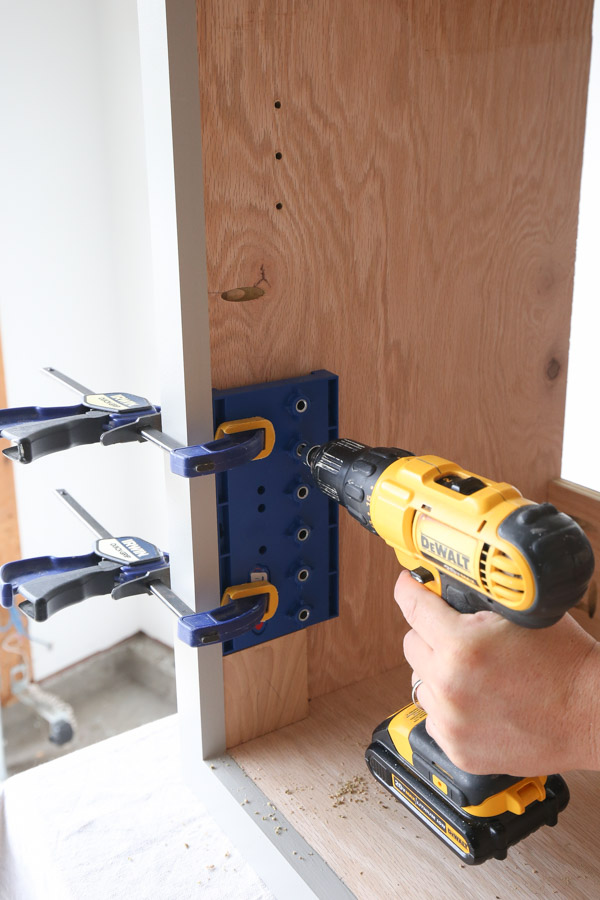
9. Drill shelf pin holes for the garage cabinets DIY
We used our Kreg Shelf Pin Jig for easy drilling of the shelf pin holes inside of the cabinets to provide adjustable shelves. We also used it for our DIY built in cabinets for our kitchen and DIY wall cabinets.
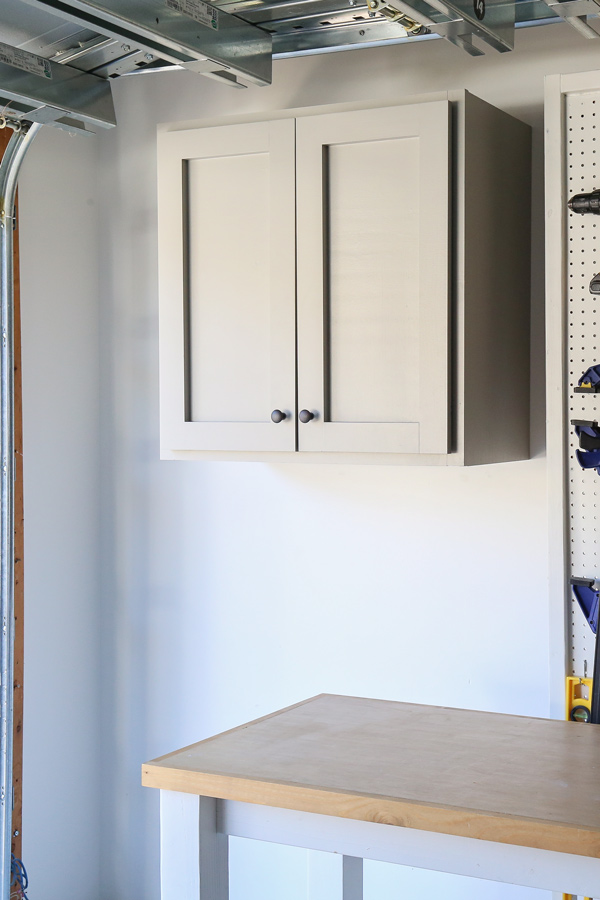
10. Attach the DIY garage cabinets to the wall
To attach the cabinets to the wall, we used 2 1/2″ screws through the back supports into our wall studs, making sure the cabinet was level when attaching.
Our drywall is 1/2″ thick. If your drywall is thicker make sure to use a longer screw.
We also put a temporary 2×4 board up to help with this step and keep the cabinet level while we attached it to the wall.
You can see all of this in action in the how build garage cabinets video.
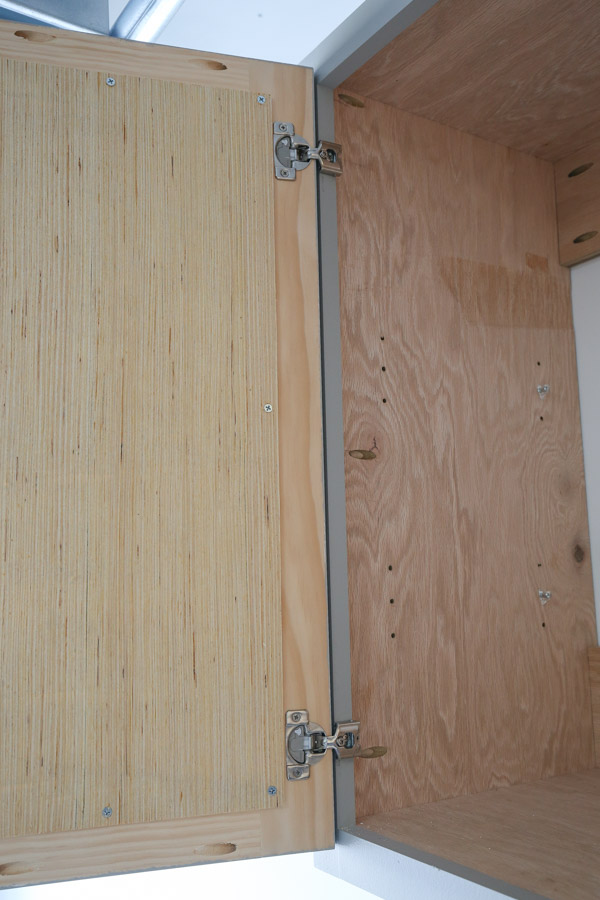
11. Install the doors to the DIY garage storage cabinets
To attach the door hinges to the door, we pre-drilled holes using a self centering drill bit to get perfectly centered pre-drilled holes before installing the screws.
Just like with our kitchen DIY built in cabinets, we used ½” inch overlay face frame hinges that are installed right to the face frame.
They are concealed, European style hinges which are my favorite because you can adjust the door at the very end for the perfect placement.
The overlay style of the hinges makes them very easy to install too! And even better, they are slow close and open 105 degrees, providing easy access to everything.
To install the door to the cabinet with these face frame overlay hinges, you mark the screw hole on the face frame by holding it in place or measuring the hole center on the face frame.
Then, drill a pilot hole using the right size drill bit according to the hinge directions.
Finally, screw the door in place. It definitely helps to have two people for this step as you can see in our DIY garage cabinet video!
13. Install the cabinet door knobs and shelves
The very last steps for the DIY garage storage cabinets are to install the door knobs and shelves.
Use shelf pins to set the shelves on and drill the holes for your door knobs. I used these door knobs temporarily while I wait for a set of matte black knobs to arrive.

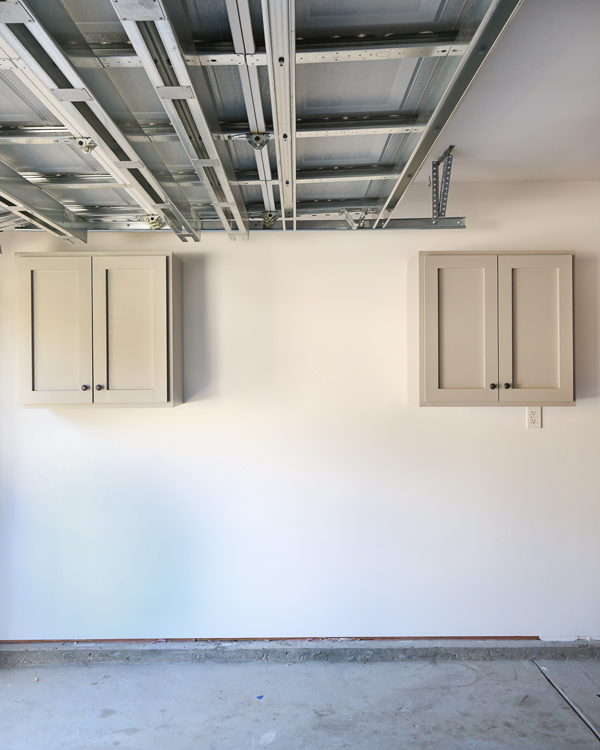
And that’s a wrap on these easy DIY garage cabinets! They are the best thing for storage for a garage space and the perfect storage solution!
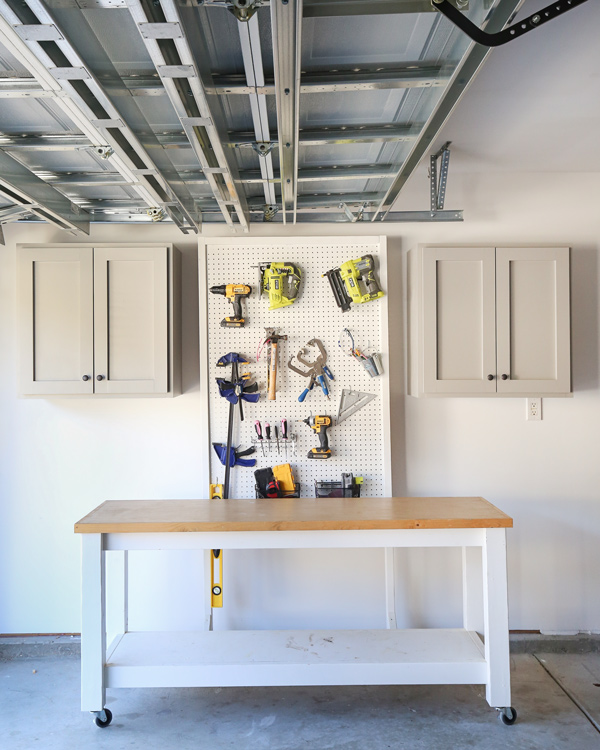
Also, they look great on both sides of our pegboard stand DIY. Although we did end up installing a DIY pegboard wall built in between them.

I can’t wait to start filling them with our shop supplies/tools.
Also, don’t forget to check out our DIY wood garage shelves for more garage storage solutions!
Frequently Asked Questions
Is it cheaper to build your own garage cabinets?
Yes, it is cheaper to build your own garage cabinets if you have the tools needed. Even if you don’t have the tools, but you are making several cabinets, it would still be cheaper to DIY them with the cost of tools.
The cost to build one garage cabinet in this tutorial is about $150 and $260 to build two cabinets. This is the cost for the lumber and hardware (including the hinges) using premium lumber. Less expensive wood may be used for additional cost savings.
What type of wood is used for garage cabinets?
These garage cabinets are made with high-quality materials, including 3/4″ thick formaldehyde free plywood and premium whitewood that has minimal knots. However, any type of 3/4″ thick plywood may be used, as well as any type of 1×3 and 1×2 lumber, as long as the dimensions are the same.
I prefer to use the more premium wood because it’s higher quality, minimal knots, easier to work with, and smooth. Also, the plywood is already sanded and ready to finish with the best paint for cabinets and trim!
Can you use kitchen cabinets for garage?
Yes, you can use kitchen cabinets in a garage. Kitchen stock cabinets that are ready to purchase or even preowned kitchen cabinets may be used. These are both good options for garage cabinets if you don’t want to build them from scratch.
I used stock base cabinets as part of our kitchen DIY built in cabinet. The same idea can be applied to garage cabinets or a workshop area in the garage.
***
My garage workshop area is starting to come together. I can’t wait to share our next garage makeover project! Follow along on Instagram and YouTube for sneak peeks and video tutorials of all the DIY projects!
Want to save for later?! Pin it here:
Don Preus
Monday 30th of December 2024
I found this project to be fun and rewarding. All my Kreg tools worked perfectly. I changed the dimensions to fit my workshop space. Thanks Angela !
Angela Marie Made
Thursday 9th of January 2025
So glad you enjoyed it!
Hannah
Thursday 9th of November 2023
Hello, thank you for the great walk through! Just wondering, is your garage heated? If not, have you noticed the cabinets warping at all during the winter or summer months?
Angela Marie Made
Friday 10th of November 2023
It is not heated! I haven't experienced any warping!
Pieter du Plessis
Friday 6th of January 2023
Hi, thank you for the great video and blog. I'm a newbie so I am grateful the instructions are easy to follow.
Angela Marie Made
Thursday 12th of January 2023
So happy you have found it helpful! Thanks so much!