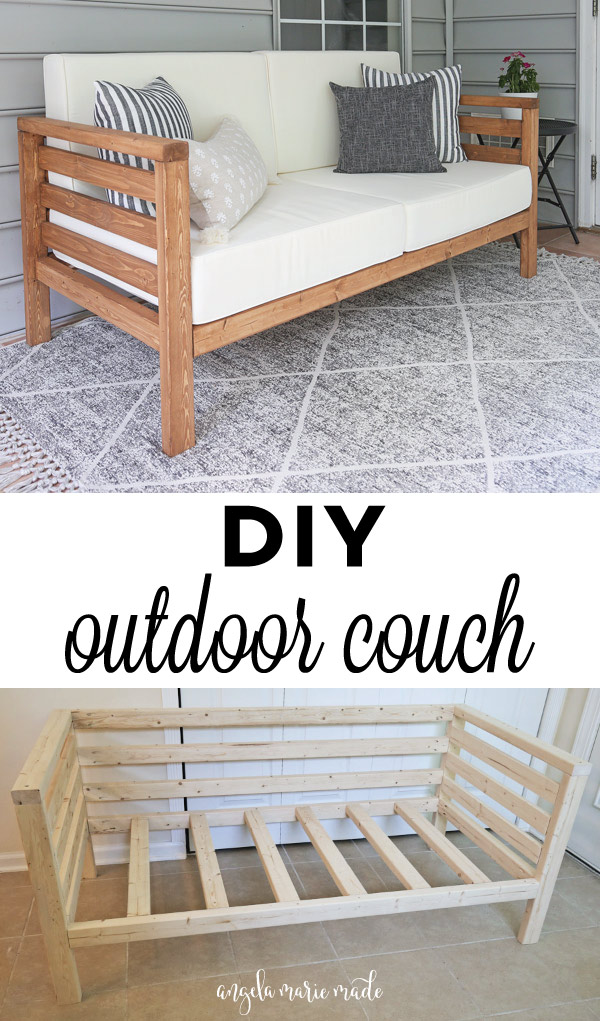
Our sunroom really needed some cute outdoor furniture, so I came up with plans to build a DIY outdoor couch! This was my first piece of DIY outdoor furniture that I’ve built and I love it!
I love how our outdoor couch turned out and I’m excited to share the step by step tutorial!
Also, I have a step by step video tutorial and printable build plans below too!
One of the best features about this DIY outdoor couch is that it only cost $30 in lumber to build!!! The exterior stain I used was an additional $15, so a total of $45 for me to build it!

Cushions Used & Cushion Options
The couch was designed to fit with two sets of outdoor cushions that are no longer sold or in stock (they use to go out of stock all of the time). I have many other cushion options listed below and updated for 2026!
The original cushions I used were 28.75 long x 28.75″ wide each (the seat cushion size). The closest in size that I have seen currently in stock are these 28.5×28.5 cushions and these 28.7×28.7 cushions (and they both come in multiple colors).
But, most readers that have made this couch have changed the dimensions to fit other size cushions.
*The premium outdoor couch build plans include an alternative cut list for the 24×24 and 28×28 common couch cushion sizes!
If you use different cushions than the ones above, make sure to adjust the below cut measurements! And make sure to order your cushions first before building in case they go out of stock!
Spring 2026 Cushion Update:
The cushions I used are still out of stock. Here are currently stocked options in 24×24 sizes (and multiple colors/good reviews) as of spring 2026:
Premium Printable Build Plans
Our step by step tutorial below is free, but I also have printable premium outdoor couch build plans for this outdoor couch with 3D diagram models for each step to help make the building process easier!
***These premium plans also include alternative cut lists for the 24×24 and 28×28 common couch cushion sizes!***
I built a matching DIY outdoor chair and DIY outdoor coffee table and DIY outdoor side table to go with the couch and complete the set!
I also have a DIY outdoor dining table that compliments the outdoor furniture set too!
Note, this post contains some affiliate links. For more info see my disclosures here.
How to build a DIY Outdoor Couch:
Materials:
- (8) 2×3 @ 8ft (framing lumber)
- (2) 1×3 @ 8ft
- 2 1/2″ Deck Screws (optional – see step #2)
- 2″ brad nails
- 2 1/2″ Kreg screws (weather resistant)
- Waterproof wood glue
- Stainable wood filler
- (2) sets of outdoor cushions**
- Exterior wood stain (I used a quart of Valspar exterior stain in Pinebark)
Tools:
- Kreg Jig (or Kreg Jig mini)
- Miter saw
- Drill
- Brad nailer
- Clamps
- Tape Measure
**If you use different cushions than the ones I used, make sure to adjust the below cut measurements!
The final size of this DIY outdoor couch is 26″ tall x 62 1/2″ wide x 30 1/4″ deep.

VIDEO TUTORIAL:
Subscribe to my YouTube Channel here!
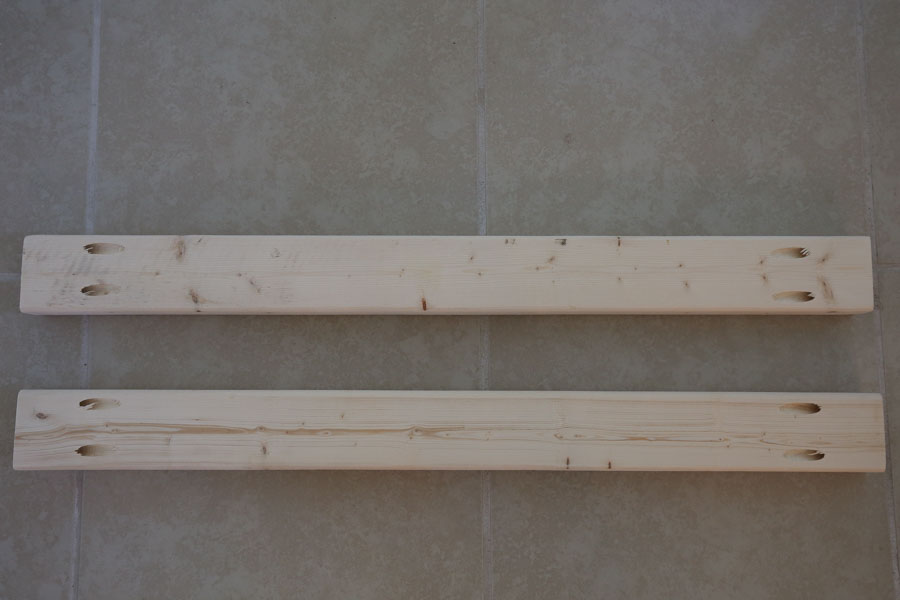
1. Make cuts for outdoor couch frame
Use a miter saw and make the following cuts from the 2x3s:
- 4 pieces @ 24 1/2″ (for side frames)
- 2 pieces @ 30 1/4″ (for side frames)
- 5 pieces @ 57 1/2″ (for back & front frames)
- 8 pieces @ 27 1/4″ (for side & bottom frames)
Note, if this is your first time building , check out my 6 easy tips for getting started with woodworking!
*Get the premium outdoor couch build plans which also has an alternative cut list for the 24×24 and 28×28 common couch cushion sizes!
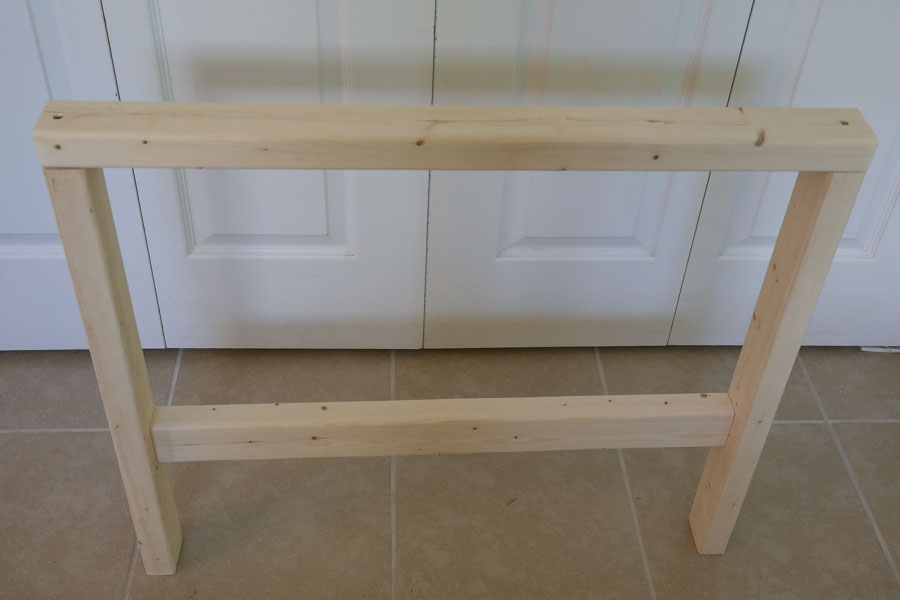
2. Assemble DIY outdoor couch side frames
Add two pocket holes with the Kreg Jig to each end of two of the 27 1/4″ pieces.
Tip: See my how to use a Kreg Jig post for an easy, step by step tutorial and video tutorial on how to use the Kreg Jig!
Mark 10″ up from the bottom of one of the 24 1/2″ pieces (on the edge of it). Attach one of the 27 1/4″ pieces perpendicularly to the 24 1/2″ piece at the 10″ mark.
*Note: If you prefer the seat to sit higher than 10″ (plus your cushion height), increase the 10″ marks by a few inches to your desired seat height!*
Make sure to attach it so the edge of the 27 1/4″ piece is flush with the top edge of the 24 1/2″ piece as shown in the below photo. I used a scrap 1×2 and paint stick underneath of the board to help with this part!
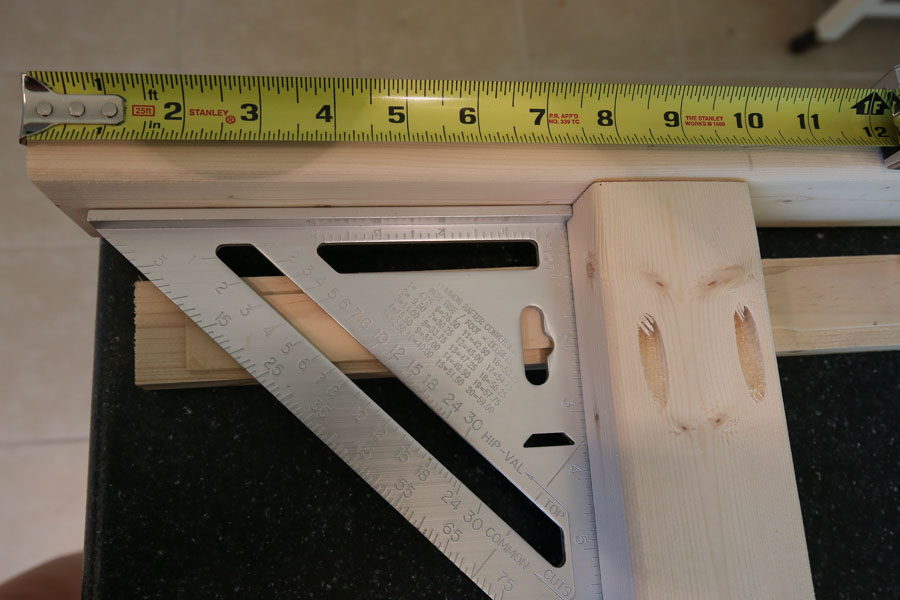
Then attach the two together with 2 1/2″ Kreg screws and waterproof wood glue. Repeat this process on the other side of the 27 1/4″ piece. Once complete your side frame piece will look like this:
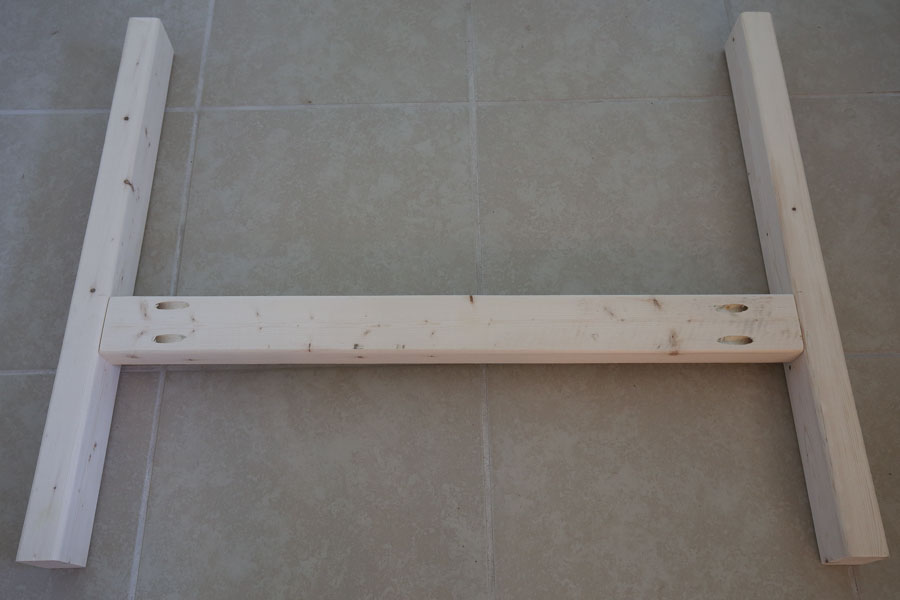
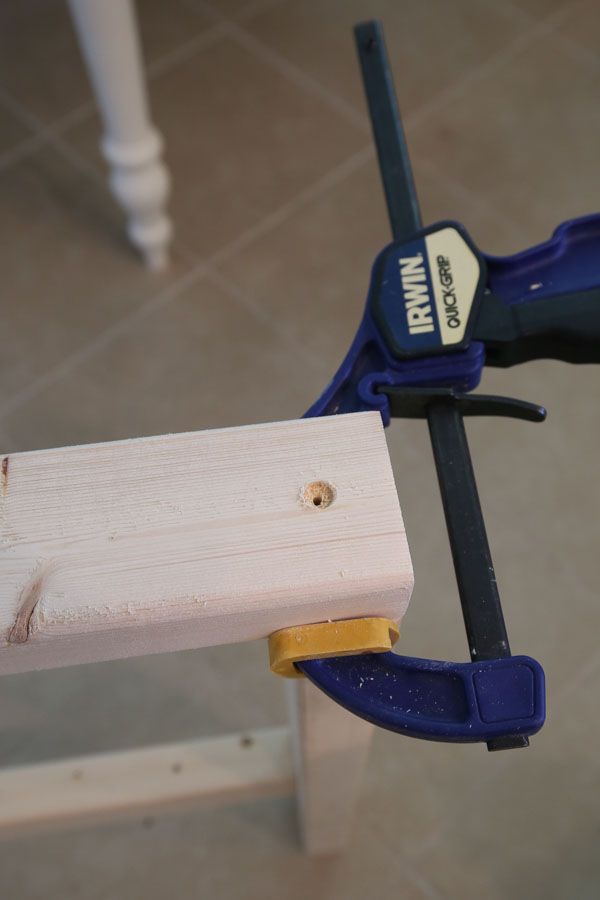
Next, attach one of the 30 1/4″ boards to the top of the frame with 2 1/2″ deck screws and waterproof wood glue. Make sure they are countersunk beneath the wood surface (you will fill them with wood filler later).
I forgot to get deck screws, so I just used Kreg screws instead, which works too!
To do this, I used a 3/8″ drill bit and drilled a shallow hole, just deep enough to cover my screw head. Then, I drilled my pilot hole inside of that larger hole with a smaller bit for the Kreg screw. Lastly, I drilled in my Kreg screw to attach the two boards.
Repeat on the back of the side frame piece and then your side frame is complete!
📩 Want to Save This?
Repeat the above process to create the second side frame piece for your DIY outdoor couch.
Also, the steps for these side frames are exactly the same as the matching DIY outdoor chair. I created a how to build an outdoor chair VIDEO if you want to see the steps in a video tutorial form!
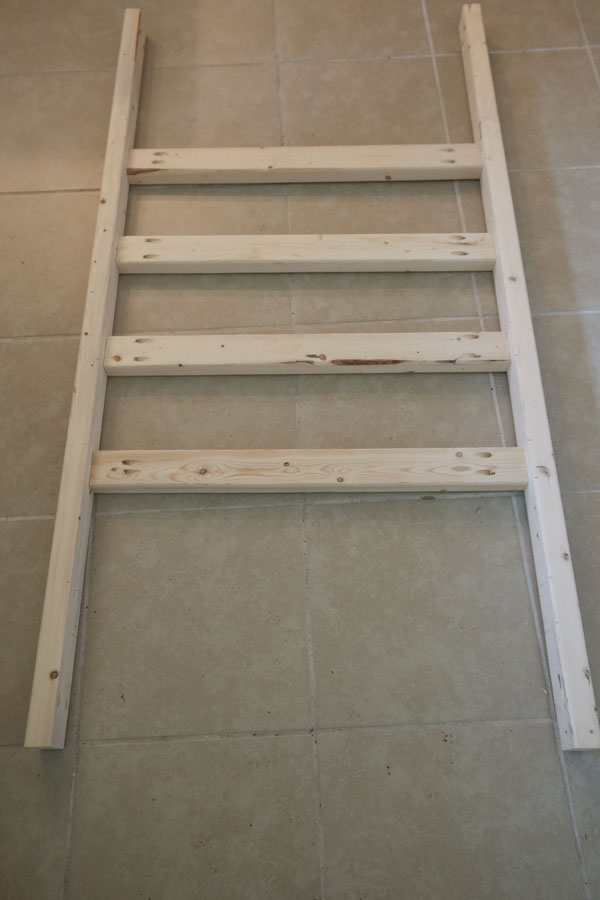
3. Add side slat boards to side frames
Now it’s time to add the horizontal slat boards to the side frames. This step is totally optional. These slats are more a decorative feature than structural. I think they make the DIY outdoor sofa look really cool and will help prevent throw pillows from falling out the sides!
Measure the exact distance between the two legs of the side frames and cut three 1x3s to this size. The measurements should be close to 27 1/4″ but since we’re working with framing lumber, they will probably be a little different.
Each of my three slats were a little different in size, so make sure to measure exactly where the board is going. The boards should be spaced out 1 3/4″ from each other:
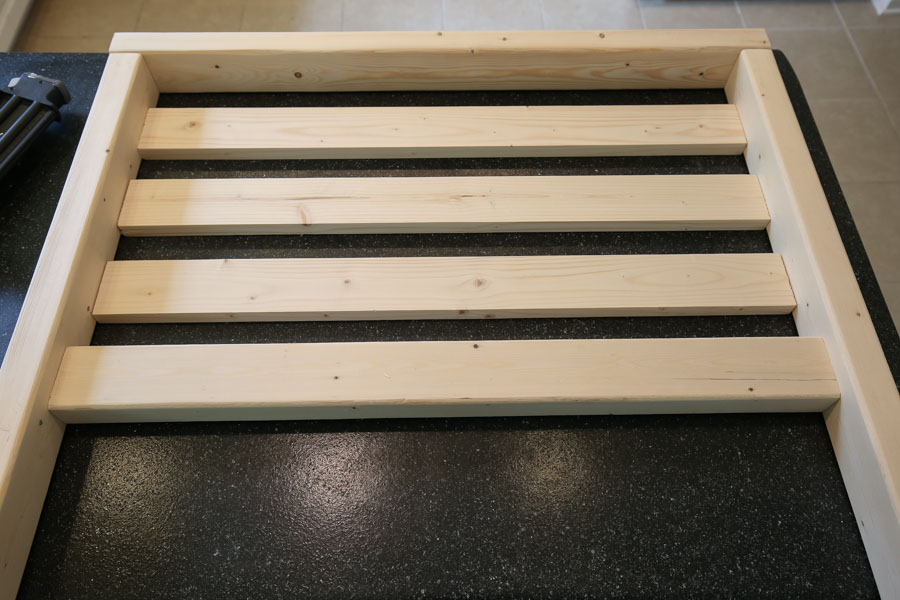
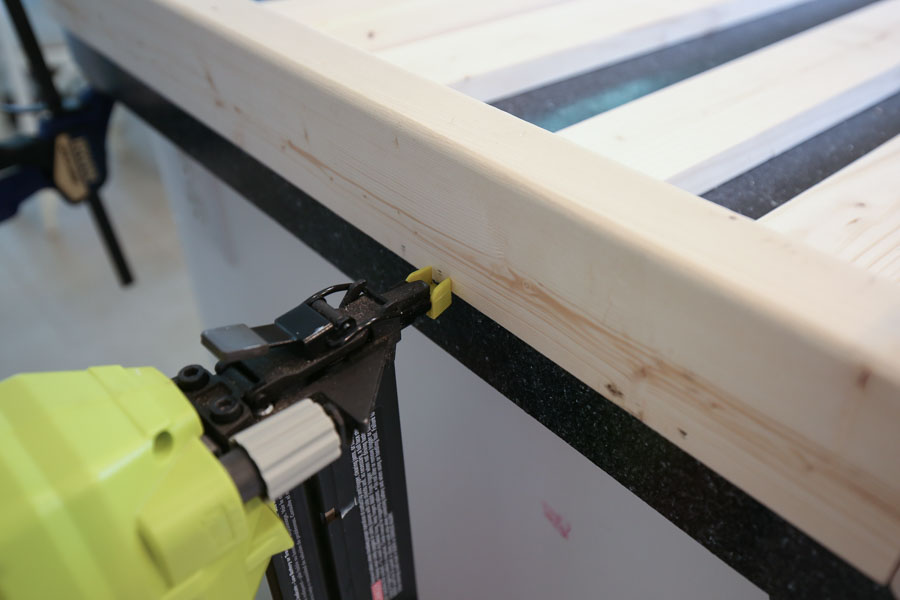
Attach the 1×3 slat boards with a brad nailer and 2″ brad nails.
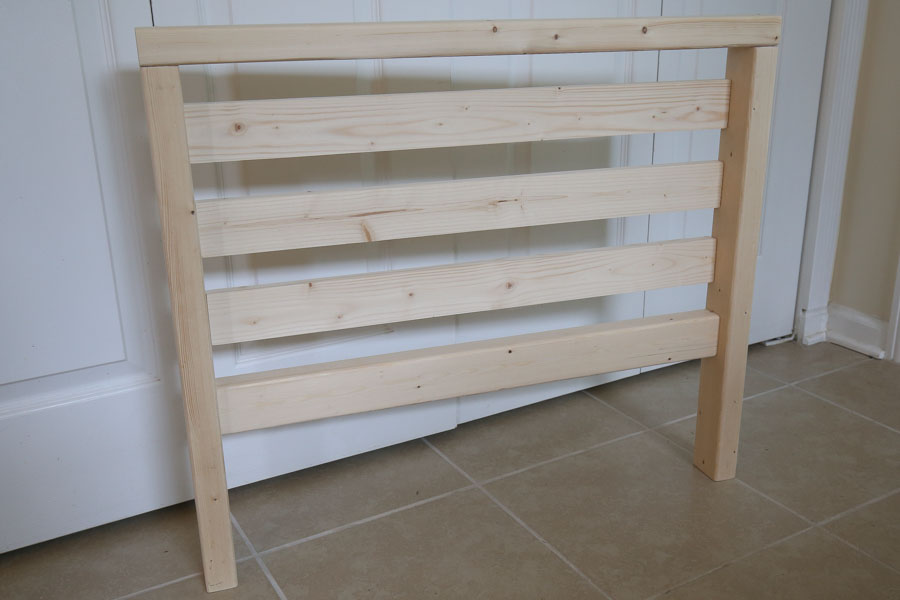
Repeat the above process for the second side frame.
4. Assemble bottom frame of DIY Outdoor Sofa
Add pocket holes to both ends of the remaining 6 boards @ 27 1/4″ AND to the ends of the 5 boards @ 57 1/2″.
Then use Kreg screws and waterproof wood glue and attach four of the 27 1/4″ boards perpendicularly to two of the 57 1/2″ boards as shown in the below photo. Make sure the 57 1/2″ boards pocket holes are facing the inside.
Space the 27 1/4″ boards about 6″ part and attach the first and fourth board about 14 1/2″ up from the side board ends. Note, you will add the other 2 boards in soon, but not yet so you can easily fit your drill in the space and attach this bottom frame to the side frame in the next step.
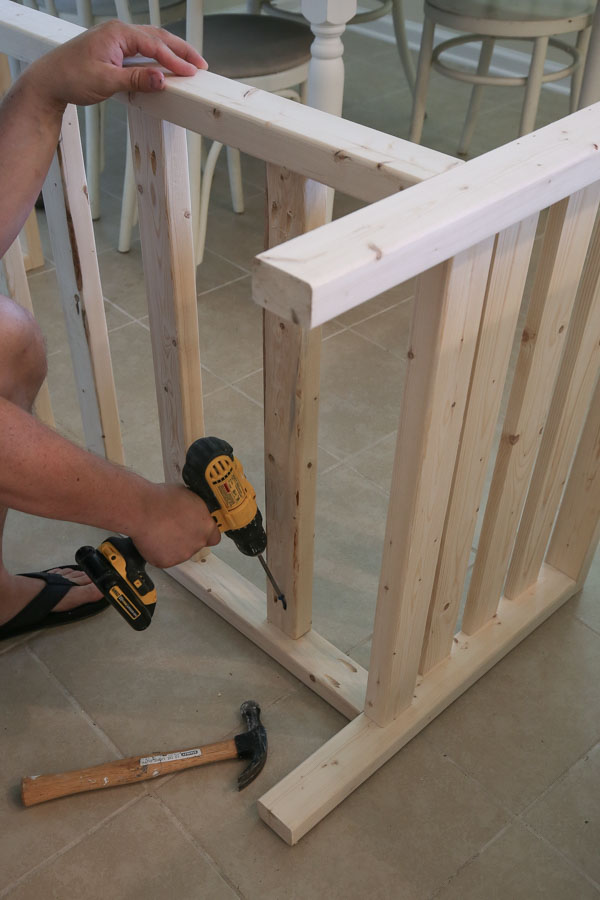
5. Attach bottom frame to outdoor couch side frames
Attach the bottom frame to the side frames using 2 1/2″ Kreg screws and waterproof wood glue and 10″ up from the ground (as shown in photo below). It helps to place the side frame flat on the floor and have a second person hold up the bottom frame on top of it.

Once both side frames have been attached to the bottom frame, go ahead and add the last two 27 1/4″ boards on the bottom frame (from step #4). If it’s difficult to get them in place, use a hammer to tap them in place better.
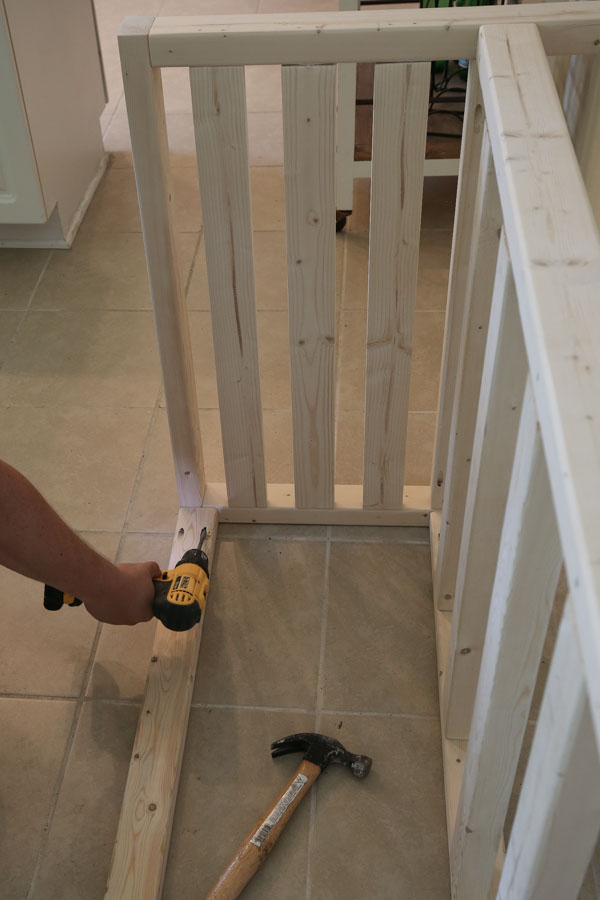
6. Add back frame boards to DIY outdoor couch
Turn the outdoor couch on its side and use Kreg screws and waterproof wood glue to attach the remaining three, 57 1/2″ boards to the side frames to create the back frame of the couch (space the boards about 2 3/4″ apart).
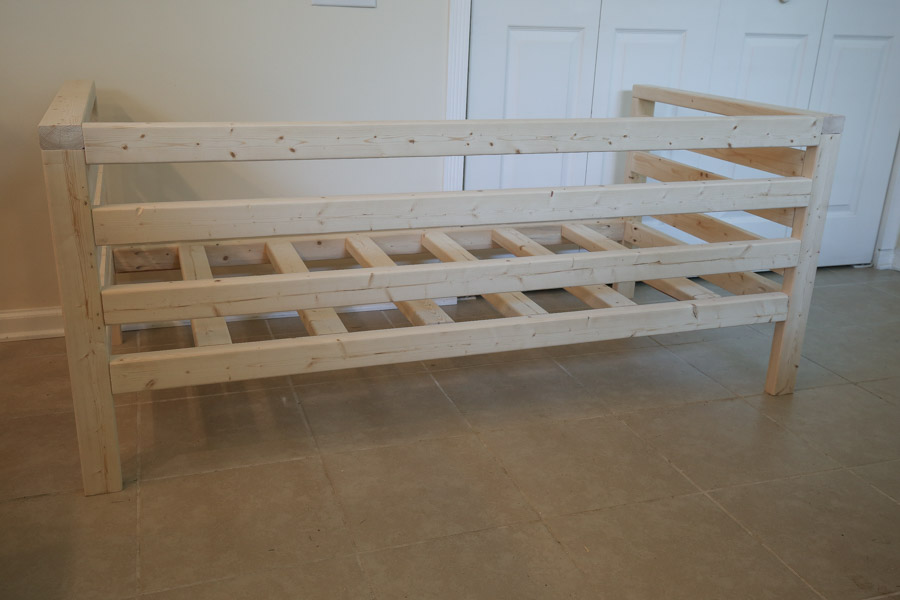
Flip your couch back up and your DIY outdoor couch build is finished yay!!!

7. Fill holes, sand, and stain
Fill the 4 screw holes and nail holes in with stainable wood filler. If you haven’t sanded your boards yet (I like to do most of my sanding before starting), go ahead and sand them well.
For tips on sanding wood, check out my easy guide on how to sand wood.
Finish off your project with exterior wood stain! I used Valspar semi transparent exterior stain in Pine bark. It was one of the only exterior stains I could find that came in a quart size and not a gallon size. And it only took one coat!
Check out my tutorial on how to stain wood for a beautiful finish and the best way to apply stain!
After staining, let your couch dry for a full 24 hours, then add the cushions, and enjoy!!!
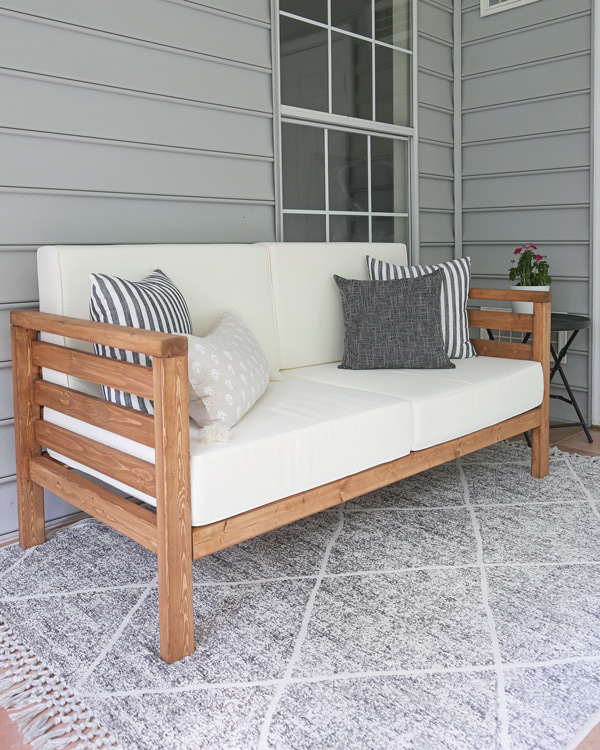
Here’s another angle of it!

I loveeee this DIY outdoor couch so much, I’m thrilled with how it turned out and the low cost! In the spring I’d like to build a matching chair set to go with it!! How fun would that be?!
Update: I built a matching DIY patio chair and DIY outdoor coffee table and DIY outdoor side table to go with the couch! And a DIY outdoor dining table that compliments the set too!
So, what do you think of this build? It fits great in small spaces and it has really helped to start transforming our sunroom into an enjoyable, cute, and functional space. Next up, I need some kind of wall art to go above it!
If you make this DIY couch, please share it with me on social media @angelamariemade or #angelamariemade!

Follow along on my latest projects and sneak peaks on Instagram, YouTube, and Facebook!
If you want to save this tutorial for later, Pin It here:
Decor Product Sources:
- Striped Pillow Covers – From Amazon & discontinued, similar here (18×18 size) with 20×20 Pillow Inserts
- Black Pillow Covers (16×16 size) with 18×18 Pillow Inserts
- 5×7 Outdoor Rug
- Round Black Metal Accent Table (similar one here!)
- Lumbar pillow – From Target a few years ago
Kenneth Donaldson
Saturday 13th of April 2024
What type of wood do you recommend for these types of outdoor projects? Thanks 🙏
Angela Marie Made
Wednesday 24th of April 2024
I usually just use pine and finish it with a outdoor stain. But cedar is always best for outdoor projects if it's in the budget!
Megan
Wednesday 10th of April 2024
Love the look of this couch! Unfortunately my husband made the version to fit 28x28 inch cushions and I have scoured every store and website for said cushions and they are nowhere to be found. Suuuuper bummed and learned the lesson to check out cushions prior to building.
Brenna Tunnicliff
Saturday 6th of January 2024
Hello!
First of all, thank you for making this! I made this and two chairs using the chair plans two years ago; we have gotten a ton of use out of them! I do not have them in a covered area, so they definitely take a beating in the PNW weather.
With that said, I have a couple of recommendations to all who are planning on building these to use outdoors:
1. Use stainless steel brad nails or outdoor trim screws to avoid bleeding. Also, I’ve had several snap, so consider just screwing them in instead.
2. Add an additional support piece of wood (like a 2”x 1”) to the insides of both front legs to prevent the wood from snapping from the weight. I know this from experience 😂
3. Consider using pressure-treated wood or cedar for durability.
4. Consider sanding and staining prior to building—way easier!
Because of the above, these unfortunately only lasted three seasons before turning to firewood.
Charis Hasson
Monday 3rd of July 2023
Hi I love the couch and chairs for outside and would like measurements to fit the cushions I just found. I'm using (3) 24x24 cushions instead of 2 to make it a little bigger for the couch. Would u mind sending me measurements for that? Thank u so much. I love all ur designs
Michael
Tuesday 20th of June 2023
Seems like thestraight upright back would not be as comfortable as one would like.