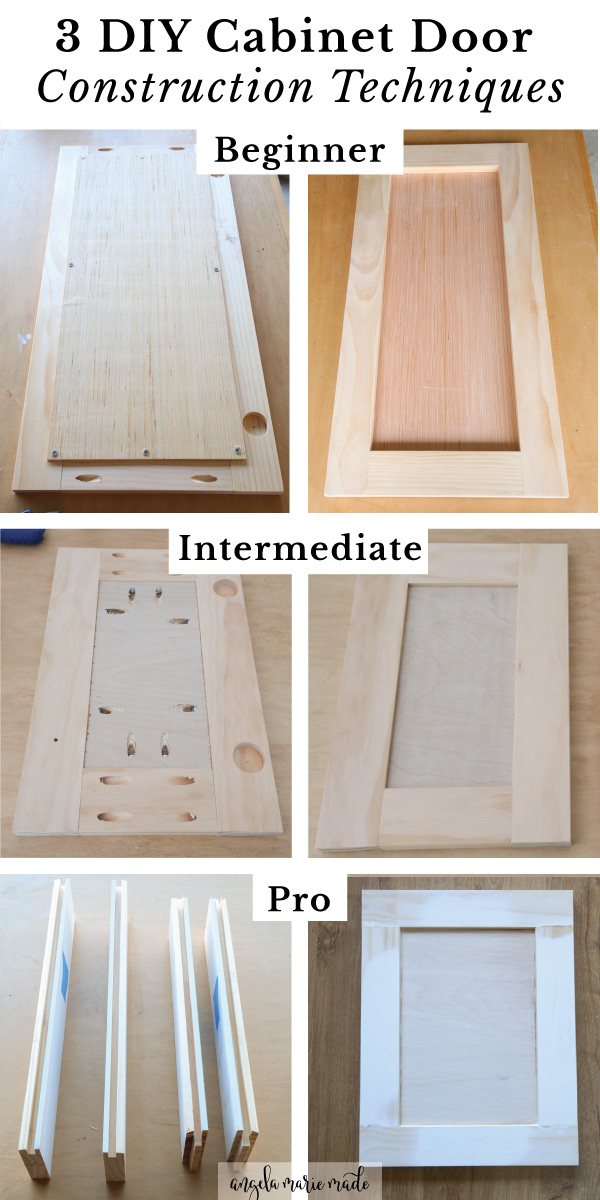
Learn 3 DIY shaker cabinet door construction techniques, for all skill levels, including an easy and beginner technique, intermediate, and a more advanced and professional technique. Also, learn about parts of a cabinet door, and common styles and materials.
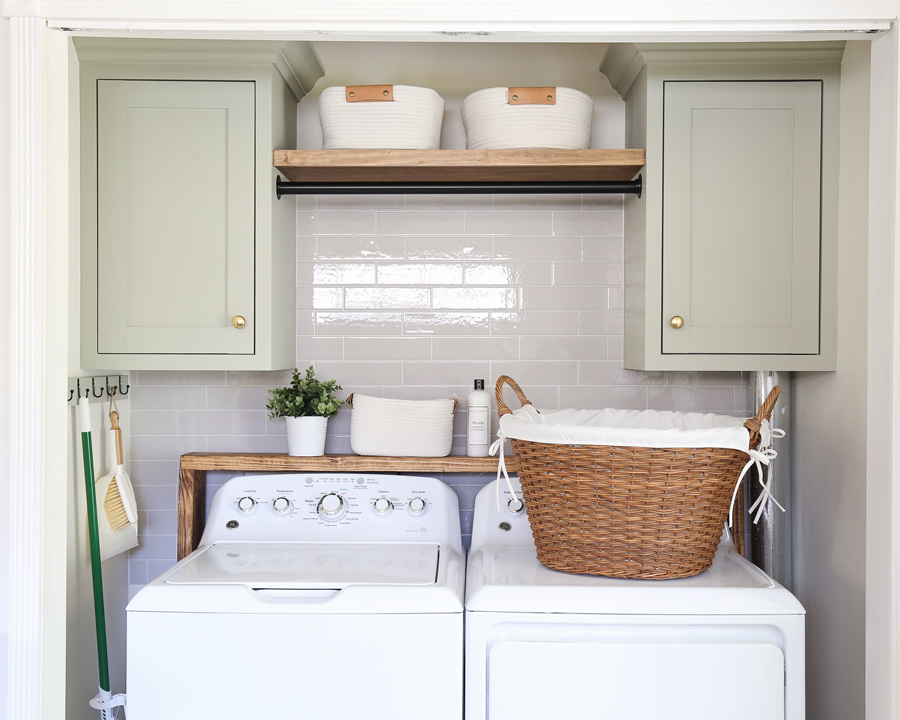
I’ve made many DIY cabinet doors for DIY furniture and cabinet projects, like our DIY wall cabinets for our laundry room, DIY garage cabinets, and DIY bathroom vanity with double doors.

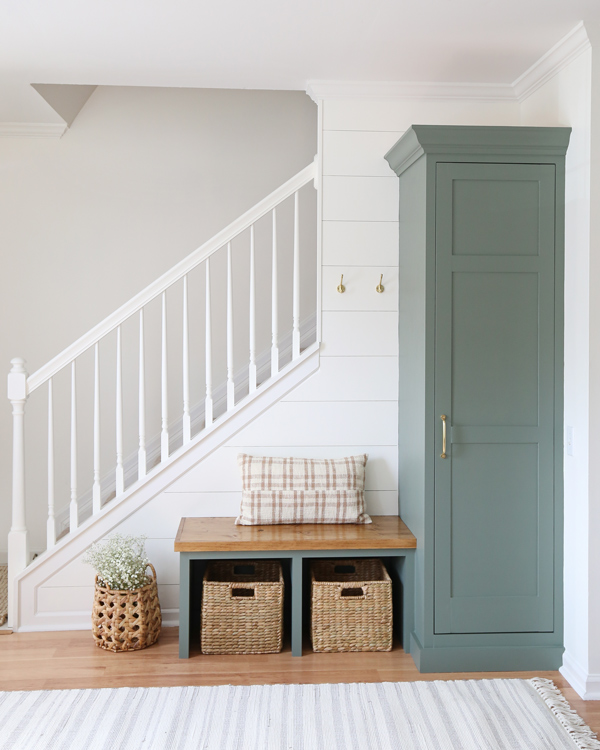
I’ve also made larger DIY cabinet doors like for our entryway built in cabinet.
A DIY cabinet door can sound intimidating to build, just like a DIY cabinet. And there really are so many different ways to build cabinet doors.
But, today I want to share three specific cabinet door construction techniques that I have used to make DIY cabinet doors. These range in skill level from beginner to advanced. I will also be sharing the pros and cons of each!
DIY shaker cabinet doors
These methods will all be for a DIY shaker cabinet door style because shaker doors are classic, beautiful, and one of the most popular choice door styles. Plus, they are one of the easier styles to make.

These DIY cabinet doors can be used on all sorts of projects including kitchen cabinets, bathroom cabinets, built in cabinets, and more! Also, this shaker style door can also be used for drawer fronts on drawer boxes too!
Before I get into the three techniques, first I want to go over other important aspects of DIY cabinet doors, including the parts, sizes, and styles/overlays. These are important concepts to understand before building a cabinet door!
Note, this post contains some affiliate links. I may earn a commission if you shop those links (at no cost to you). Thank you for supporting my small business. For more info see my disclosures here.
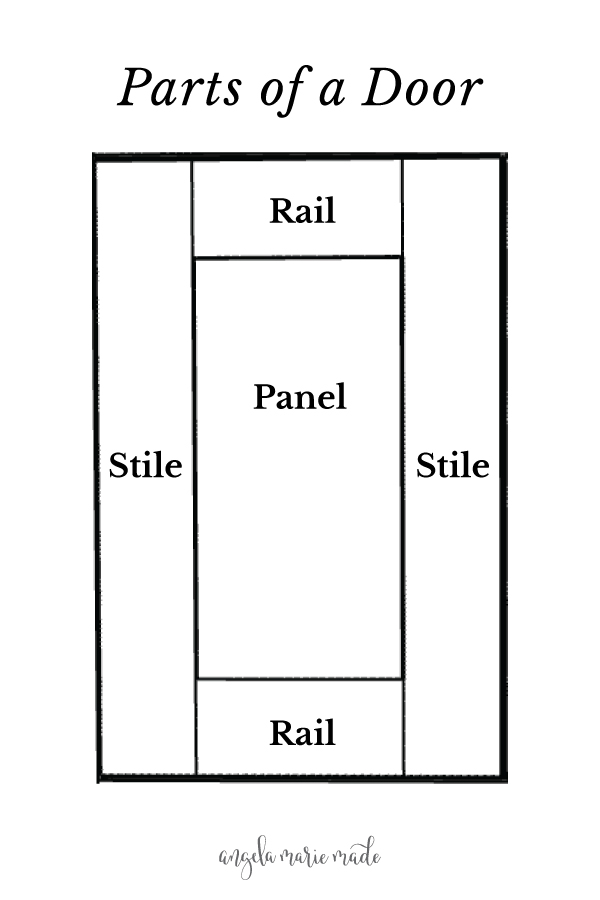
Parts of a Door:
Let’s talk about the parts of a door!
The door frame is made up of four boards. The two horizontal boards are called the rails and the two vertical boards are called the stiles. The center board is called the center panel or just panel.
Materials for DIY Cabinet Doors
DIY shaker cabinet doors frames can be made from many types of wood.
For more affordable materials, white wood and pine are good choices.
A more quality wood to use when painting the cabinet door is poplar. However, this is more expensive.
Premium woods to use, especially when staining the wood, are hardwoods like oak and walnut wood. Hardwoods are usually the most expensive option and are best to use once you are comfortable with the building technique you are using to avoid wasting material!
The center panel can be made from wood, plywood, or MDF. For a DIY shaker door, 1/4″ plywood or MDF works well. Note, MDF should only be used when painting the doors not staining.
Types of Cabinet Door Styles and Sizes
Just like materials, there are many types of door styles and sizes. The two main door styles though are: inset and overlay (full or partial). This is important to understand since it will determine your cabinet door measurements.
Overlay Cabinet Doors
Overlay doors are very common. The cabinet door overlays the cabinet face frame or frame either fully or partially.
A full overlay door can be used on face frame and frameless cabinets.
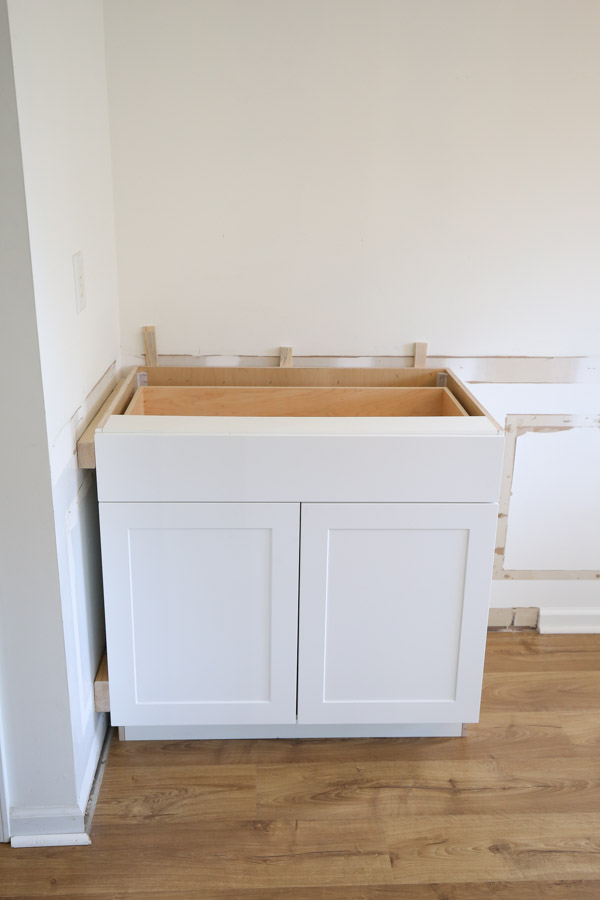
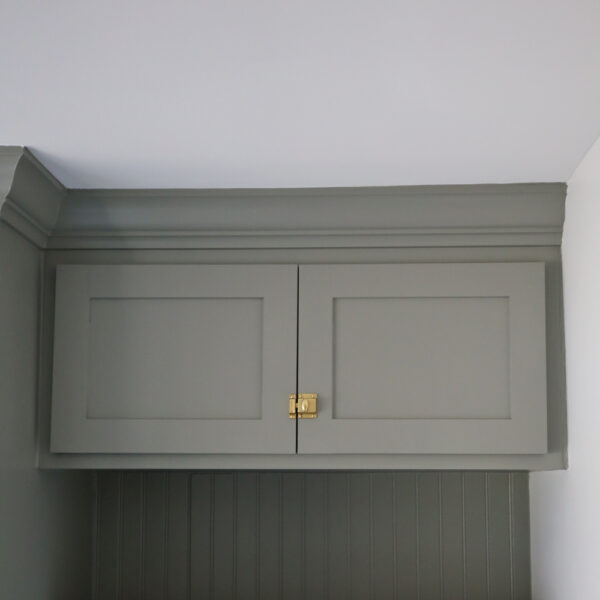
Many stock cabinets, like the base kitchen cabinet from our DIY kitchen built ins, use full overlay cabinet doors on frameless cabinets:
A partial overlay is where the door overlays only part of the cabinet face frame (it’s not used for frameless cabinets), usually about 1/2″ or 3/8″ partial overlay, depending on the door hinges used.
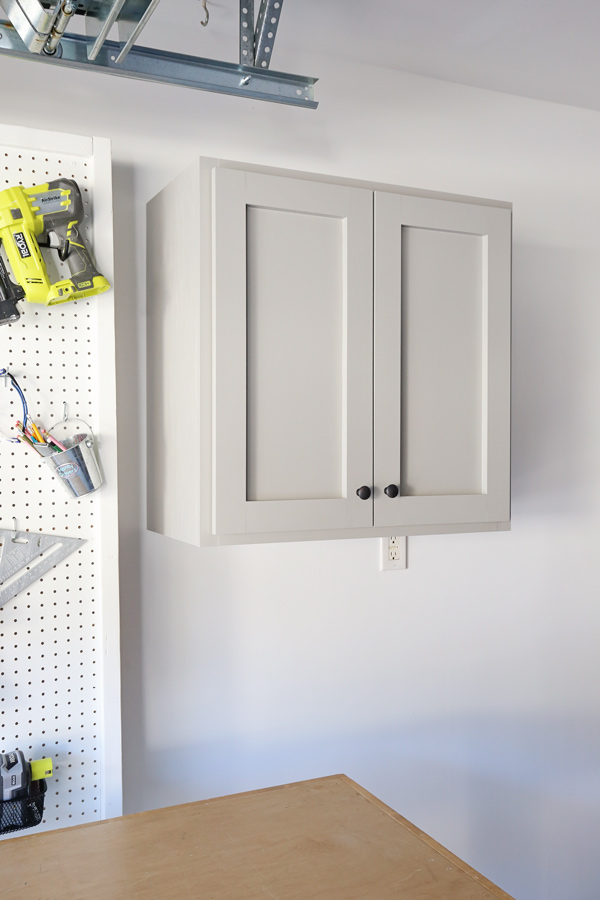
I used a 1/2″ partial overlay cabinet door with a face frame for our DIY garage cabinets:
To determine your cabinet door size for overlay or partial overlay doors, you measure the opening for your door and add the amount of overlay you want on each side of the door.
Inset Cabinet Doors
Inset cabinet doors are smaller than the cabinet face frame, there is about 1/16″ to 1/8″ gap between the door and the face frame of the cabinet. The door sits flush with the cabinet face frame.
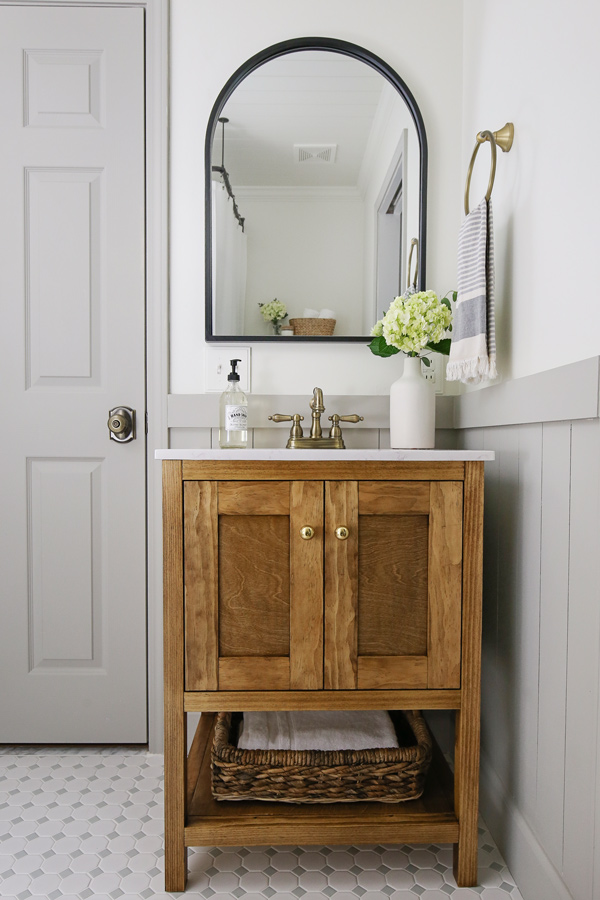
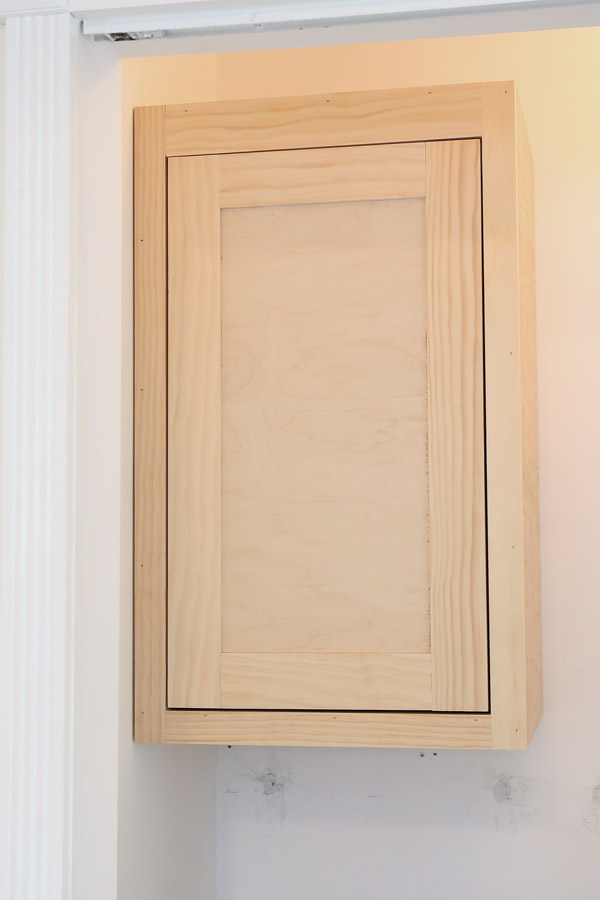
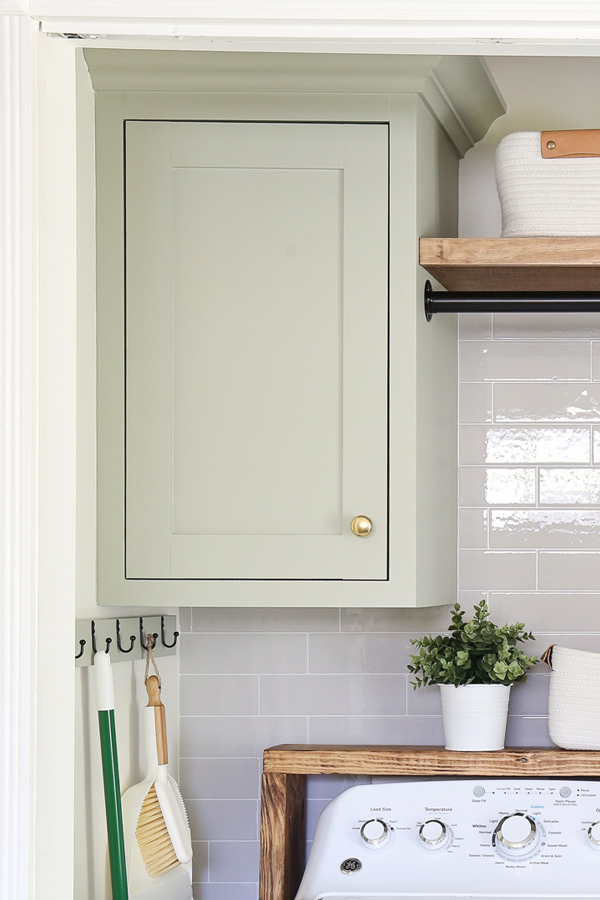
I’ve used an inset door several times, like for my DIY wall cabinet and my DIY bathroom vanity with doors.
Inset doors are beautiful and a very high end, custom look. Due to the more advanced skill and time it requires to build and install them, they cost more if you were to buy them and pay for installation. And they take patience to build and install yourself due to the precision they need!
Cabinet Door Sizes
Cabinet door sizes can vary greatly. In general most standard size doors have one center panel. But, if your door is large, about 48″ or taller, it may need two or three panels and additional rails (horizontal boards).
Also, the frame of a door can range in size too. Common board frame sizes used are 1x2s, 1x3s, and 1x4s.
Now that we have all of those foundational concepts covered, let’s talk about the three techniques for building cabinet doors!
DIY Cabinet Door Construction Technique #1 – Easy and Beginner Level
Materials and Tools Needed:
- 1/4″ thick plywood
- 1×3
- 3/4″ wood screws
- 1 1/4″ Kreg screws
- Wood Glue
- Kreg Jig
- Miter saw
- Drill
- Circular Saw or Table saw (these are both optional)
This first technique is the easiest and great for beginners! First, the 1×3 door frame boards are cut to size with a miter saw.
Then the door frame is constructed using pocket holes with a Kreg Pocket Hole Jig on the rail boards, 1 1/4″ Kreg pocket hole screws, and wood glue. The boards are connected with butt joints.
Then, cut the center panel board (using the 1/4″ plywood) larger than the door frame opening, usually about 1/2″ larger all the way around.
Use a circular saw and straight edge guide or table saw. Or alternatively, you can also get the panel to cut to size at your local home improvement center as it does not have to be a perfect size cut for this easy method!
Attach the plywood panel to the back of the door with wood glue and either 3/4″ brad nails and a brad nailer or 3/4″ wood screws and a drill.
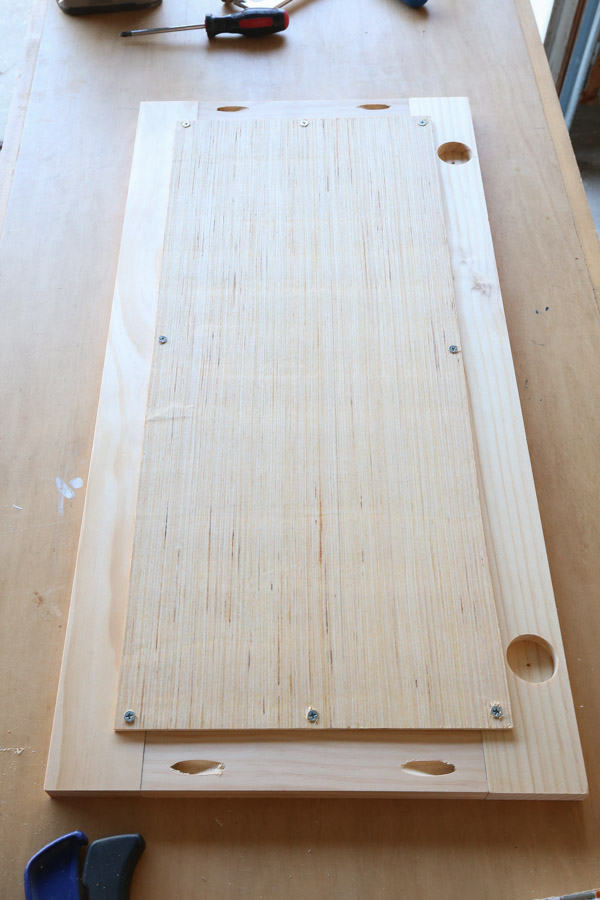
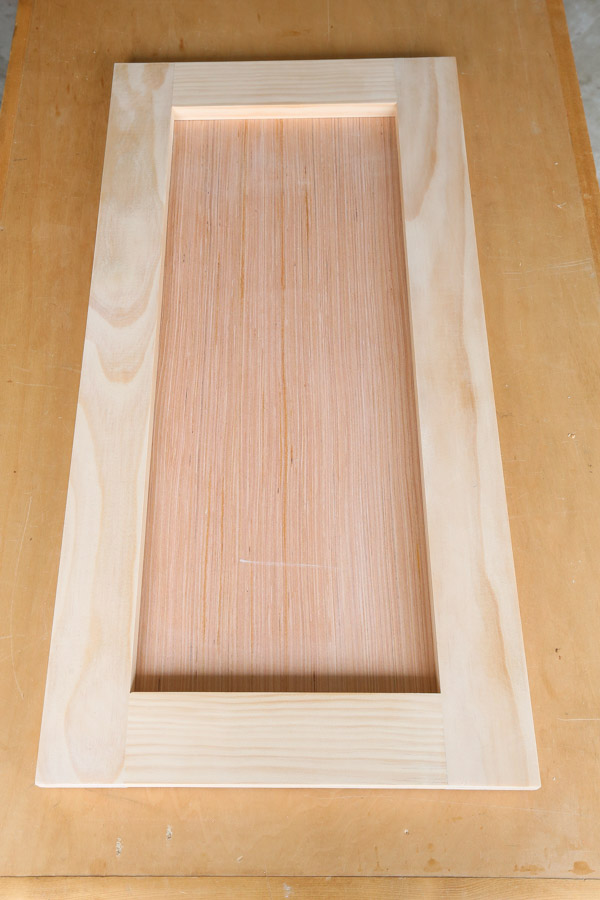
Here is the front view:
Check out my DIY garage cabinets for a step by step tutorial with measurements of this easy DIY cabinet door technique! I also cover how to do cabinet construction in this tutorial as well.
I have used it many times, including for our garage cabinets, bathroom built in cabinet, and our DIY entertainment center.
Here are the pros and cons of this construction method:
Pros of beginner level DIY cabinet door method:
- Very easy and beginner friendly
- Quicker than other construction methods
- Uses minimal power tools
📩 Want to Save This?
Cons of beginner level DIY cabinet door method:
- It doesn’t look as nice and finished for the back view
- For the front view, the center panel is inset 3/4″ which isn’t as professional looking as a professionally made door which is usually 1/4″ or 3/8″ inset from the front
DIY Cabinet Door Construction Technique #2 – Intermediate Level
Materials and Tools Needed:
- 1/2″ thick plywood
- 1×3
- 1″ Kreg screws
- 1 1/4″ Kreg screws
- Wood Glue
- Kreg Jig
- Miter saw
- Drill
- Circular Saw or Table saw
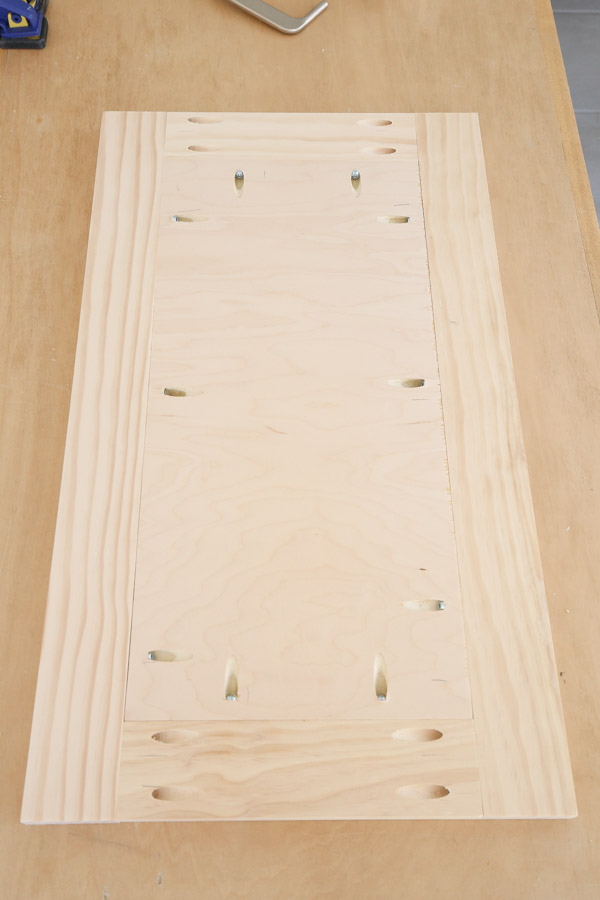
Technique #2 is intermediate in skill level, it’s a little bit harder due to the precision it takes to get the center panel size just right, along with the door frame, and keep everything square.
The first step for this method is similar to method #1 above.
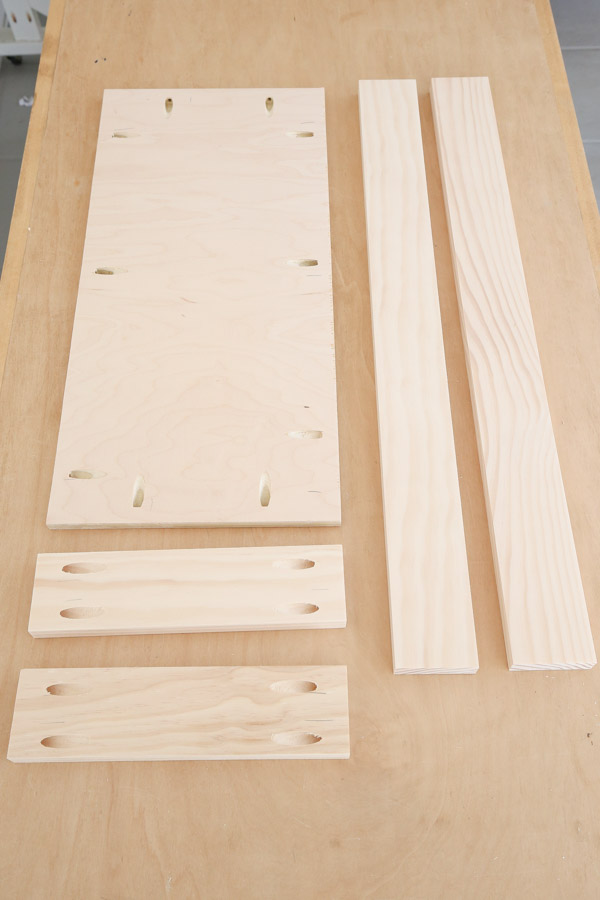
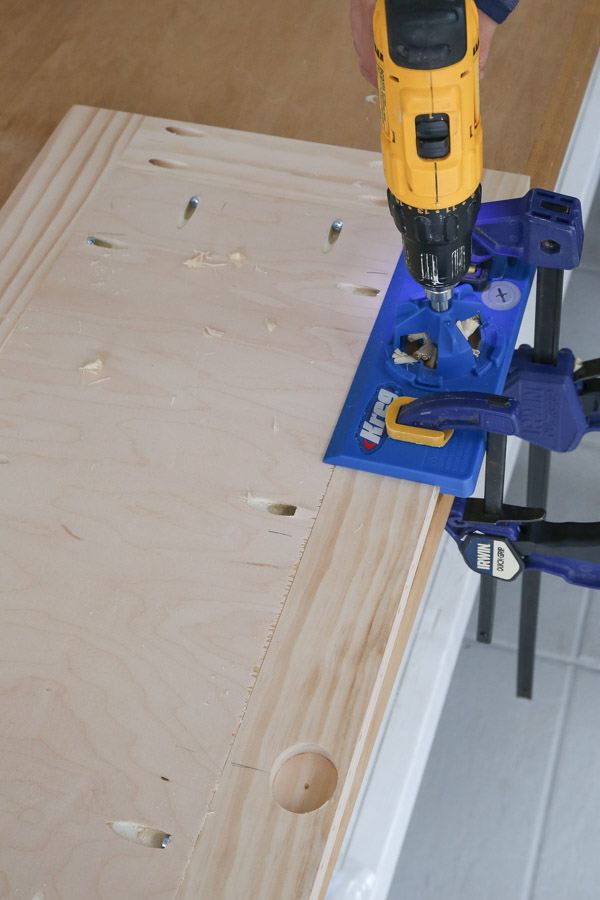
Construct the frame of the door. Cut the door frame boards to size with a miter saw and add pocket holes to the two rail boards. Don’t attach the door frame together yet.
The next step is to cut the center panel to size with the 1/2″ plywood. It needs to be the EXACT size of the inside of the door frame. So, I recommend cutting this yourself with a circular saw and straight edge guide or table saw to get the measurements exactly right!
Even being just 1/16″ off can mess things up!
Add pocket holes to the panel board and rail boards.
Then, the center panel is attached to the door frame with wood glue and Kreg screws. I like to attach it to the rails first, then the stiles.
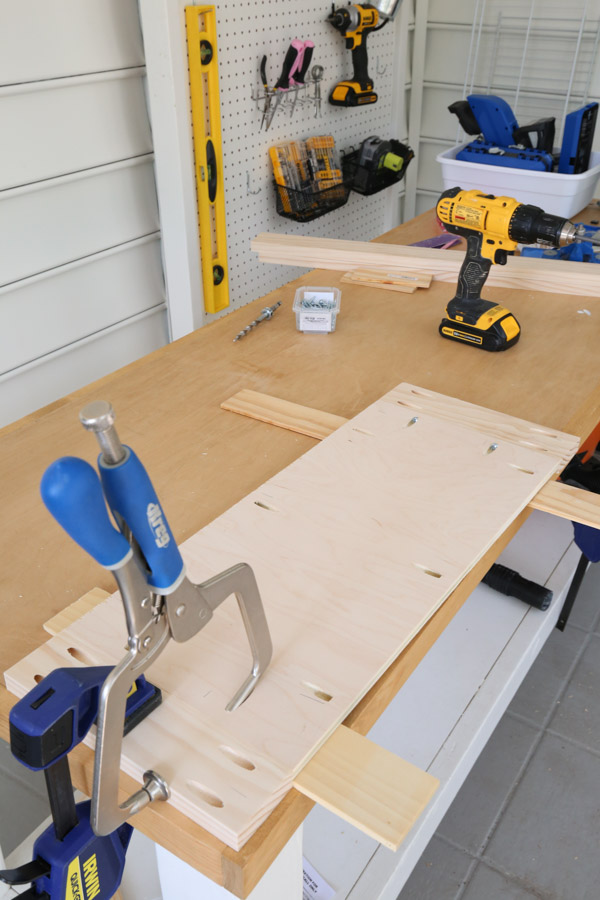
*Note, make sure to use 1″ Kreg screws on the 1/2″ plywood pocket holes and use 1 1/4″ Kreg screws on the 1×3 door frame pocket holes!*
Check out my DIY wall cabinets and doors for a step by step tutorial with measurements and more details of this intermediate DIY cabinet door technique!
Pros of intermediate level DIY cabinet door method:
- DIY friendly
- Provides a more professional look from the front with a 1/4″ inset of the panel
Cons of intermediate level DIY cabinet door method:
- There are a lot of pocket holes on the back view (they can be filled though)
- The center panel needs be cut very precisely for everything to assemble square
- Not as stable for large doors (especially doors with 2 or 3 door panels)
DIY Cabinet Door Construction Technique #3 – Advanced and Professional Level
Materials and Tools Needed:
- Rail and stile router bit set (make sure to get correct shank size for your router)
- Router
- Router table
- 1/4″ thick plywood
- 1×3
- Wood Glue
- Miter saw
- Drill
- Circular Saw or Table saw
For our DIY office cabinets, I needed to build 6 cabinet doors. After using the two building methods above several times, I wanted to try a more professional building technique for DIY cabinet doors.
After doing lots of research, the best and most preferred method involves using a router, router table, and a rail and stile router bit set to basically create a tongue and groove connection for the door frame and panel. Everything attaches together with wood glue.
There is definitely a learning curve to this method and it takes practice, but it is doable for a DIYer! I was proud of myself for pushing myself to learn how to do this technique!
Through all of my online research and after watching a lot of YouTube videos, I found this cabinet door tutorial and video by Rogue Engineer to be the most helpful and thorough! I highly recommend checking it out if you want to use this technique.
Check out our YouTube video for our DIY office makeover for two which shows us in action building these doors with this method using the router!
Here’s an overview summary of the steps I took:
Cut the rail and stile door frame boards to size with a miter saw.
Then, set up the groove router bit on the router table. You want the 1/4″ groove the bit creates to cut the groove 1/4″ down from the back of the 1×3 door frame boards.
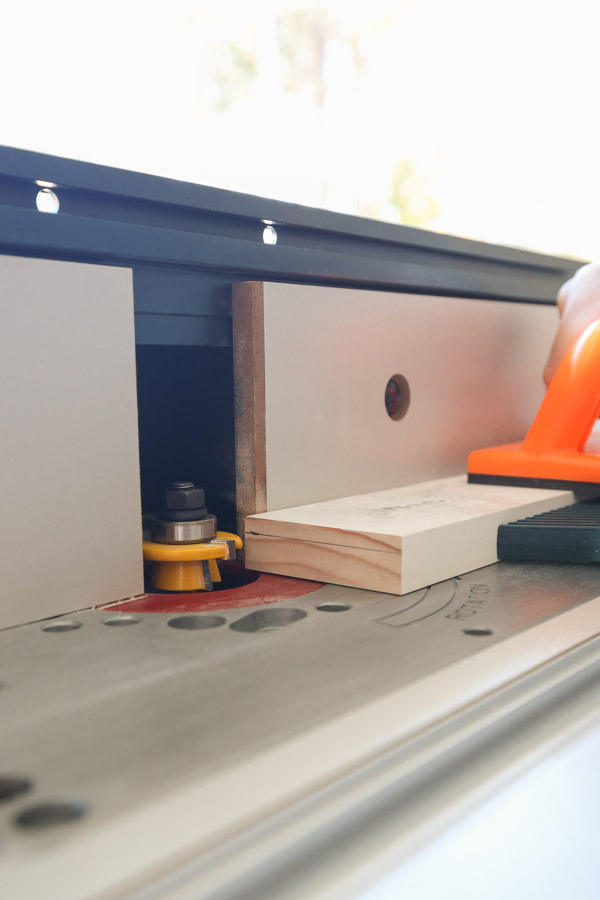
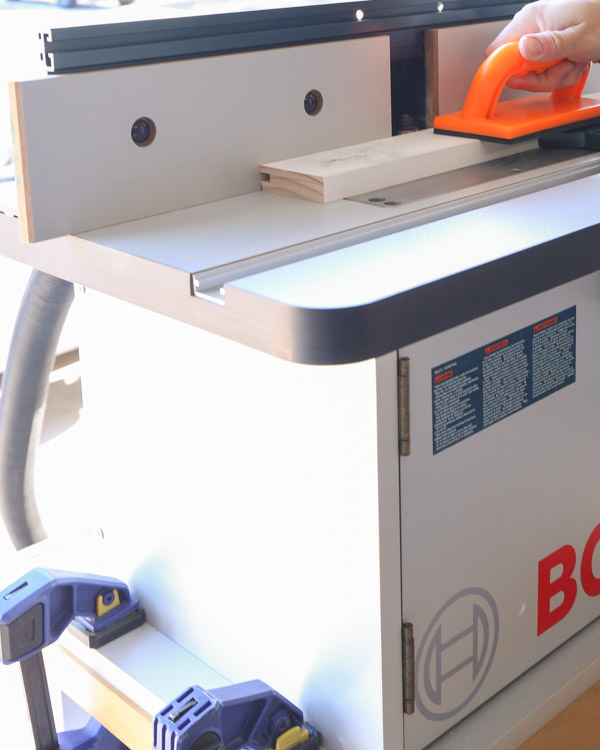
*It’s important the front of the 1×3 door frame boards faces down when using the router table.*
Cut a groove along one side of all of the 1×3 rail and stile door frame boards.
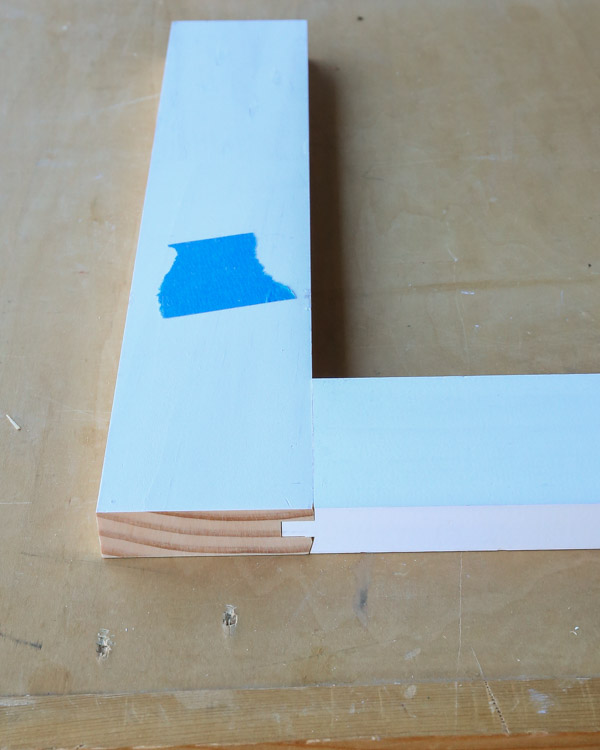
Next, cut the tongue on the two ends of the rail (horizontal) boards with the other router bit in the set.

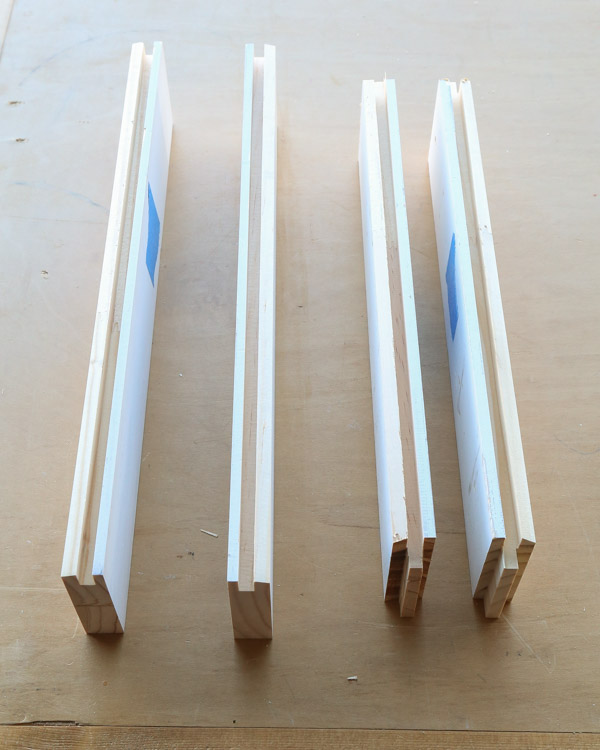
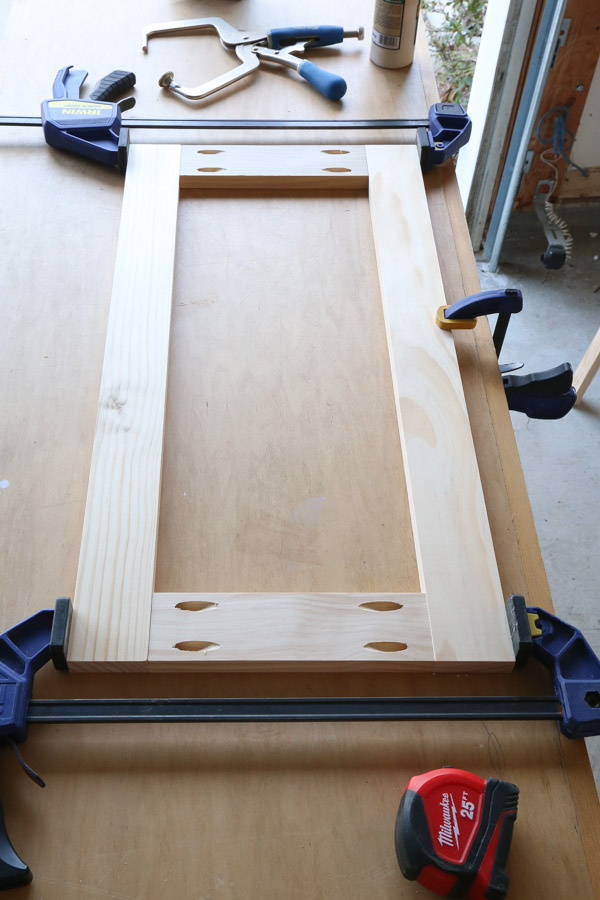
Cut the panel board to size. Add wood glue to the grooves and tongues and attach everything together.
Note, 1/4″ plywood is a little less than 1/4″, so it helps to use wood glue in the groove towards the front. Alternatively, you can use 1/4″ MDF (if painting) which is exactly 1/4″ and will be a more snug fit.
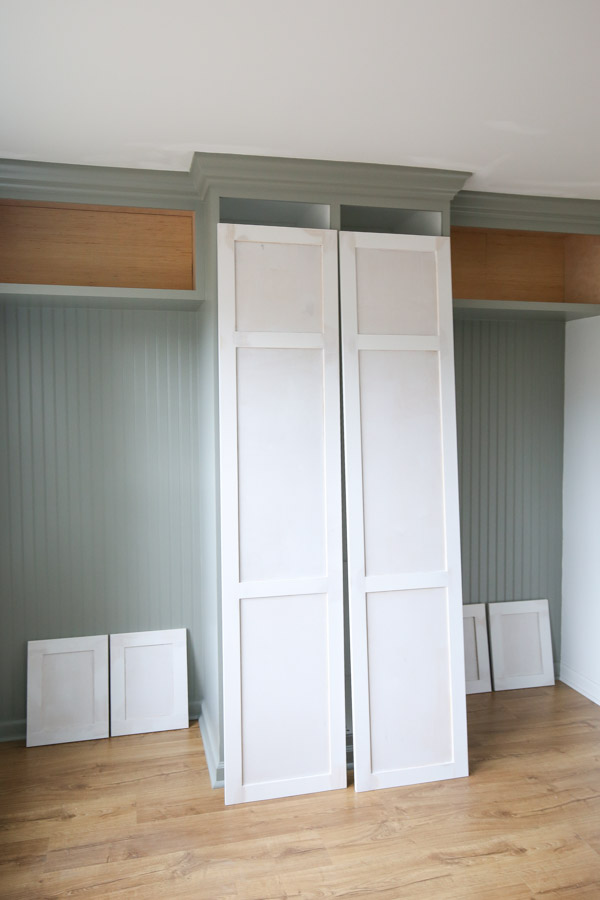
Use clamps to hold everything together overnight. Here are our two cabinet doors clamped:
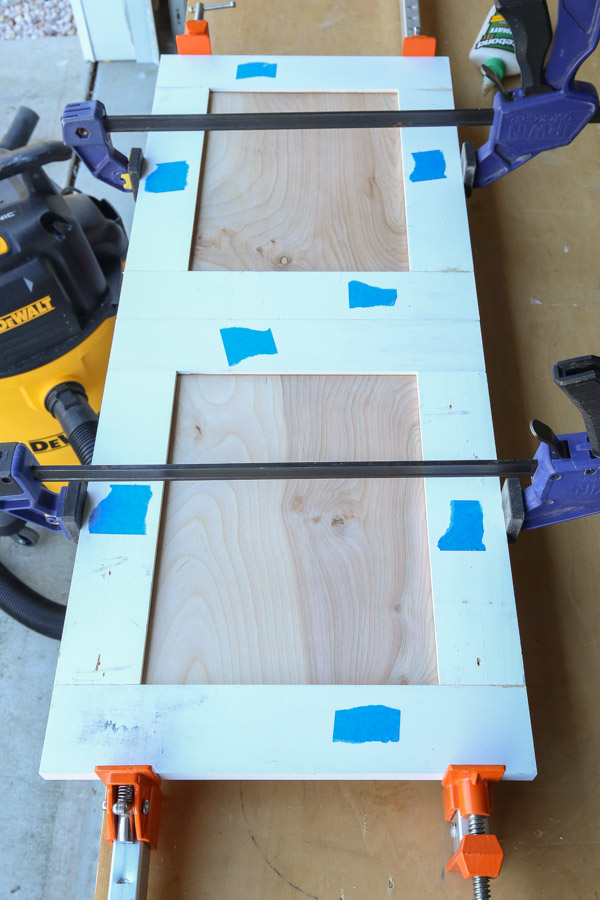
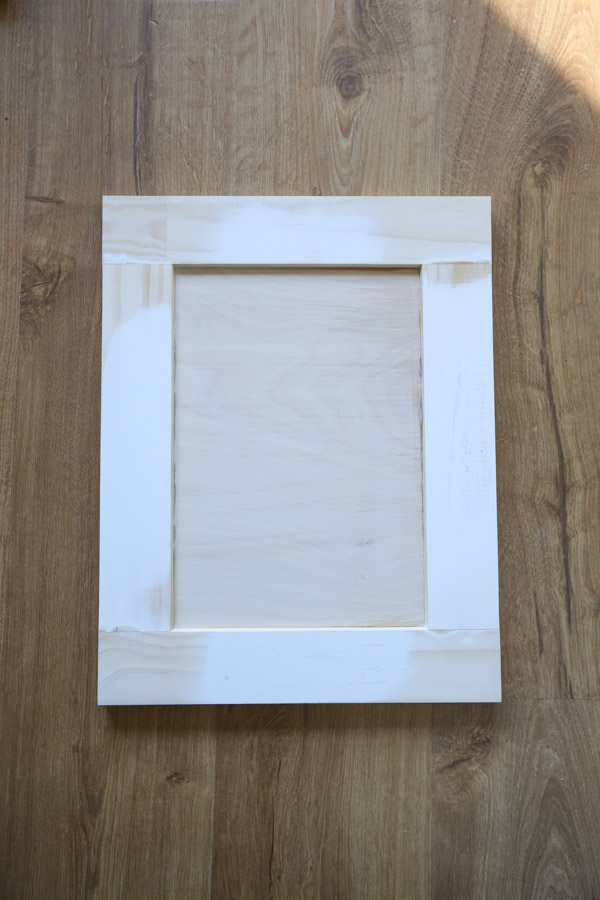
And this is the front view of this construction technique (it’s a similar look on the back too) before the final finish prep work and paint. We still need to sand some wood glue off:
Pros of advanced level DIY cabinet door method:
- Very professional looking and built style door
- Once you know how to use a router table, you can make other professional style doors using solid wood panels
- Works well for doors of all sizes including larger doors like the doors for our IKEA PAX hack
- The rail and stile router bits create a slight angled edge along the door frame against the center panel inset on the front view, which looks really nice and professional! A small but beautiful detail!
Cons of advanced level DIY cabinet door method:
- Requires more intermediate and advanced level tools like a router and router table, which also costs more money if you don’t already own them
- Takes practice and time to get the hang of it
- More finish prep work, like sanding the excess wood glue off
DIY Shaker Cabinet Door Hinge and Hardware Holes
Finally, after you finish building your DIY shaker cabinet door using one of the cabinet door construction techniques, you need to drill holes for the hinges and hardware!
I highly recommend using concealed (European) style hinges since you can adjust the door placement a little bit if needed after installation.
I also recommend drilling the hinge holes for them using using the Kreg Concealed Door Hinge Jig like we have done for many of our DIY cabinet doors like our DIY wall cabinet door and DIY garage cabinet doors.
Kreg also has other helpful jigs for making cabinet doors like the door mount jig and cabinet hardware jig!
No matter which DIY cabinet door method you use above, each one will produce beautiful, new doors! Building your own cabinet doors is a great way to save a lot of money compared to buying custom doors which can be very expensive!
Follow along on Instagram stories for sneak peeks of my DIY projects and follow along on YouTube for video tutorials of all the DIY projects!