
Our sunroom really needed some cute outdoor furniture, so I came up with plans to build a DIY outdoor couch! This was my first piece of DIY outdoor furniture that I've built and I love it!
I love how our outdoor couch turned out and I'm excited to share the step by step tutorial!
Also, I have a step by step video tutorial and printable build plans below too!
One of the best features about this DIY outdoor couch is that it only cost $30 in lumber to build!!! The exterior stain I used was an additional $15, so a total of $45 for me to build it!
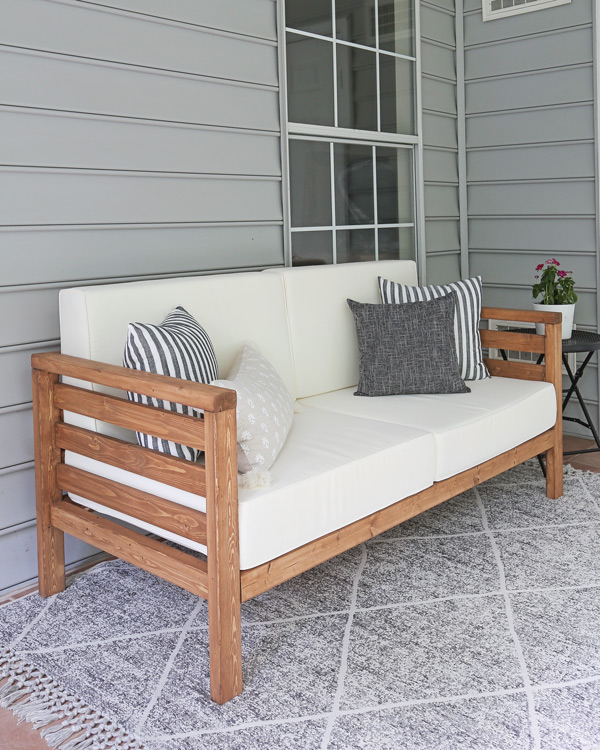
Cushions Used & Cushion Options
The couch was designed to fit with two sets of outdoor cushions that are no longer sold or in stock (they use to go out of stock all of the time). I have many other cushion options listed below and updated for 2026!
The original cushions I used were 28.75 long x 28.75" wide each (the seat cushion size). The closest in size that I have seen currently in stock are these 28.5x28.5 cushions and these 28.7x28.7 cushions (and they both come in multiple colors).
But, most readers that have made this couch have changed the dimensions to fit other size cushions.
*The premium outdoor couch build plans include an alternative cut list for the 24x24 and 28x28 common couch cushion sizes!
If you use different cushions than the ones above, make sure to adjust the below cut measurements! And make sure to order your cushions first before building in case they go out of stock!
Spring 2026 Cushion Update:
The cushions I used are still out of stock. Here are currently stocked options in 24x24 sizes (and multiple colors/good reviews) as of spring 2026:
Premium Printable Build Plans
Our step by step tutorial below is free, but I also have printable premium outdoor couch build plans for this outdoor couch with 3D diagram models for each step to help make the building process easier!
***These premium plans also include alternative cut lists for the 24x24 and 28x28 common couch cushion sizes!***
I built a matching DIY outdoor chair and DIY outdoor coffee table and DIY outdoor side table to go with the couch and complete the set!
I also have a DIY outdoor dining table that compliments the outdoor furniture set too!
Note, this post contains some affiliate links. For more info see my disclosures here.
How to build a DIY Outdoor Couch:
Materials:
- (8) 2x3 @ 8ft (framing lumber)
- (2) 1×3 @ 8ft
- 2 ½″ Deck Screws (optional - see step #2)
- 2" brad nails
- 2 ½″ Kreg screws (weather resistant)
- Waterproof wood glue
- Stainable wood filler
- (2) sets of outdoor cushions**
- Exterior wood stain (I used a quart of Valspar exterior stain in Pinebark)
Tools:
- Kreg Jig (or Kreg Jig mini)
- Miter saw
- Drill
- Brad nailer
- Clamps
- Tape Measure
**If you use different cushions than the ones I used, make sure to adjust the below cut measurements!
The final size of this DIY outdoor couch is 26" tall x 62 ½" wide x 30 ¼" deep.

VIDEO TUTORIAL:
Subscribe to my YouTube Channel here!
1. Make cuts for outdoor couch frame
Use a miter saw and make the following cuts from the 2x3s:
- 4 pieces @ 24 ½" (for side frames)
- 2 pieces @ 30 ¼" (for side frames)
- 5 pieces @ 57 ½″ (for back & front frames)
- 8 pieces @ 27 ¼" (for side & bottom frames)
Note, if this is your first time building , check out my 6 easy tips for getting started with woodworking!
*Get the premium outdoor couch build plans which also has an alternative cut list for the 24x24 and 28x28 common couch cushion sizes!
2. Assemble DIY outdoor couch side frames
Add two pocket holes with the Kreg Jig to each end of two of the 27 ¼" pieces.
Tip: See my how to use a Kreg Jig post for an easy, step by step tutorial and video tutorial on how to use the Kreg Jig!
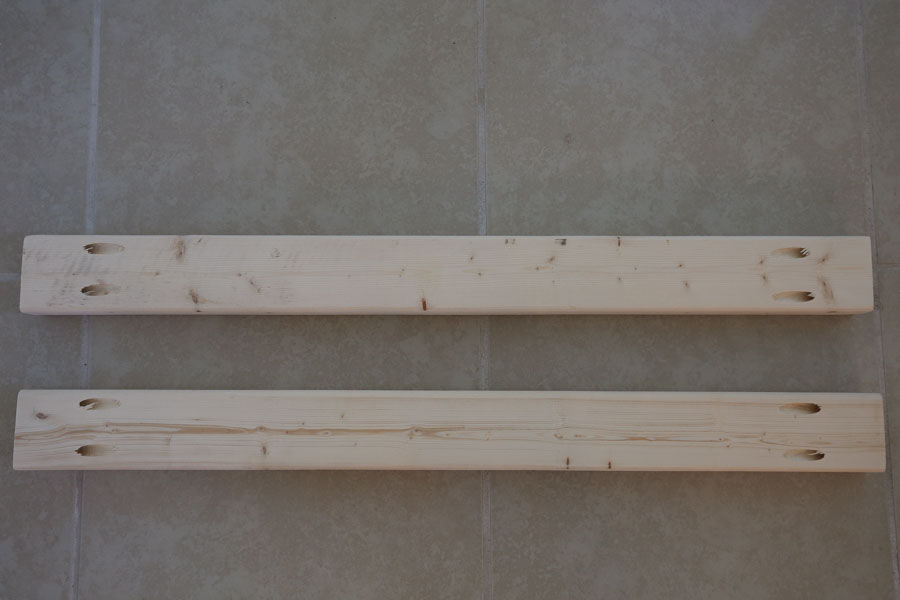
Mark 10" up from the bottom of one of the 24 ½" pieces (on the edge of it). Attach one of the 27 ¼" pieces perpendicularly to the 24 ½" piece at the 10" mark.
*Note: If you prefer the seat to sit higher than 10″ (plus your cushion height), increase the 10″ marks by a few inches to your desired seat height!*
Make sure to attach it so the edge of the 27 ¼" piece is flush with the top edge of the 24 ½" piece as shown in the below photo. I used a scrap 1x2 and paint stick underneath of the board to help with this part!
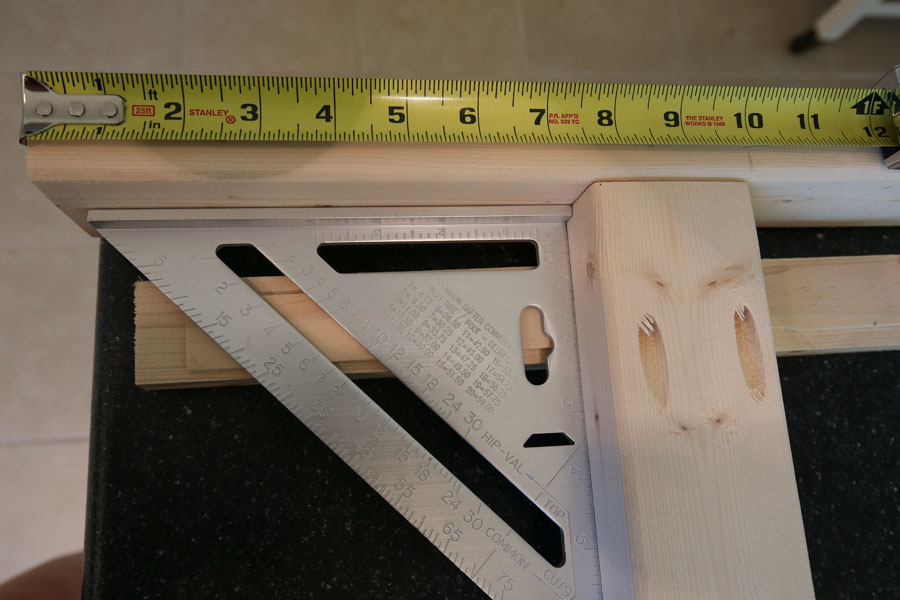
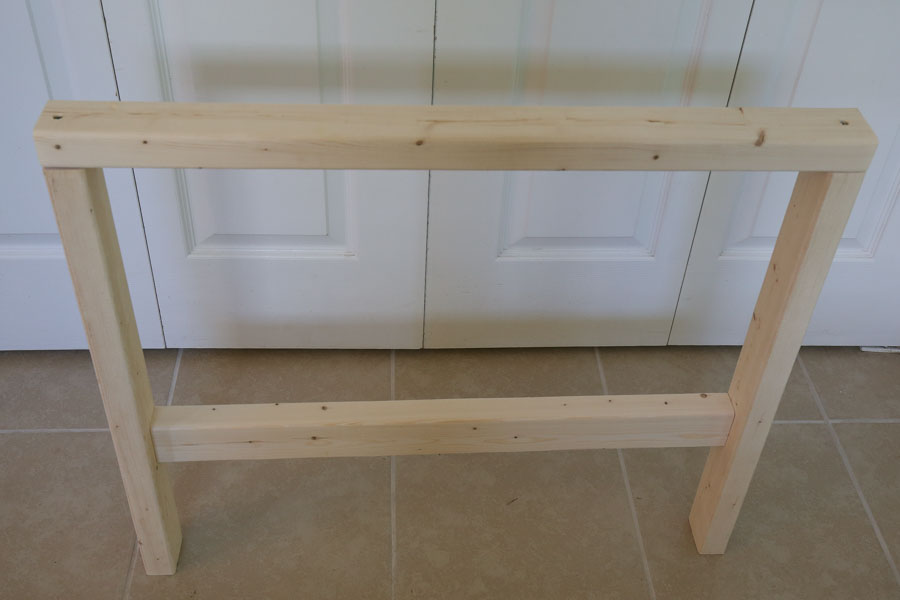
Then attach the two together with 2 ½" Kreg screws and waterproof wood glue. Repeat this process on the other side of the 27 ¼" piece. Once complete your side frame piece will look like this:
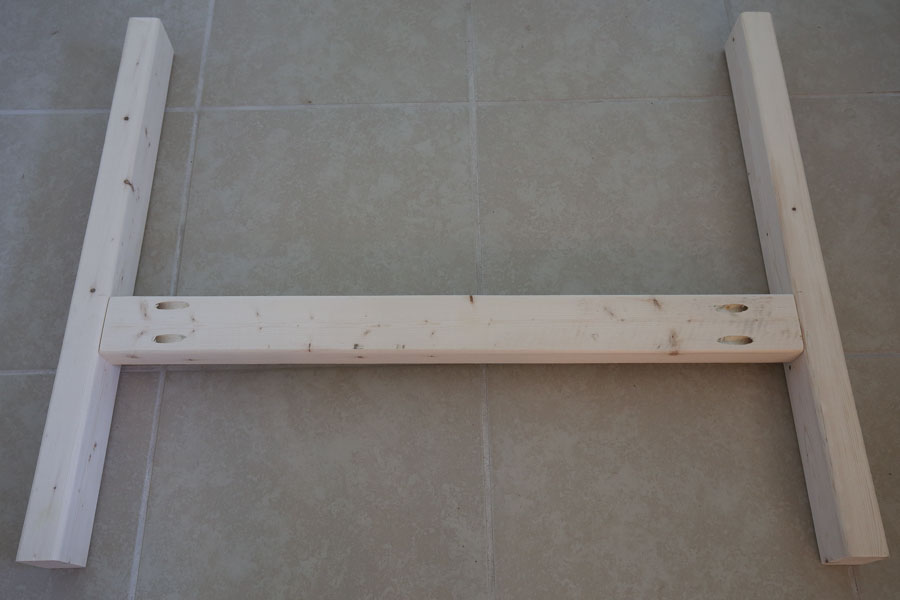
Next, attach one of the 30 ¼" boards to the top of the frame with 2 ½" deck screws and waterproof wood glue. Make sure they are countersunk beneath the wood surface (you will fill them with wood filler later).
I forgot to get deck screws, so I just used Kreg screws instead, which works too!
To do this, I used a ⅜" drill bit and drilled a shallow hole, just deep enough to cover my screw head. Then, I drilled my pilot hole inside of that larger hole with a smaller bit for the Kreg screw. Lastly, I drilled in my Kreg screw to attach the two boards.
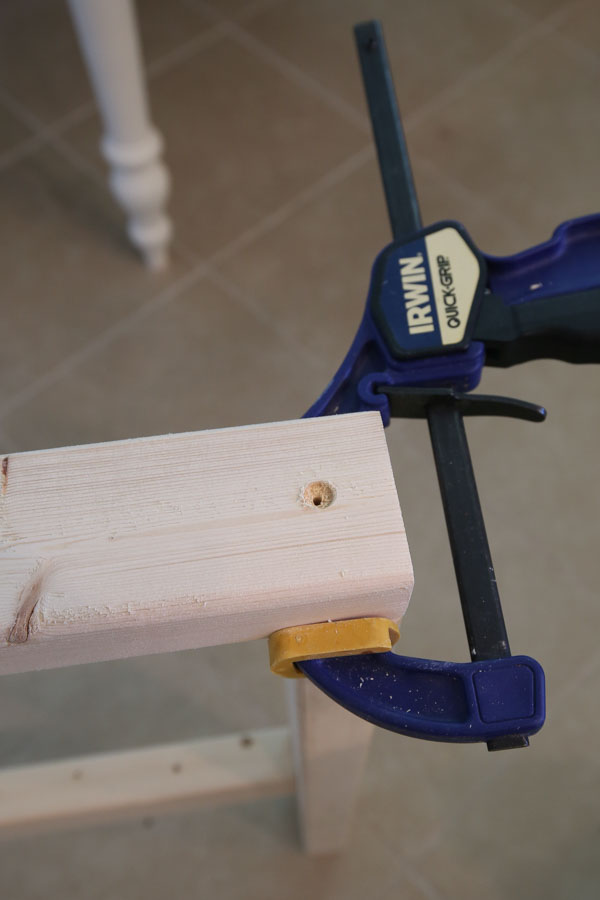
Repeat on the back of the side frame piece and then your side frame is complete!
📩 Want to Save This?
Repeat the above process to create the second side frame piece for your DIY outdoor couch.
Also, the steps for these side frames are exactly the same as the matching DIY outdoor chair. I created a how to build an outdoor chair VIDEO if you want to see the steps in a video tutorial form!
3. Add side slat boards to side frames
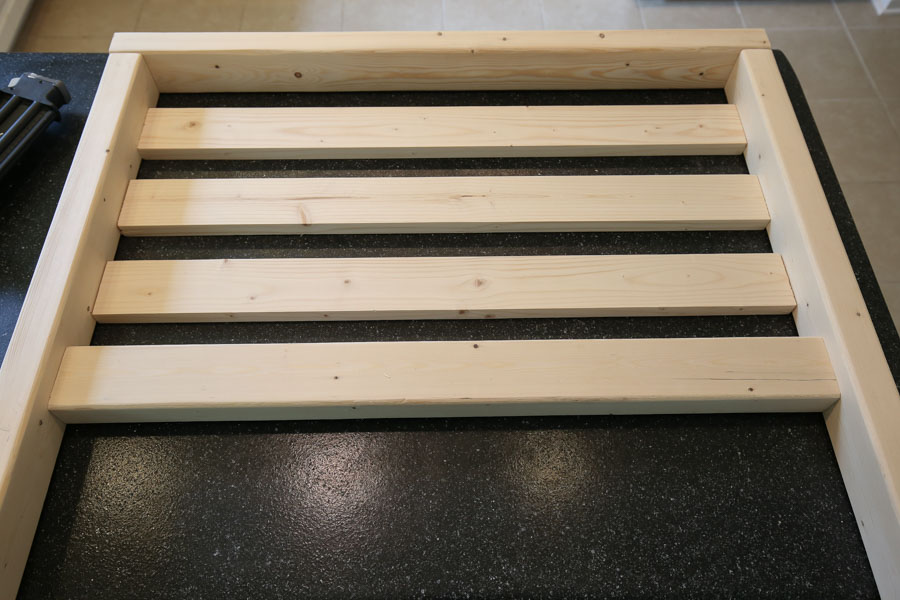
Now it's time to add the horizontal slat boards to the side frames. This step is totally optional. These slats are more a decorative feature than structural. I think they make the DIY outdoor sofa look really cool and will help prevent throw pillows from falling out the sides!
Measure the exact distance between the two legs of the side frames and cut three 1x3s to this size. The measurements should be close to 27 ¼" but since we're working with framing lumber, they will probably be a little different.
Each of my three slats were a little different in size, so make sure to measure exactly where the board is going. The boards should be spaced out 1 ¾" from each other:
Attach the 1x3 slat boards with a brad nailer and 2" brad nails.
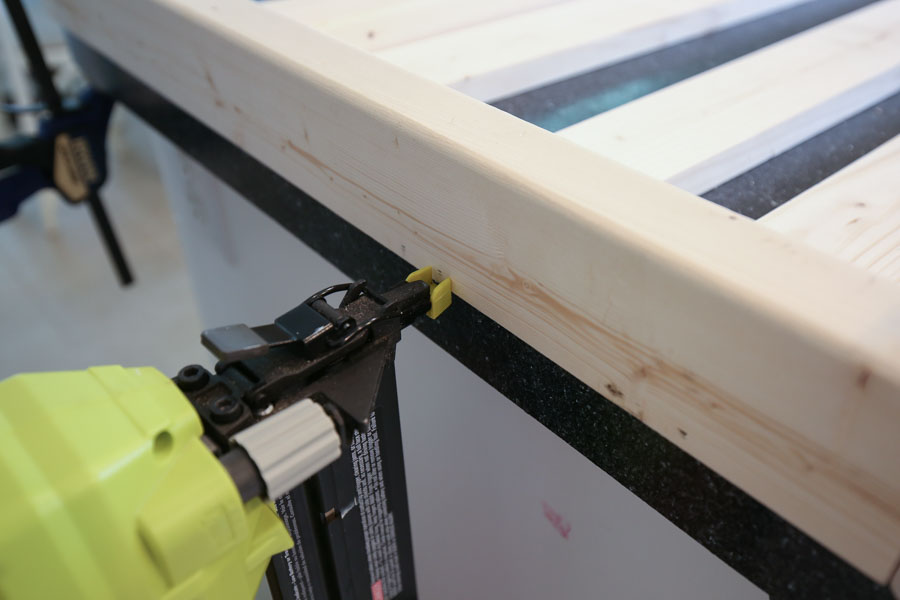
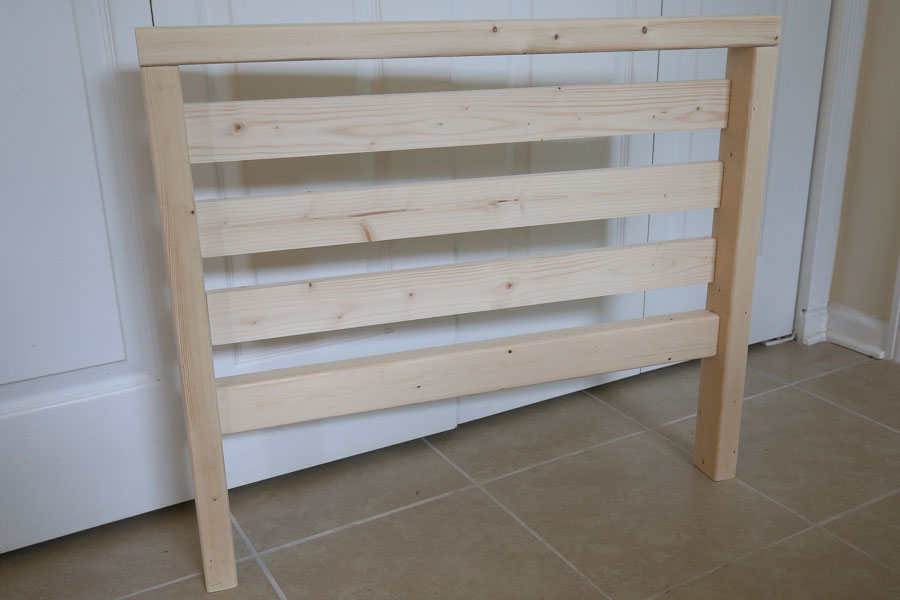
Repeat the above process for the second side frame.
4. Assemble bottom frame of DIY Outdoor Sofa
Add pocket holes to both ends of the remaining 6 boards @ 27 ¼" AND to the ends of the 5 boards @ 57 ½″.
Then use Kreg screws and waterproof wood glue and attach four of the 27 ¼" boards perpendicularly to two of the 57 ½" boards as shown in the below photo. Make sure the 57 ½" boards pocket holes are facing the inside.
Space the 27 ¼" boards about 6" part and attach the first and fourth board about 14 ½" up from the side board ends. Note, you will add the other 2 boards in soon, but not yet so you can easily fit your drill in the space and attach this bottom frame to the side frame in the next step.
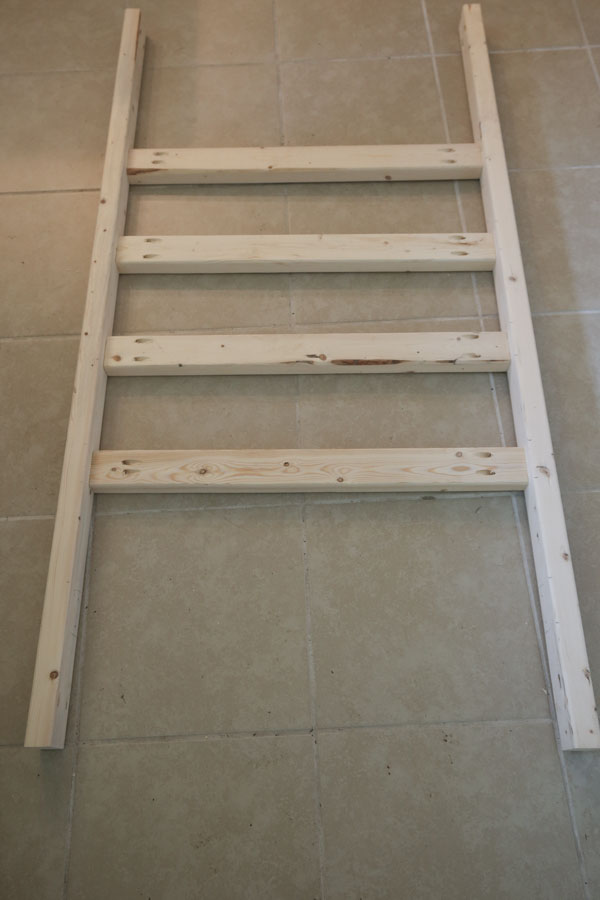
5. Attach bottom frame to outdoor couch side frames
Attach the bottom frame to the side frames using 2 ½" Kreg screws and waterproof wood glue and 10" up from the ground (as shown in photo below). It helps to place the side frame flat on the floor and have a second person hold up the bottom frame on top of it.
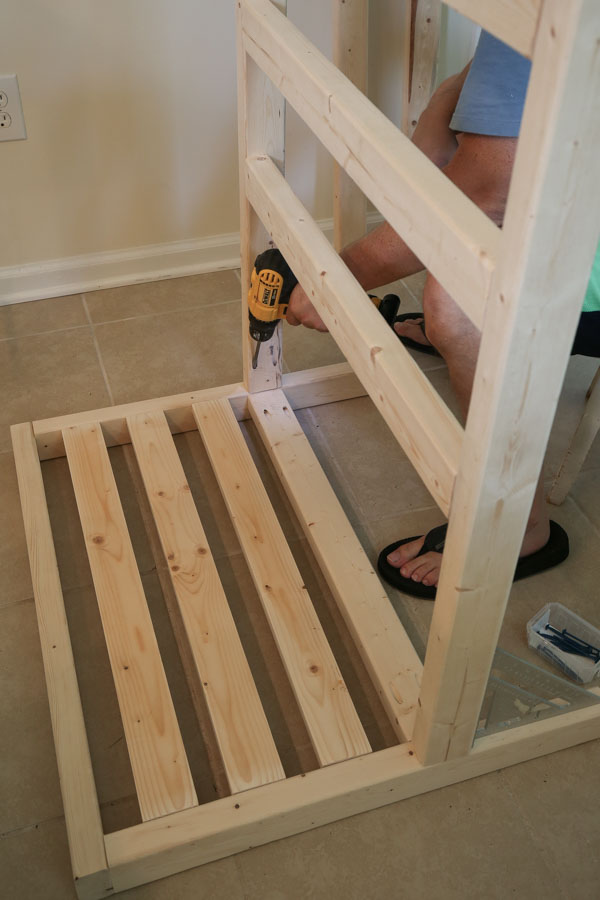
Once both side frames have been attached to the bottom frame, go ahead and add the last two 27 ¼" boards on the bottom frame (from step #4). If it's difficult to get them in place, use a hammer to tap them in place better.
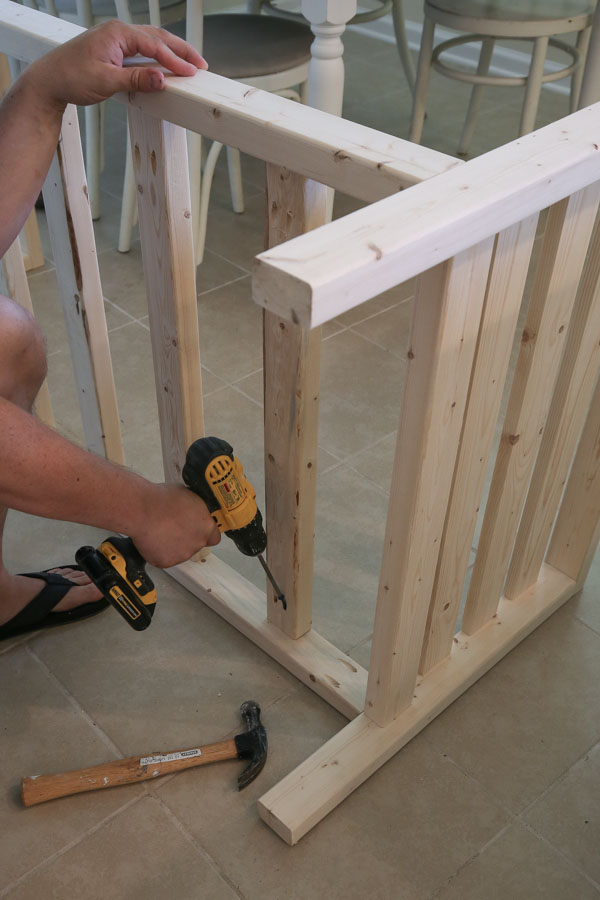
6. Add back frame boards to DIY outdoor couch
Turn the outdoor couch on its side and use Kreg screws and waterproof wood glue to attach the remaining three, 57 ½" boards to the side frames to create the back frame of the couch (space the boards about 2 ¾" apart).
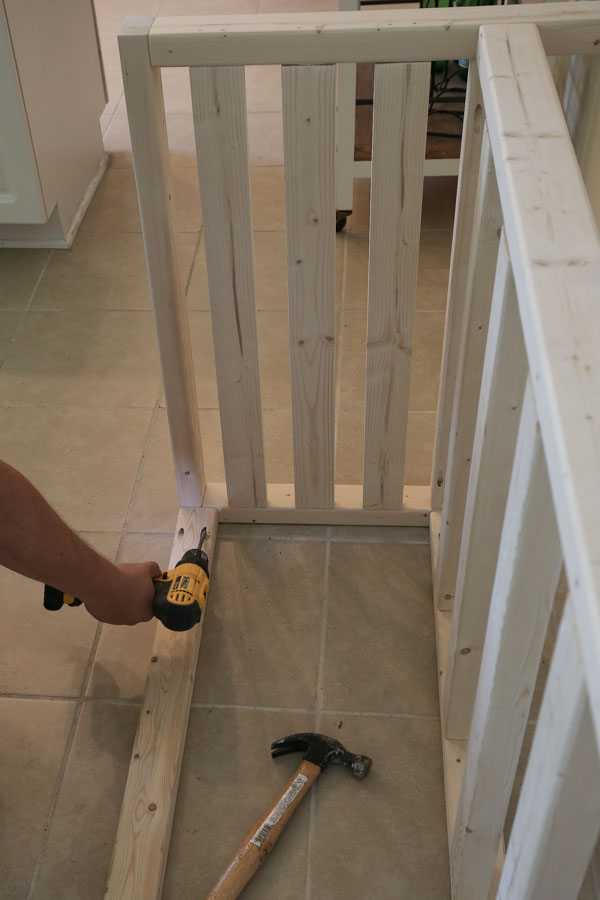
Flip your couch back up and your DIY outdoor couch build is finished yay!!!
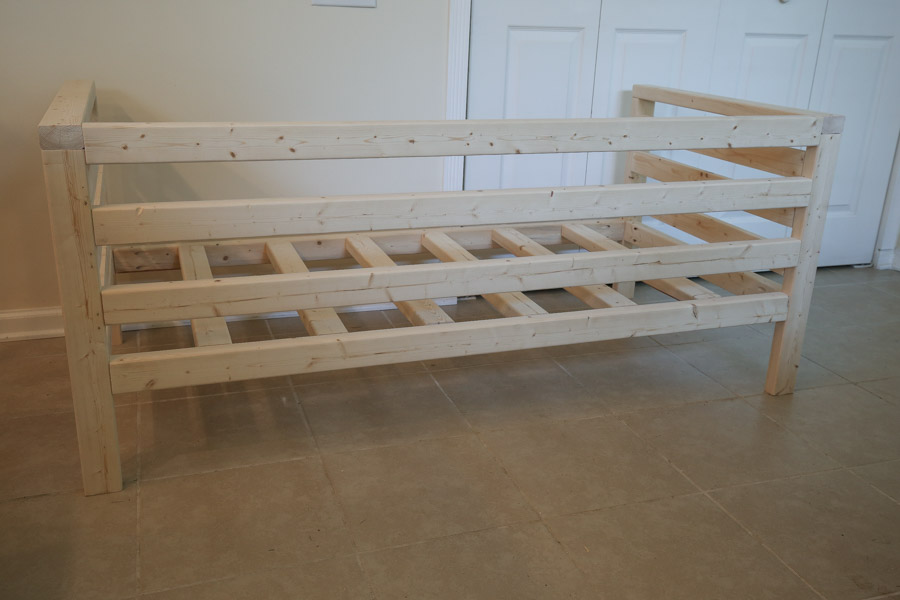
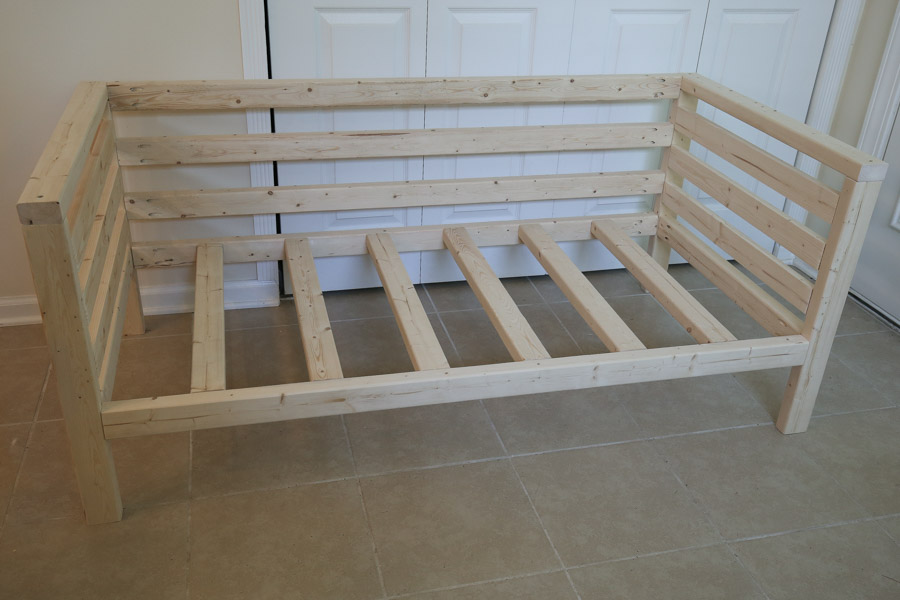
7. Fill holes, sand, and stain
Fill the 4 screw holes and nail holes in with stainable wood filler. If you haven't sanded your boards yet (I like to do most of my sanding before starting), go ahead and sand them well.
For tips on sanding wood, check out my easy guide on how to sand wood.
Finish off your project with exterior wood stain! I used Valspar semi transparent exterior stain in Pine bark. It was one of the only exterior stains I could find that came in a quart size and not a gallon size. And it only took one coat!
Check out my tutorial on how to stain wood for a beautiful finish and the best way to apply stain!
After staining, let your couch dry for a full 24 hours, then add the cushions, and enjoy!!!
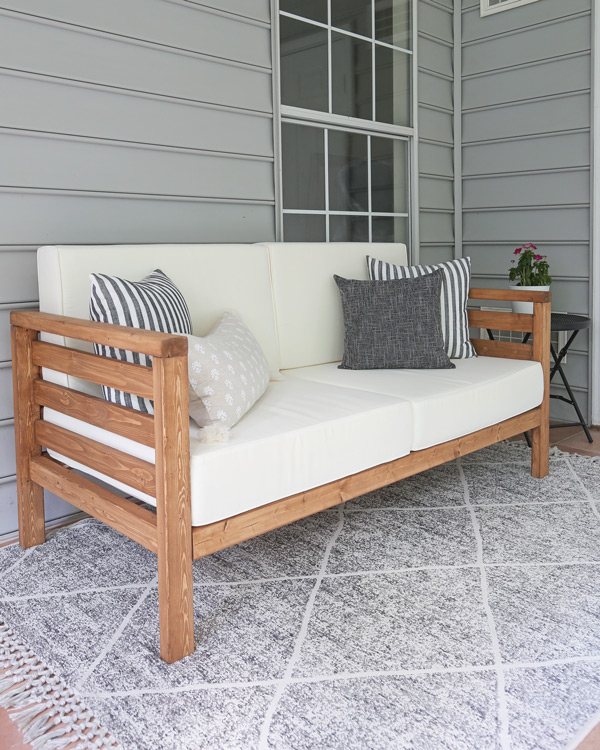
Here's another angle of it!
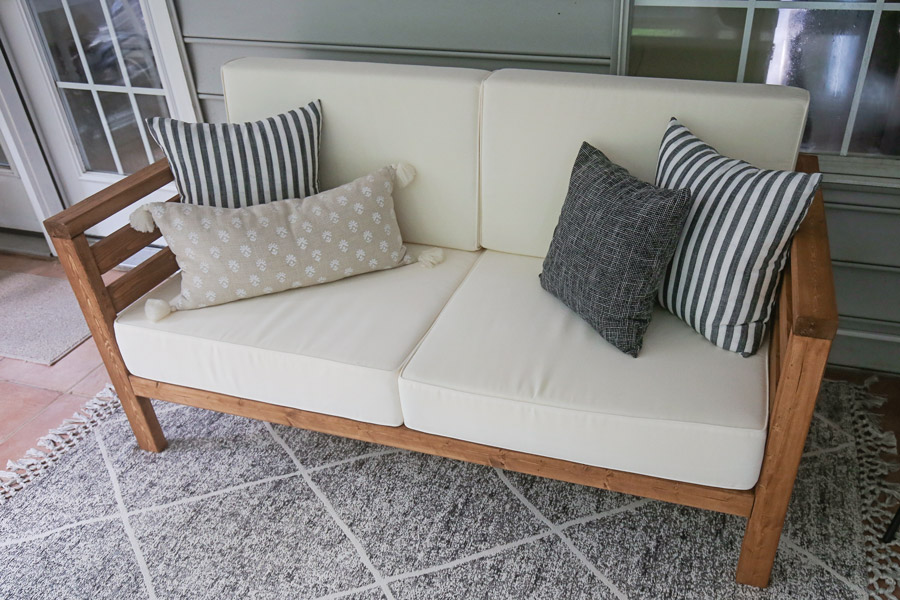
I loveeee this DIY outdoor couch so much, I'm thrilled with how it turned out and the low cost! In the spring I'd like to build a matching chair set to go with it!! How fun would that be?!
Update: I built a matching DIY patio chair and DIY outdoor coffee table and DIY outdoor side table to go with the couch! And a DIY outdoor dining table that compliments the set too!
So, what do you think of this build? It fits great in small spaces and it has really helped to start transforming our sunroom into an enjoyable, cute, and functional space. Next up, I need some kind of wall art to go above it!
If you make this DIY couch, please share it with me on social media @angelamariemade or #angelamariemade!

Follow along on my latest projects and sneak peaks on Instagram, YouTube, and Facebook!
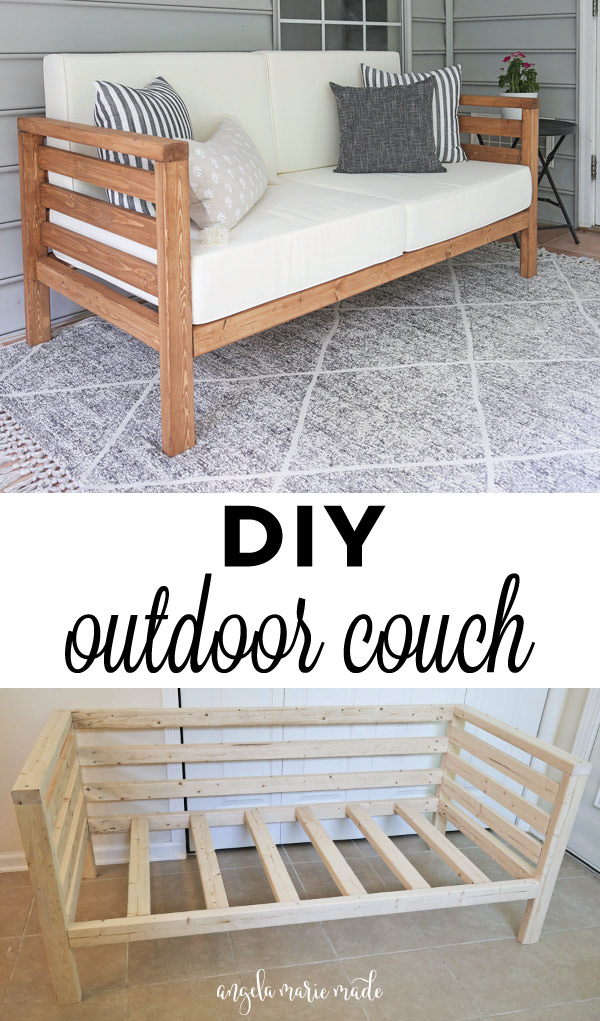
If you want to save this tutorial for later, Pin It here:
Decor Product Sources:
- Striped Pillow Covers - From Amazon & discontinued, similar here (18x18 size) with 20x20 Pillow Inserts
- Black Pillow Covers (16x16 size) with 18x18 Pillow Inserts
- 5x7 Outdoor Rug
- Round Black Metal Accent Table (similar one here!)
- Lumbar pillow - From Target a few years ago


where did you get the cushions?!
They are from World Market, here is a direct link to them: https://rstyle.me/+LI10HJjZqFrl7PuW4ACWVA
Are the cushions waterproof? I’m wanting to do this build for my deck and wondering if they will hold up
The cushions are outdoor cushions so they can get wet, but the care description for them did say to cover from inclement weather.
how thick were your seated cushions. my seated cushions are 25.5w X 23d X 7.5 thick and I'm trying to calculate my project out based off of the steps above
The seat cushions are 5.5" thick
We built the couch and went to buy the cushions and they are out of stock. I can't find and other cushions that fit. Do you know of any other cushions that would work?
I'm not sure of any others that are the exact same size. I'd sign up for their stock alerts on the product page to notify you by email when they come back in stock! Hopefully they will soon!
Have you had any luck finding a similar product? They are still sold out 🙁
No, I have been looking for weeks now. I think I am going to have to make my own I just haven't had the time yet. If someone else finds cushions that fit maybe the will post and let us know.
I just found these. They are close to the same size.
https://www.wayfair.com/TK-Classics--IndoorOutdoor-Cushion-Cover-010CKARMLESS-L291-K~TKCN0024.html?refid=GX258768711333-TKCN0024_27445399&device=c&ptid=436211752218&network=g&targetid=pla-436211752218&channel=GooglePLA&ireid=50653567&fdid=1817&PiID%5B%5D=27445399&gclid=EAIaIQobChMIqYS5kePO5gIVD_DACh1JIwJ4EAQYBCABEgKMPfD_BwE
Thanks Megan!
Where did you find your rug? Also cushions have been out of stock any ideas on where I could find some other white ones that size? Thanks
The rug is from Target. Hm I'm not sure since it's off season right now for outdoor cushions. I've seen similar cushions at Walmart, Target, Home Depot, and Lowe's but not sure about the size of them. Hopefully World Market gets them in stock soon!
Just wanted to let you know that the second link you gave for alternative cushions on Wayfair are actually not for replacement cushions but replacement cushion *covers*. Cheers!
Wow I love this, I can’t wait to try it at my new townhome! Thank you for being so detailed with the instructions 🙂 Do you think I could make it a little taller without having to insert a middle support beam? Would love to use it as storage underneath!
You're welcome Madison! Yes I think so! The 2x3 framing lumber is very sturdy and if you're just doing a little taller instead of wider it shouldn't be an issue.
How much did it cost to make with Materials and cushions? I’m trying to decide if it’s better to just buy something already made.
It cost around $30 in lumber and $15 for stain. I already had all the tools. The cushions I bought on sale for I think $80. So about $125 total.
I am looking at making this couch for my patio in the next few weeks. I'm so excited for this project. Are you able to give measurements for a side chair and tables so I can have matching everything?
That's exciting to hear!! I have been planning on making a matching chair up but I probably won't get to it for another month or so but I will definitely share the plans and blog post for it once I do!
Hello I was wondering does the sofa seat 3 people comfortably??
Yes it does! The cushions I used are firm enough as well so the person in the middle doesn't sink either.
what are the exact size of the cushions? I'm looking at ones that are 6" thick x 22" wide x 24"deep
The seat cushions I used were 28.75" x 28.75" and about 5.75" thick
So, for 24x24 inch cushions which measurements would I have to cut down? and by how much?
The seat cushions I used were 28.75″ x 28.75″ so for 24×24 cushions I would adjust the cuts for the width by the difference of 4.75″ and for the length or middle part by double that, so 9.5" less for two cushions.
It’s very confusing to figure out what boards should be cut differently. In these plans. What should be changed specifically for a 24x24 cushion?
1. MAKE CUTS FOR OUTDOOR COUCH FRAME
Use a miter saw and make the following cuts from the 2x3s:
4 pieces @ 24 1/2″
2 pieces @ 30 1/4″
5 pieces @ 57 1/2″
8 pieces @ 27 1/4″
Are there changes in measurements for the 1x3 boards?
I would recommend downloading the printable build plans which has a diagram of the build and makes it easier to figure out size changes! I'll also go ahead and update in step 1 next to the cuts what each of those pieces are for.
The seat cushions I used were 28.75″ x 28.75″ so for 24×24 cushions I would adjust the cuts for the width by the difference of 4.75″ and for the length or middle part by double that, so 9.5″ less for two cushions.
For 24x24 cushions, would the following measurements be correct?
4 pieces @ 24 1/2″ (for side frames)- Leave
2 pieces @ 30 1/4″ (for side frames)= 25.5"
5 pieces @ 57 1/2″ (for back & front frames)=48"
8 pieces @ 27 1/4″ (for side & bottom frames)= 22.5"
1x3= 22.5"
@Cate, Did these measurements work for you?
@Cate, how did those measurements work for you? I have the same size cushions and am trying to figure out the measurements.
Why can't I download the free printable plans. When I click the links it just returns me to this same page. I did submit my email and confirm... something is broken.
Did you check your e-mail? A link to the printable library, which has the plans, should be in the email sent to you from Angela Marie Made
I’m also having the same problem. I click the link to the free printable site. Scroll to find the free printable on the blog post but it just reopens the blog post.
Are you in the printable library? Make sure to click on the grey text or the image, that opens the build plans file. The pink text is linked to the tutorial.
Hi there! Since you’ve had the cushions for a while, can you please tell me how you like them quality wise? And are they easy to keep clean? Unfortunately they don’t have any reviews left online. Thank you.
I think the quality is very good! They wipe easy, although I have been meaning to add some Scotch guard to them as extra protection. Also, I've only had to wash them once when they got a stain from I believe a squirrel hanging out on them. The stain came out no problem, but it was a bit difficult to get the cushion covers off and back on.
Thank you so much. This outdoor couch and your chair will be my weekend project in preparation for the summer. I’m just going to sew my own cushions using the foam cushions from Joannes with my 50% off coupons, and outdoor fabric I already have, as soon as Joannes opens back up here in Utah. I know they sell thick foam at Home Depot too, so I may just go there.
You're welcome! That's awesome that you can sew your own cushions, such a great skill to have!!
@Genell, I thought of this too since finding the cushions was way to expensive and hard to find any cheaper options in that size. I started to Price material to make my own and it's 10x more expensive 😭
Hi there. We bought the lumber yesterday and then I realized the cushions are out of stock. It seems like there is no industry standard or universal size cushion. Most of what I find is much smaller. I am super frustrated. Has anyone had any luck finding a quality cushion? We live in Miami so I need something durable and we are a tall family so I really don't want to make this much smaller. Thank you!
Unfortunately there isn't a universal size. I have a link to some Wayfair cushions in the post and they come in two size options, with one larger option. I'd check those out! They have other cushion options as well with lots of reviews too which may mention how durable they are for others.
Sadly, we have officially scrapped this project and hubby returned the wood to Lowe's this morning. I love this couch, and the size is perfect for our back porch, but I couldn't find cushions anywhere like the ones you used. I did find seat cushions that were 29" by 27" inches (so we still would have had to adjust the measurements a bit), but then I couldn't find coordinating back cushions. If I had them custom made, it would have been $600-$1000 depending on the company I used. I did debate on making it bigger and utilizing three 24" by 24" or 25" by 25" cushions, but there isn't enough space on our porch to accommodate it, and we really didn't want a loveseat, which would have been an option if I had used only two cushions. I can't tell you how much time I spent this week researching cushions, LOL. Maybe some day we'll escape Miami and we'll live in a home that has a porch big enough for a 7ft couch or perhaps, we will win the lottery and I can just order the custom cushions!! Thank you for creating something so lovely and for taking the time to respond to my message earlier in the week.
Can you tell me the height of the finished couch? Trying to figure out if it would work with a dining table or if it would be too low. Thanks!
It's 26″ tall to the top of the couch frame and 33" up to the top of the cushions.
Where do you usually buy your lumber? And what type did you use?
I usually get it from Lowe's or Home Depot. Occasionally, I will make a special trip to our local lumber yard if I want something really nice or that is not available at the home improvement stores. I used 2x3 framing lumber and 1x3 knotty pine wood here.
So we followed the instructions to the T and the bench and chairs turned out fantastic! We even scored 40% off on the cushions before they sold out. Yay! HOwever, we ran into a problem with the stain.... we used the exact stain the you put a link to (Pinebark) but our furniture is extremely darker. Was the finished product picture before you stained it? For those creating this project, I would be VERY hesitant about the pinebark stain in the links. It comes out a dark brown.
I'm so happy to hear it turned out great and you were able to get the cushions too! Did you have the stain tinted at the paint counter? Maybe something happened with the tinting process? I've had that happen a few times before with paint colors. I had actually tested another color out on that same Valspar line and it looked nothing like the swatch sample on display in the store. So, I ordered Pinebark which turned out much better. Maybe there is some difference in the tinting process across stores!
Where did you find cushions? Which ones did you buy? Thank you.
Allie, where did you find cushions? Which ones did you buy? Thank you.
I purchased the world market Seville cushions about two weeks ago. I’m a little nervous about the color but they look very nice!
Hey, I'm making my own outdoor couch now and I found a good deal on cushions on the Wayfair site. I ended up buying cushions that are 28" x 28" and here is how to adjust the cuts to this size.
2x3s:
(2) 29.5" -- for arm tops
(4) 24.5" -- for the four legs
(2) 26.5" -- for the bottom of the armrests
(6) 26.5" -- for the seat supports on bench
(5) 56" -- bench frame (seat and back of bench)
1x3's:
(6) 26.5" -- for the inside of the armrests
Basically, you'll be adjusting the depth and width of the pieces, but not the height. Since my cushions were .75 smaller than hers, I subtracted .75" from the armrest pieces and then I doubled it (subtracted 1.5") for the bench pieces because there are two cushions that are both .75" smaller than hers.
I hope this helps!
Thanks Megan for sharing!
Very helpful. I can only find covers on Wayfair in 28 by 28. Where did you find the actual cushions?
Anyone have support concerns or does this hold up well without needing some kind of brace/support in the middle?
I don't know what the max weight is for it, but it's very sturdy with the framing lumber. It supports my husband and I no problem and he's over 200 lbs!
We built this and adjusted the measurements for (3) 25x25" cushions across. My husband put a support brace in the middle on the front and back because we do have several larger people in our family and we wanted to ensure it to be sturdy. We also used wider boards for the support under the cushions only because my husband already had that wood. I still need to stain it and I love your stain color! I may try to get that one. I wish I could post a picture here!
I forgot to say thank you for this post!!
You're welcome!!!
I'd love to see it with 3 cushions! I will need to add that capability to comments 🙂
We are going to try to build it with 3 cushions too. Do you have pictures??
Thank you for sharing your creations with us. You have a super cute blog. I specifically saw this one for the bench and loved the color you chose, so I too chose this Valspar semi-transparent wood stain in Pine Bark but mine does not look like yours. I feel like my color came out really dark and hardly transparent. At places it was even blotchy-like. Is there anything you did different with the stain/sealer than you do with a regular stain?
Thank you! Some others have has this same issue as well. It is harder to spread because it's water based and I did have to rub it in with a lint free rag immediately after each time I applied fresh stain. As far as the color goes, sometimes Lowe's is inconsistent with their color tinting at the paint color, I don't know why, but that's the only thing I can think of that would cause a color variation since it does have to be tinted at the counter. The only other tip is to make sure you stir it really well before starting, a lot of the pigment falls to the bottom.
Is there a substitute tool you can use instead of a Kreg Jig?
You can use a drill and screws instead, but you will need to fill a lot more screw holes at the end if you don't want to see them!